Management Console integration with Okta
Feature availability
Available in: Resilio Active Everywhere 4.2 and newer
Available for: OpenID standard (SAML is not supported)
Set up Okta applications and API endpoints
Warning
Before you proceed with setting up integration with Okta, make sure to configure Management Console Address, Management Console Address for data managers and enable Use Management Console address for IdP redirect URI option in Advanced Settings.
When defining both addresses, make sure to include the HTTPS protocol prefix and the port number, for example: https://mc.example.com:8443.
Groups and Users
User authorization in Management Console is based on group claims, which are used to manage roles.
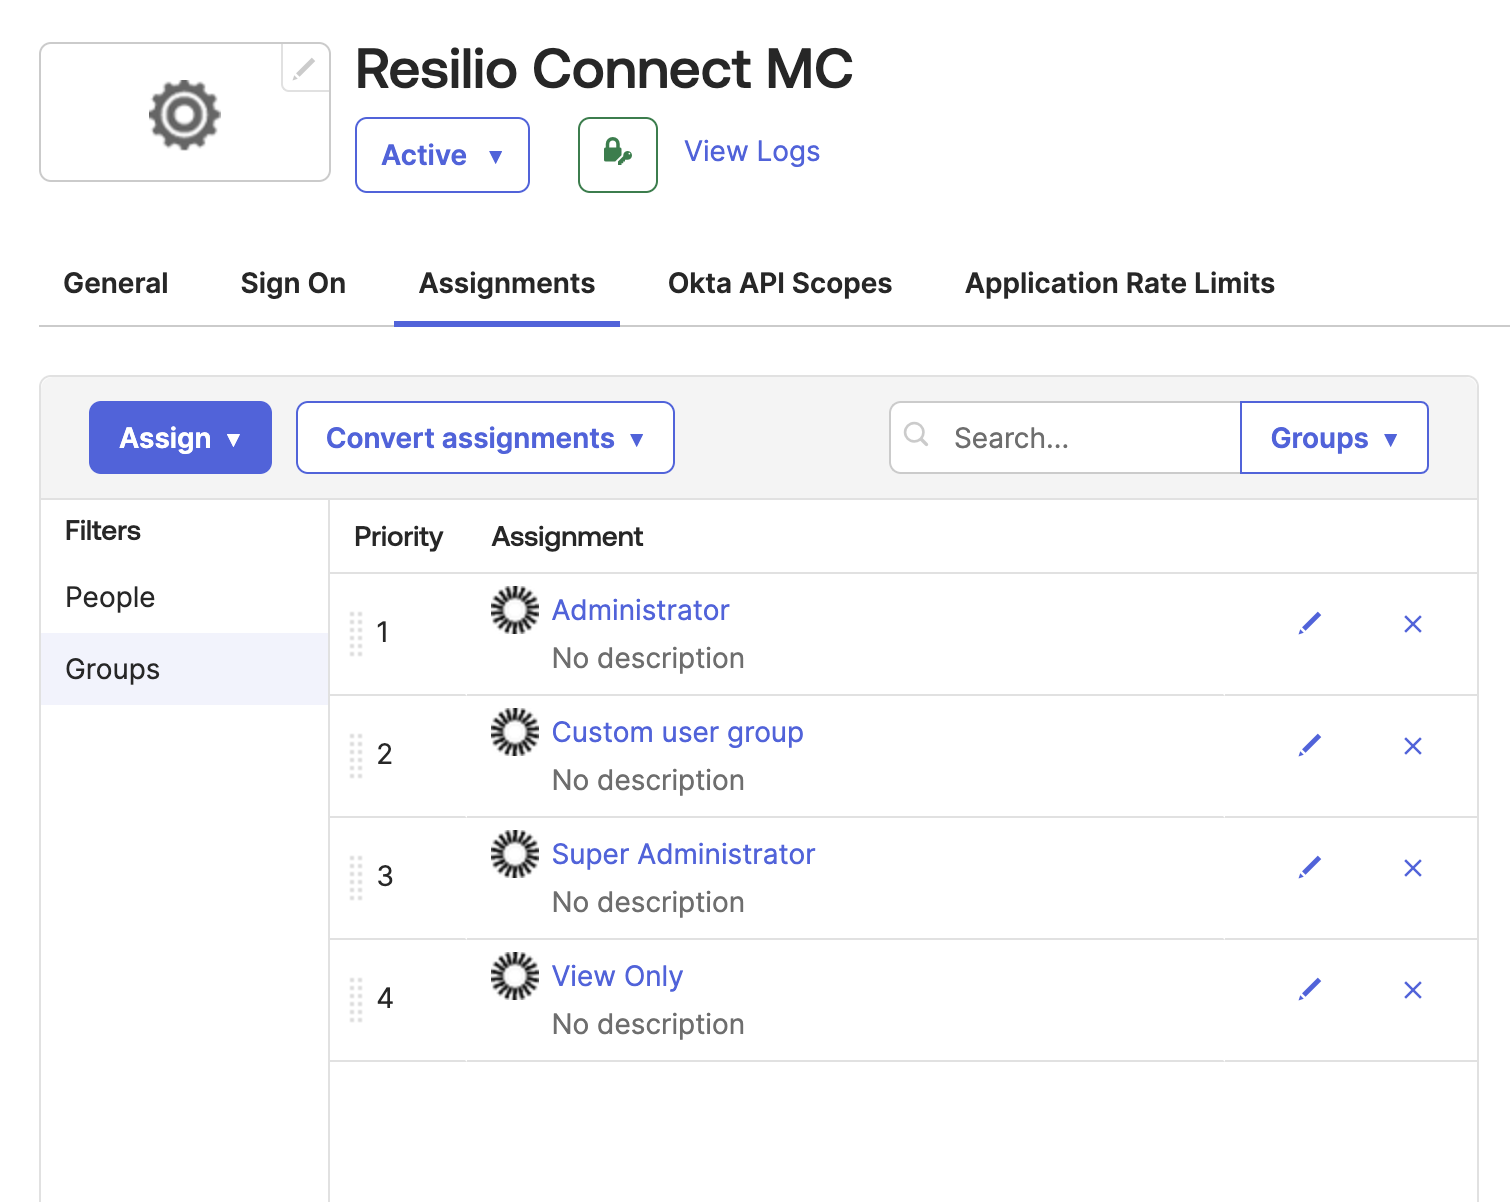
Set up groups in Okta with names matching the Management Console roles:
- Super Administrator
- Administrator
- View Only
- Custom user group (this is a custom group with some custom name)
Custom Okta to Management Console user groups mapping
If you need to use specific user group names in Okta, you can add the claim as an expression that will map your Okta user group to a specific user group in the Management Console.
Assign these groups to the users. Technically a single user can be assigned to an application individually, but this is not supported by Management Console - Management Console will reject users who are not part of a user group.
Create an app integration
To create an app integration:
-
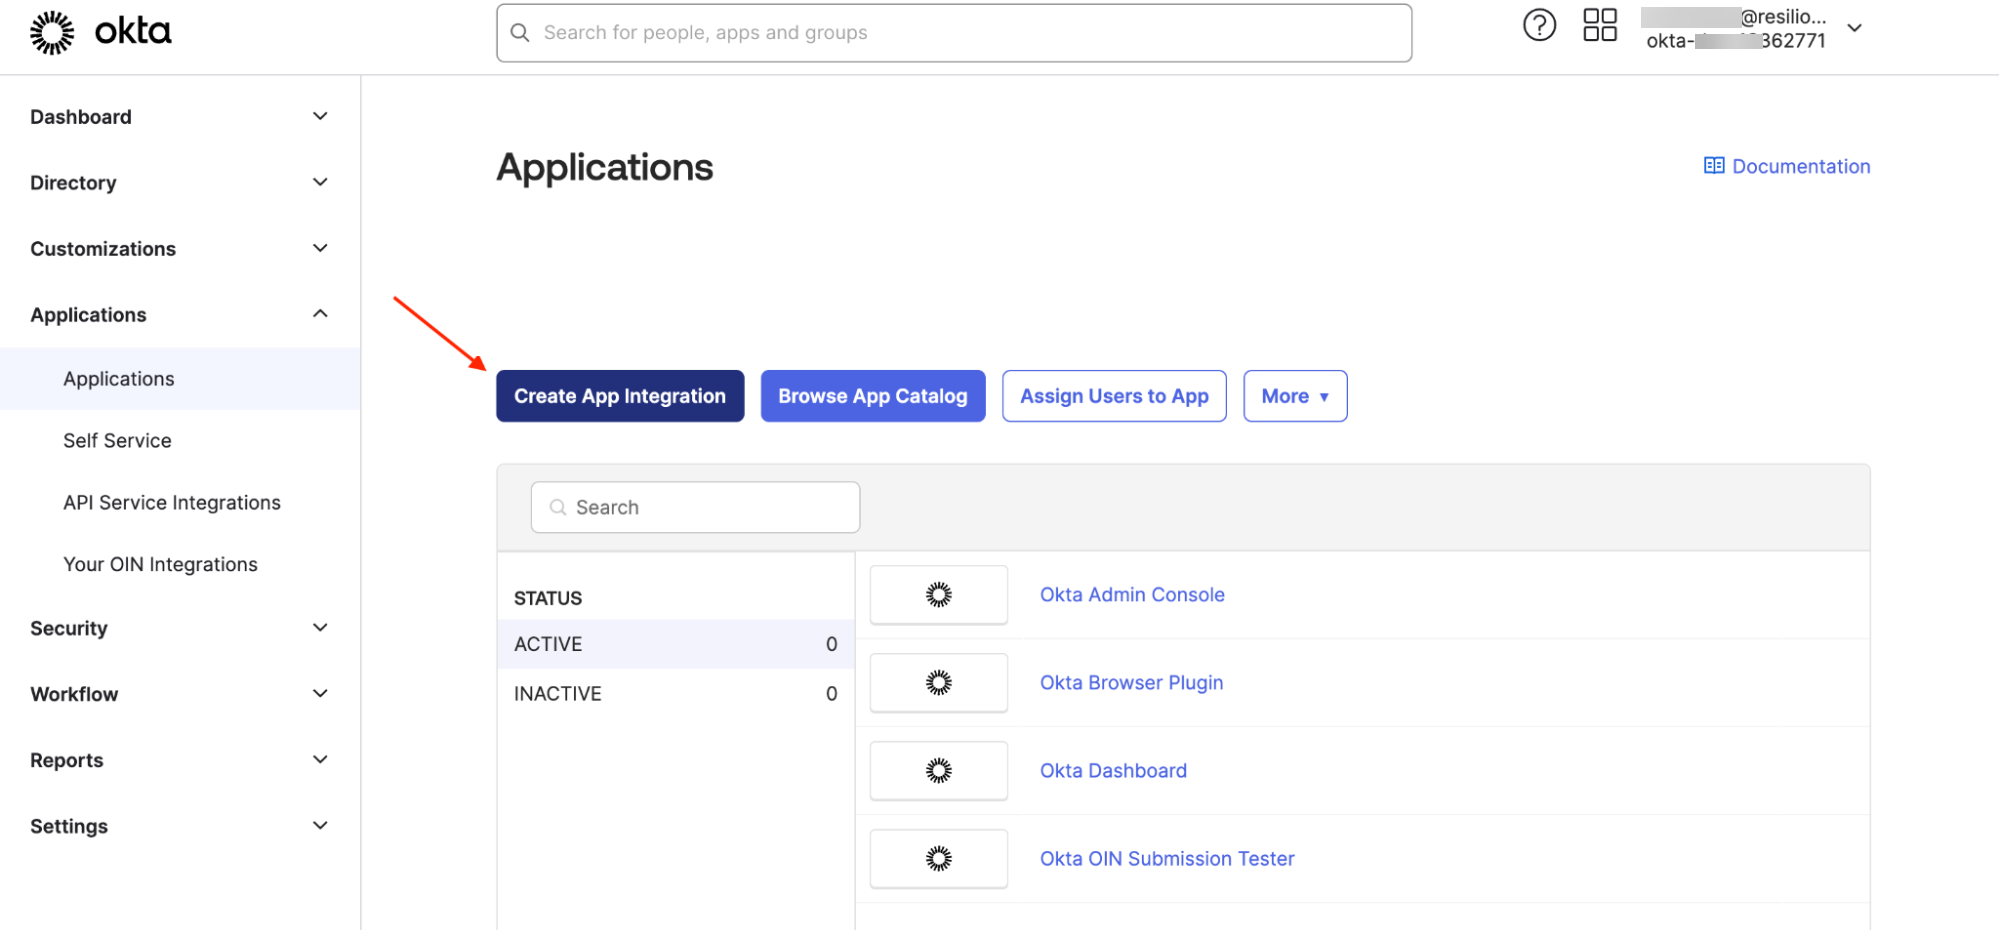
In the Okta Admin Console, select Applications > Applications, then click Add App Integration.
-
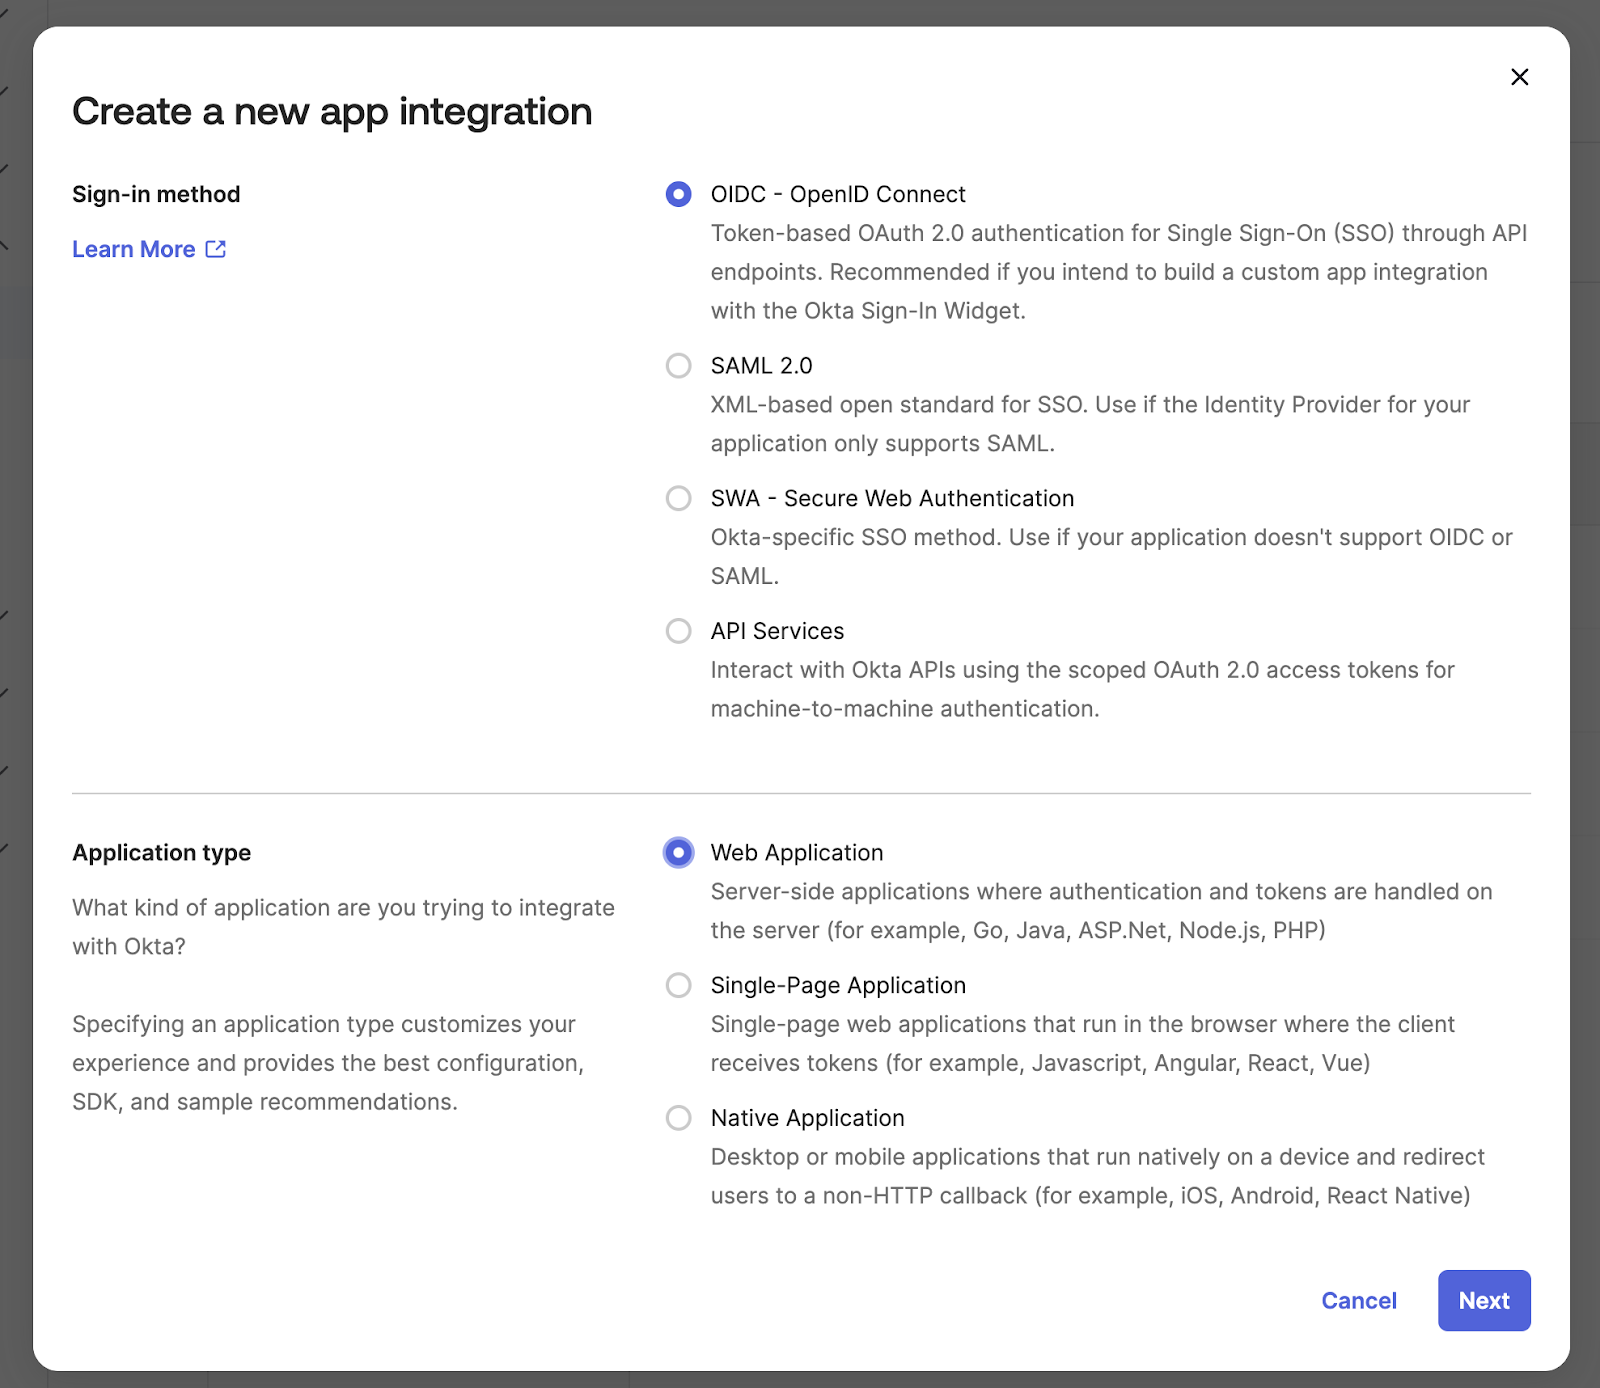
Select sign in method.
- OIDC - OpenID Connect - For user authorization in Management Console.
- API Services - For API authorization only.
-
Select the Web Application type, then click Next.
-
Configure your app integration for user authorization or API integration.
User authorization: OpenID Connect Application
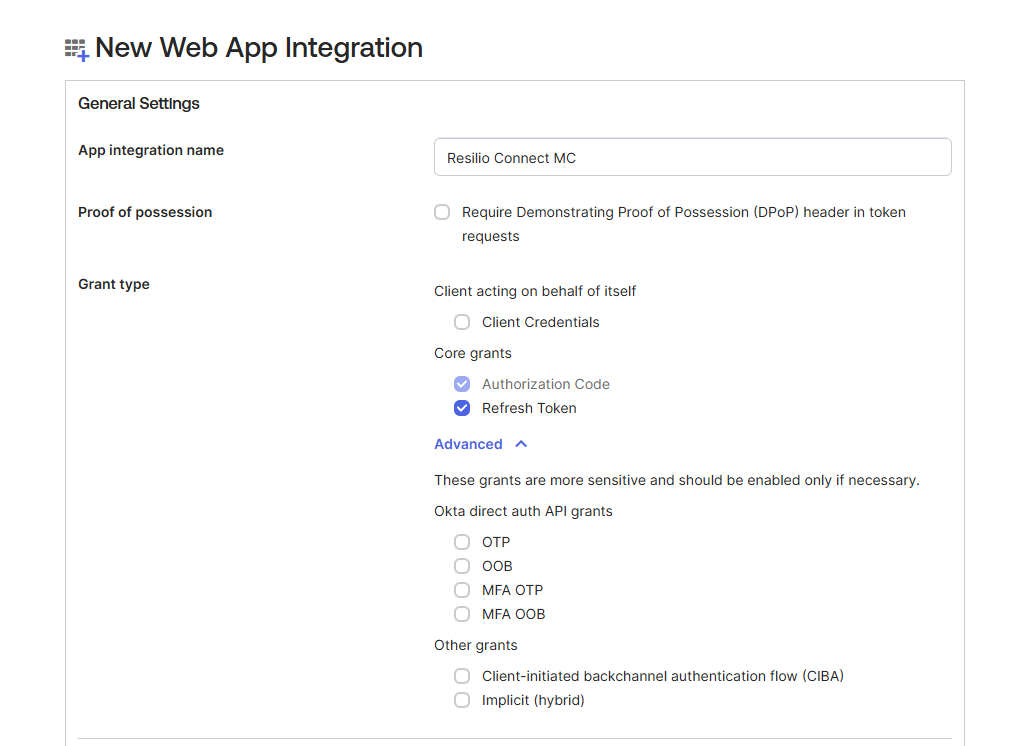
- Provide a name for your application.
-
In Grant type, under Core grants, select Refresh Token.
-
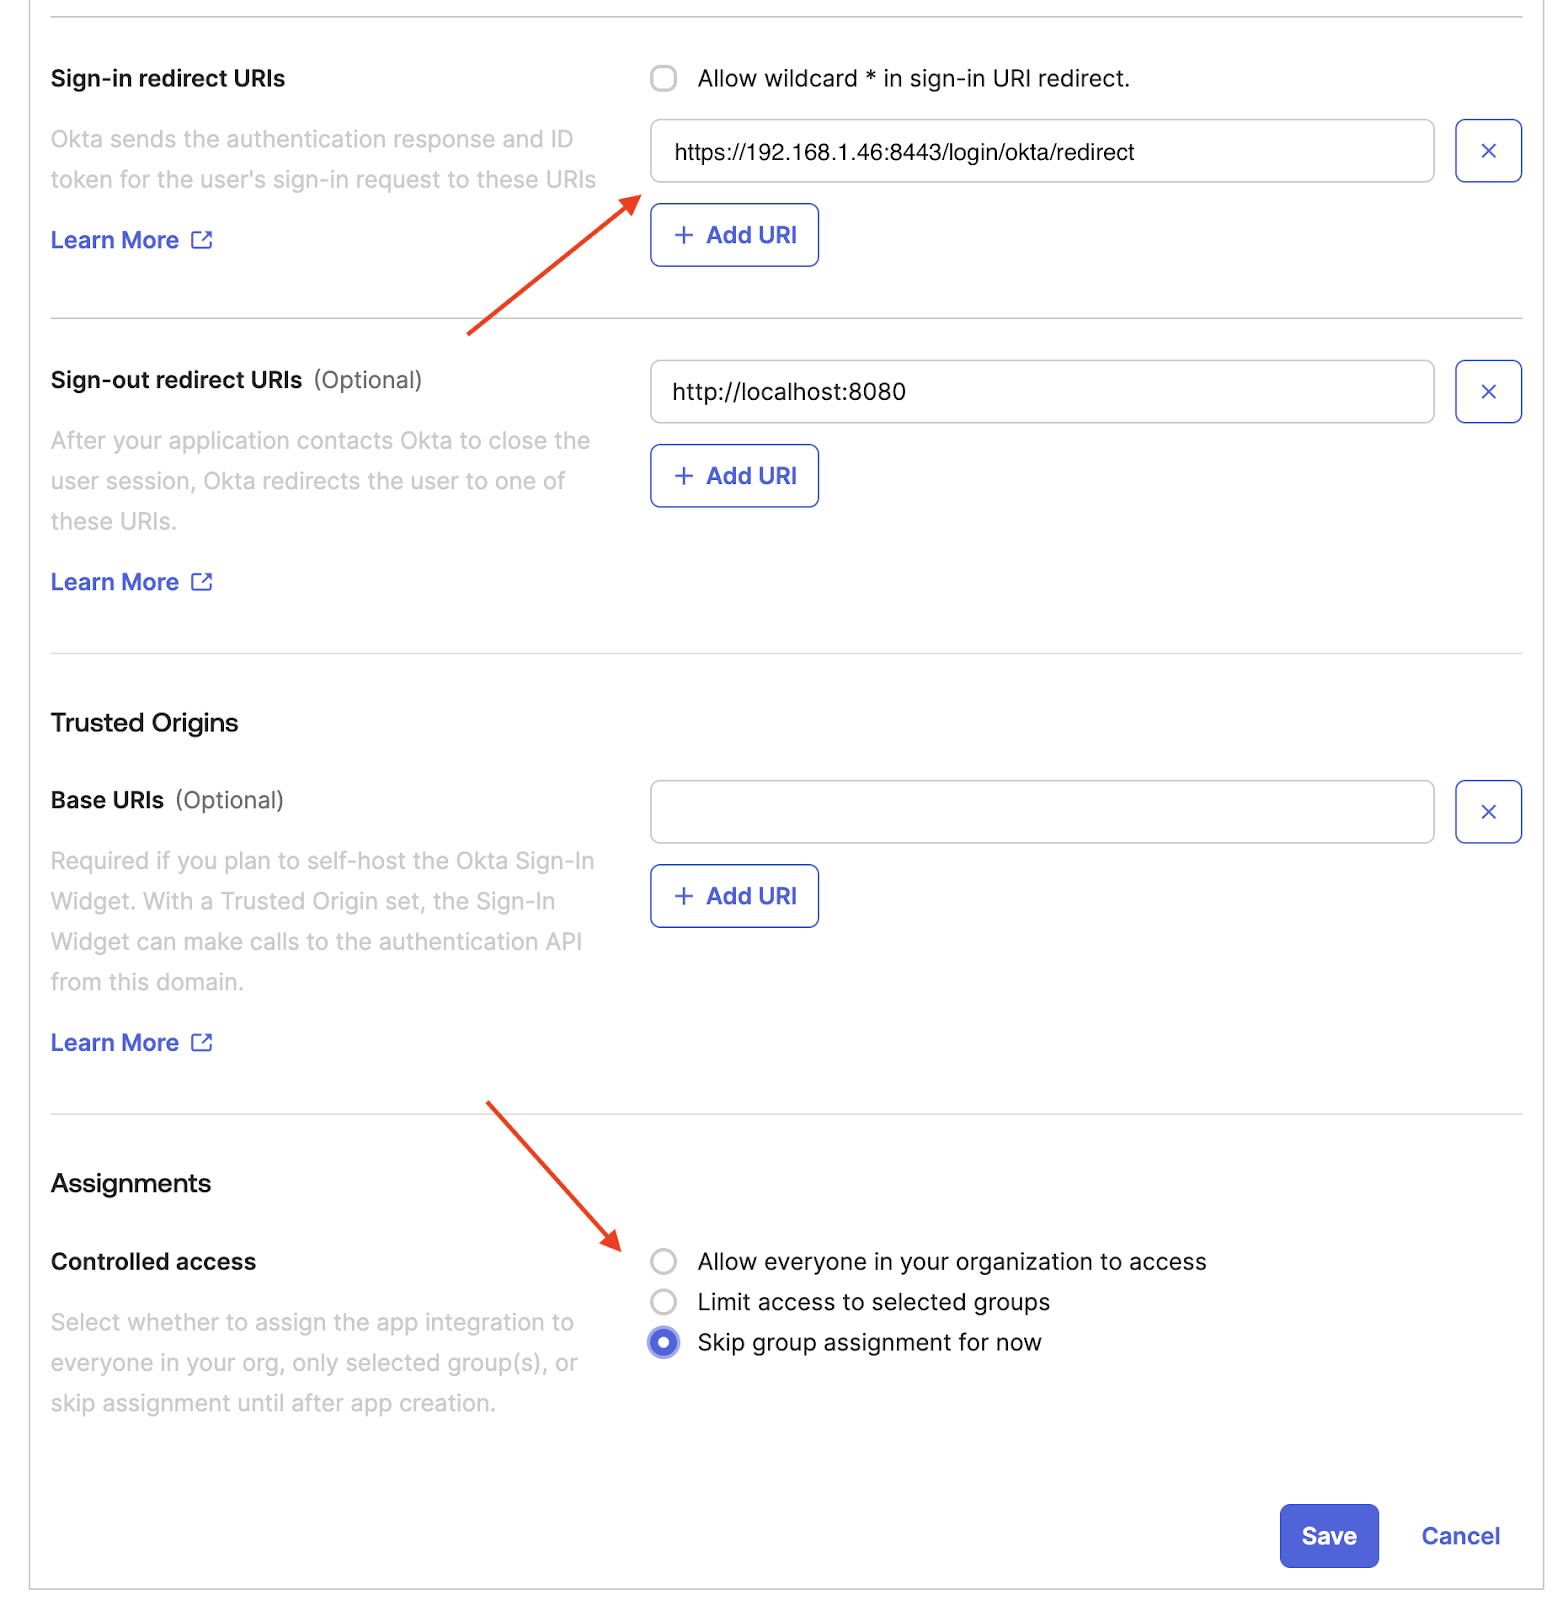
In Sign-in redirect URIs, provide the URI with address matching the one specified in the Management Console's advanced settings, or the IP address of your device.
For example:https://mc.example.com:8443/login/okta/redirect.Important
The host address in the Sign-in redirect URI must match the one specified in the Management Console's advanced settings. Incorrect URI will result in error 400 Bad request on attempt to login.
-
Select Skip group assignment if you're not ready to configure group access.
-
Click Save.
-
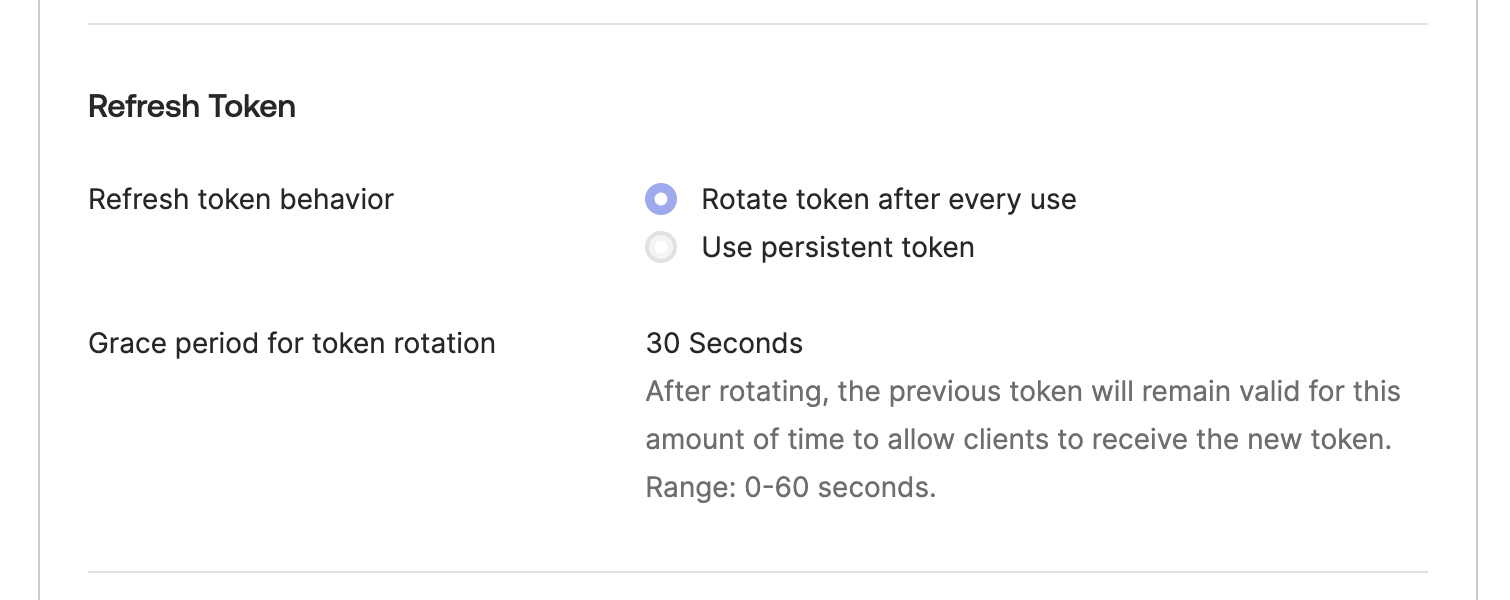
In the General tab, click Edit in the Client Credentials section, then select Require PKCE as additional verification and Rotate token after every use for improved security.
API integration: API Services
1. Provide a name for your application.{width=500}-
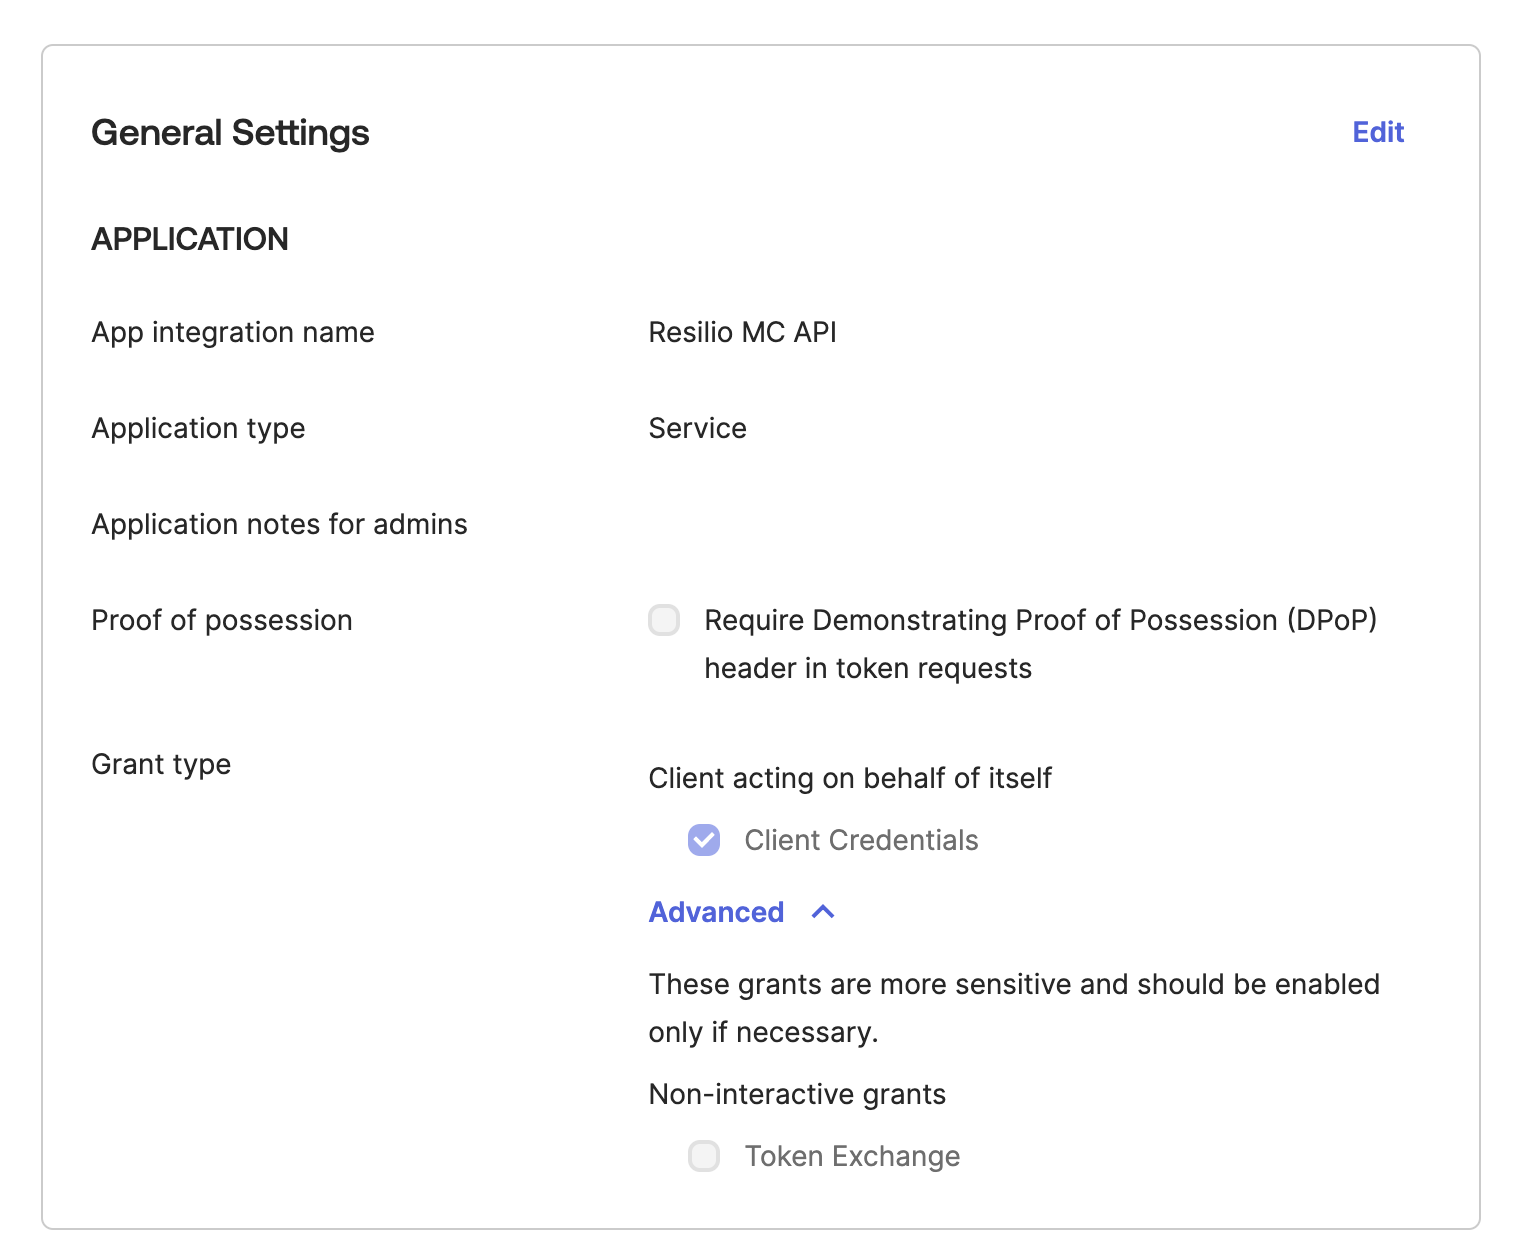
Deselect Require Demonstrating Proof of Possession (DPoP) header in token requests for the newly created application if you don't want to use it.
-
In Grant type, under Core grants, select Client Credentials.
- Click Save.
-
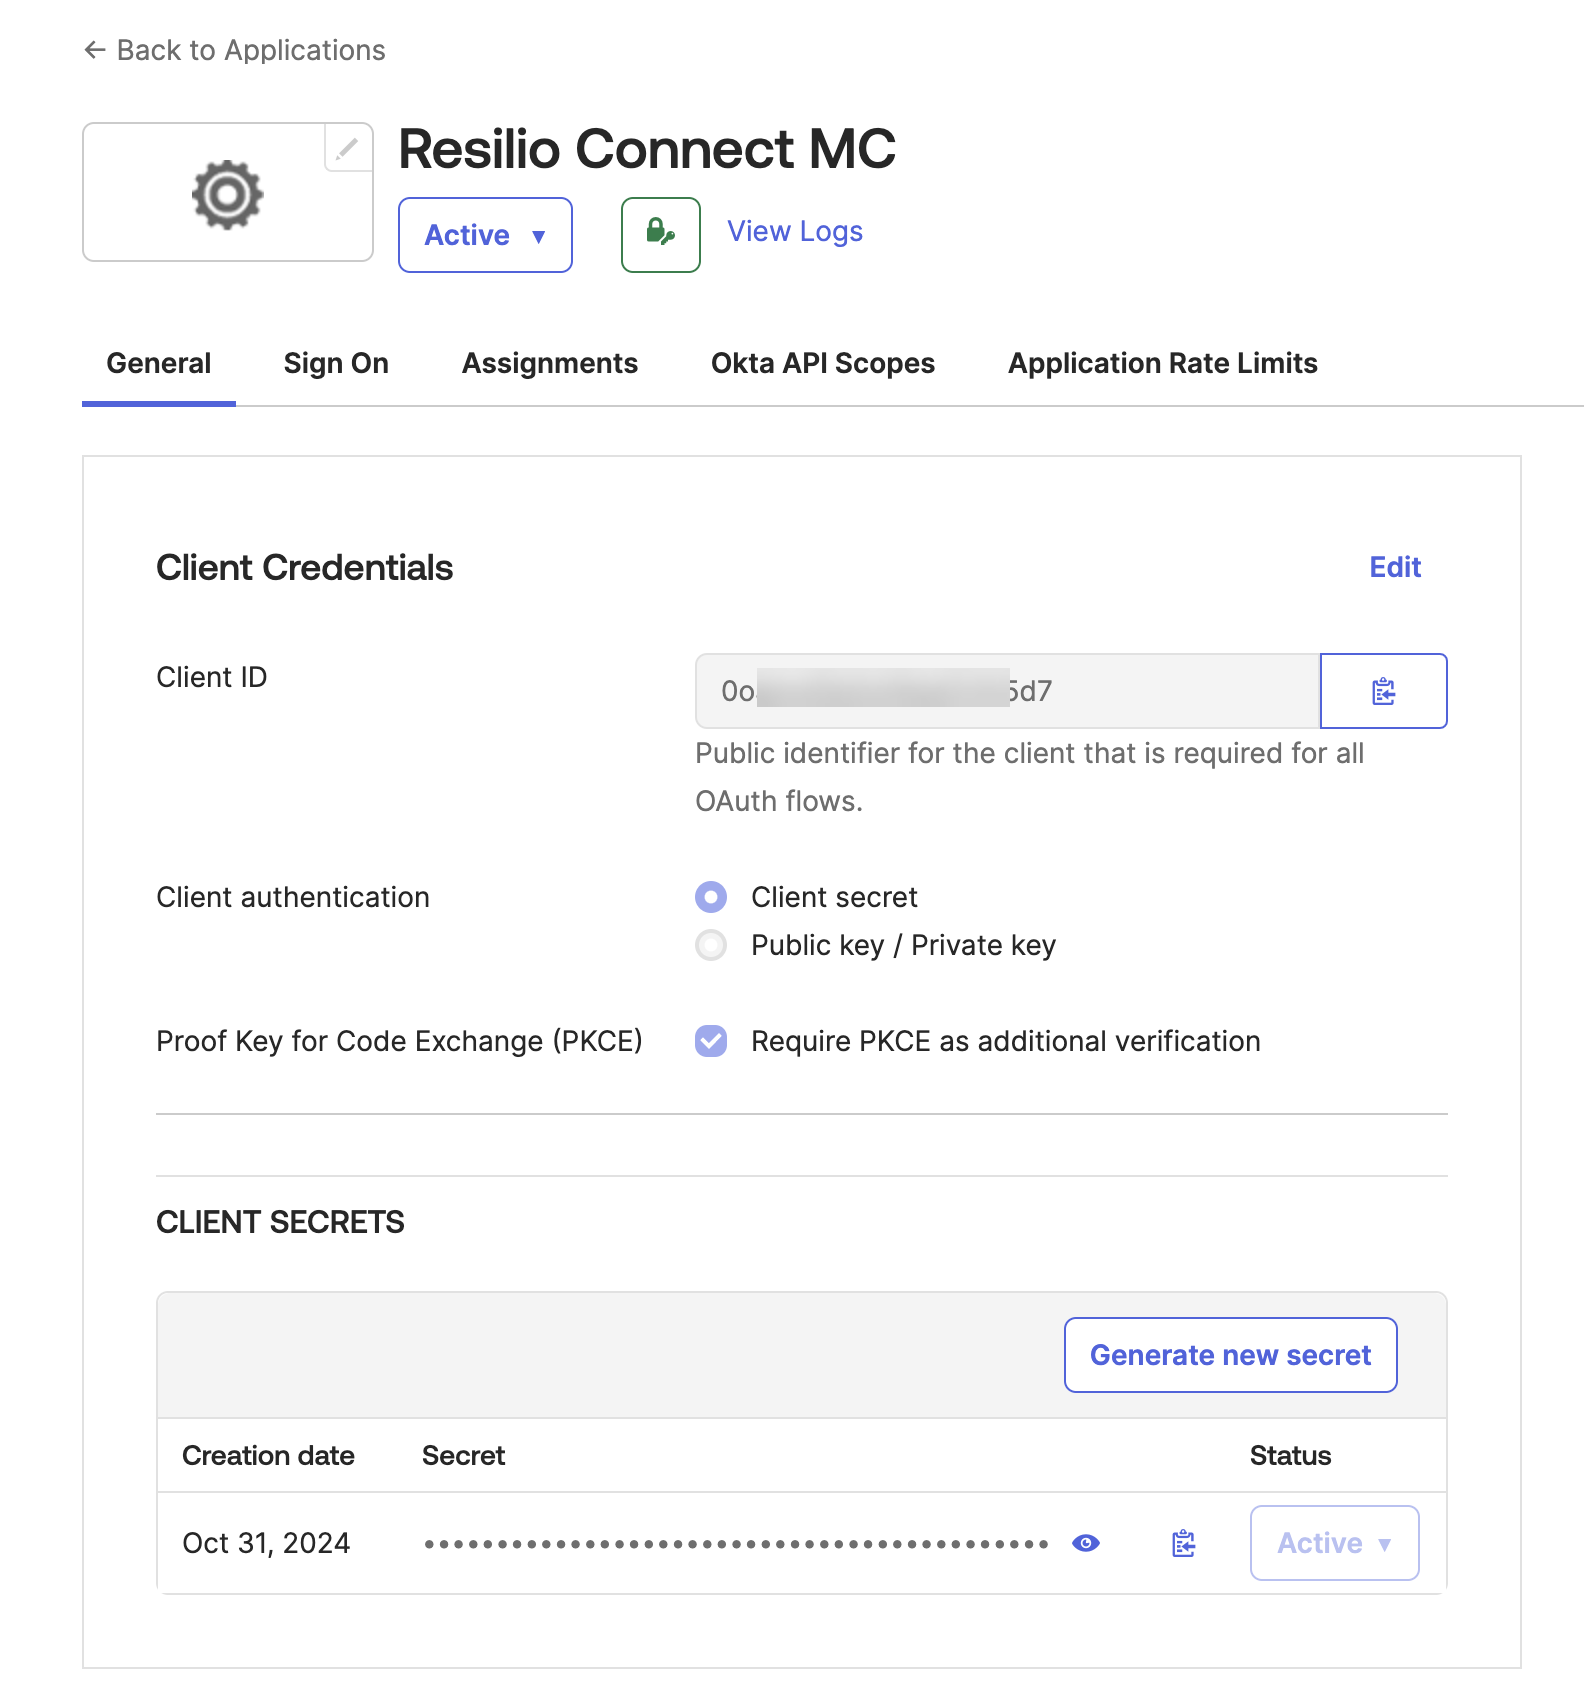
Review your application.
-
Assign previously created groups to your application(s). Once the groups are assigned, users within those groups will be able to sign into Management Console with permissions based on their roles.
Authorization server
An Authorization Server in Okta is essential for managing secure access to APIs, applications, and resources by issuing and validating tokens. It serves as the backbone for implementing OAuth 2.0 and OpenID Connect (OIDC) flows, which allow your apps and services to authenticate users and authorize access in a standardized, secure way.
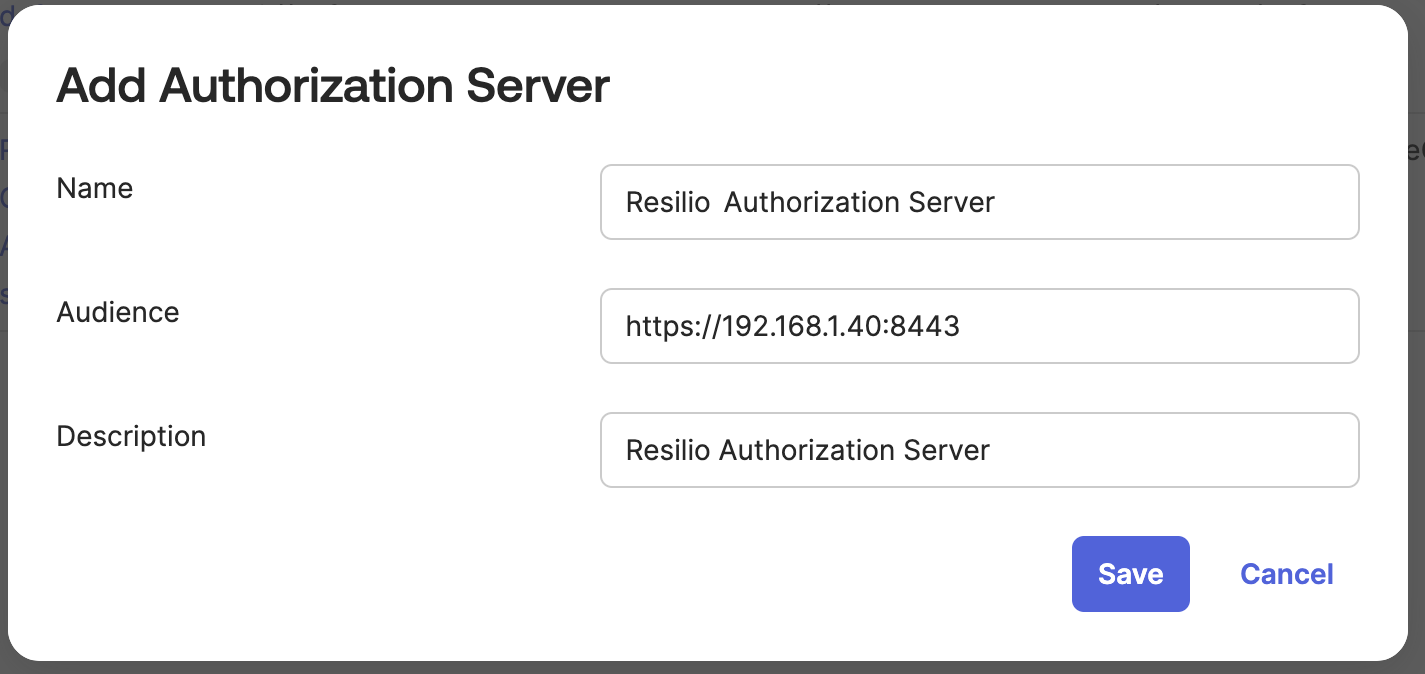
- Select Security > API, then click Add Authorization Server.
- Enter a name.
- Provide Audience that specify the intended recipient of an access token. It plays a critical role in ensuring that tokens are only used by the appropriate API. Management Console validates if it matches the Management Console's address configured in advanced settings, or the IP address of your host device:
https://address:8443.
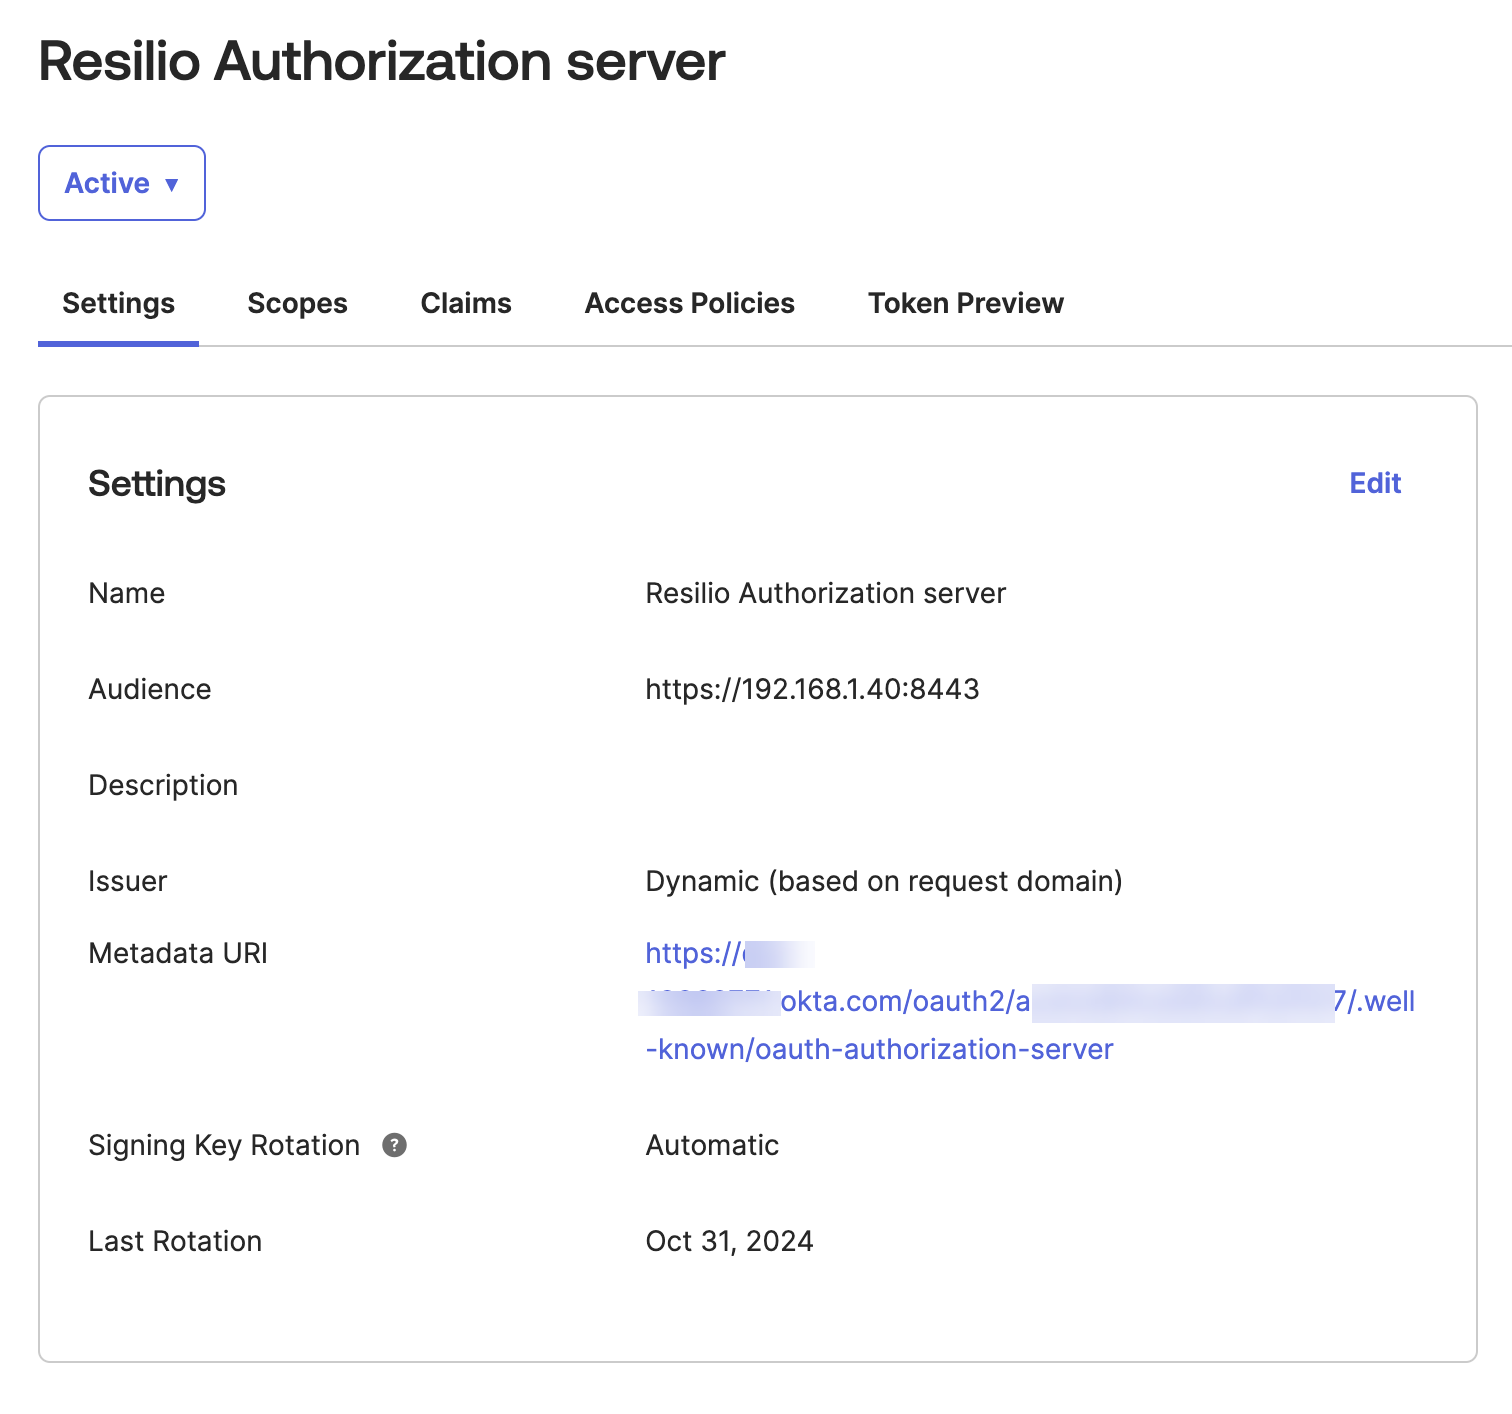
Review the created Authorization server and note the authorization server ID in the Metadata URI. It will be needed later for connection configuration in the Management Console
Next, proceed to configure Scopes, Claims, and Access policy rules to include roles (user group information) in the ID and Access tokens.
Scopes
Scope defines the level and type of access a user is requesting from the server. Scopes are critical components in OAuth 2.0 authorization flows, as they specify what actions or data the user is permitted to access on behalf of the user.
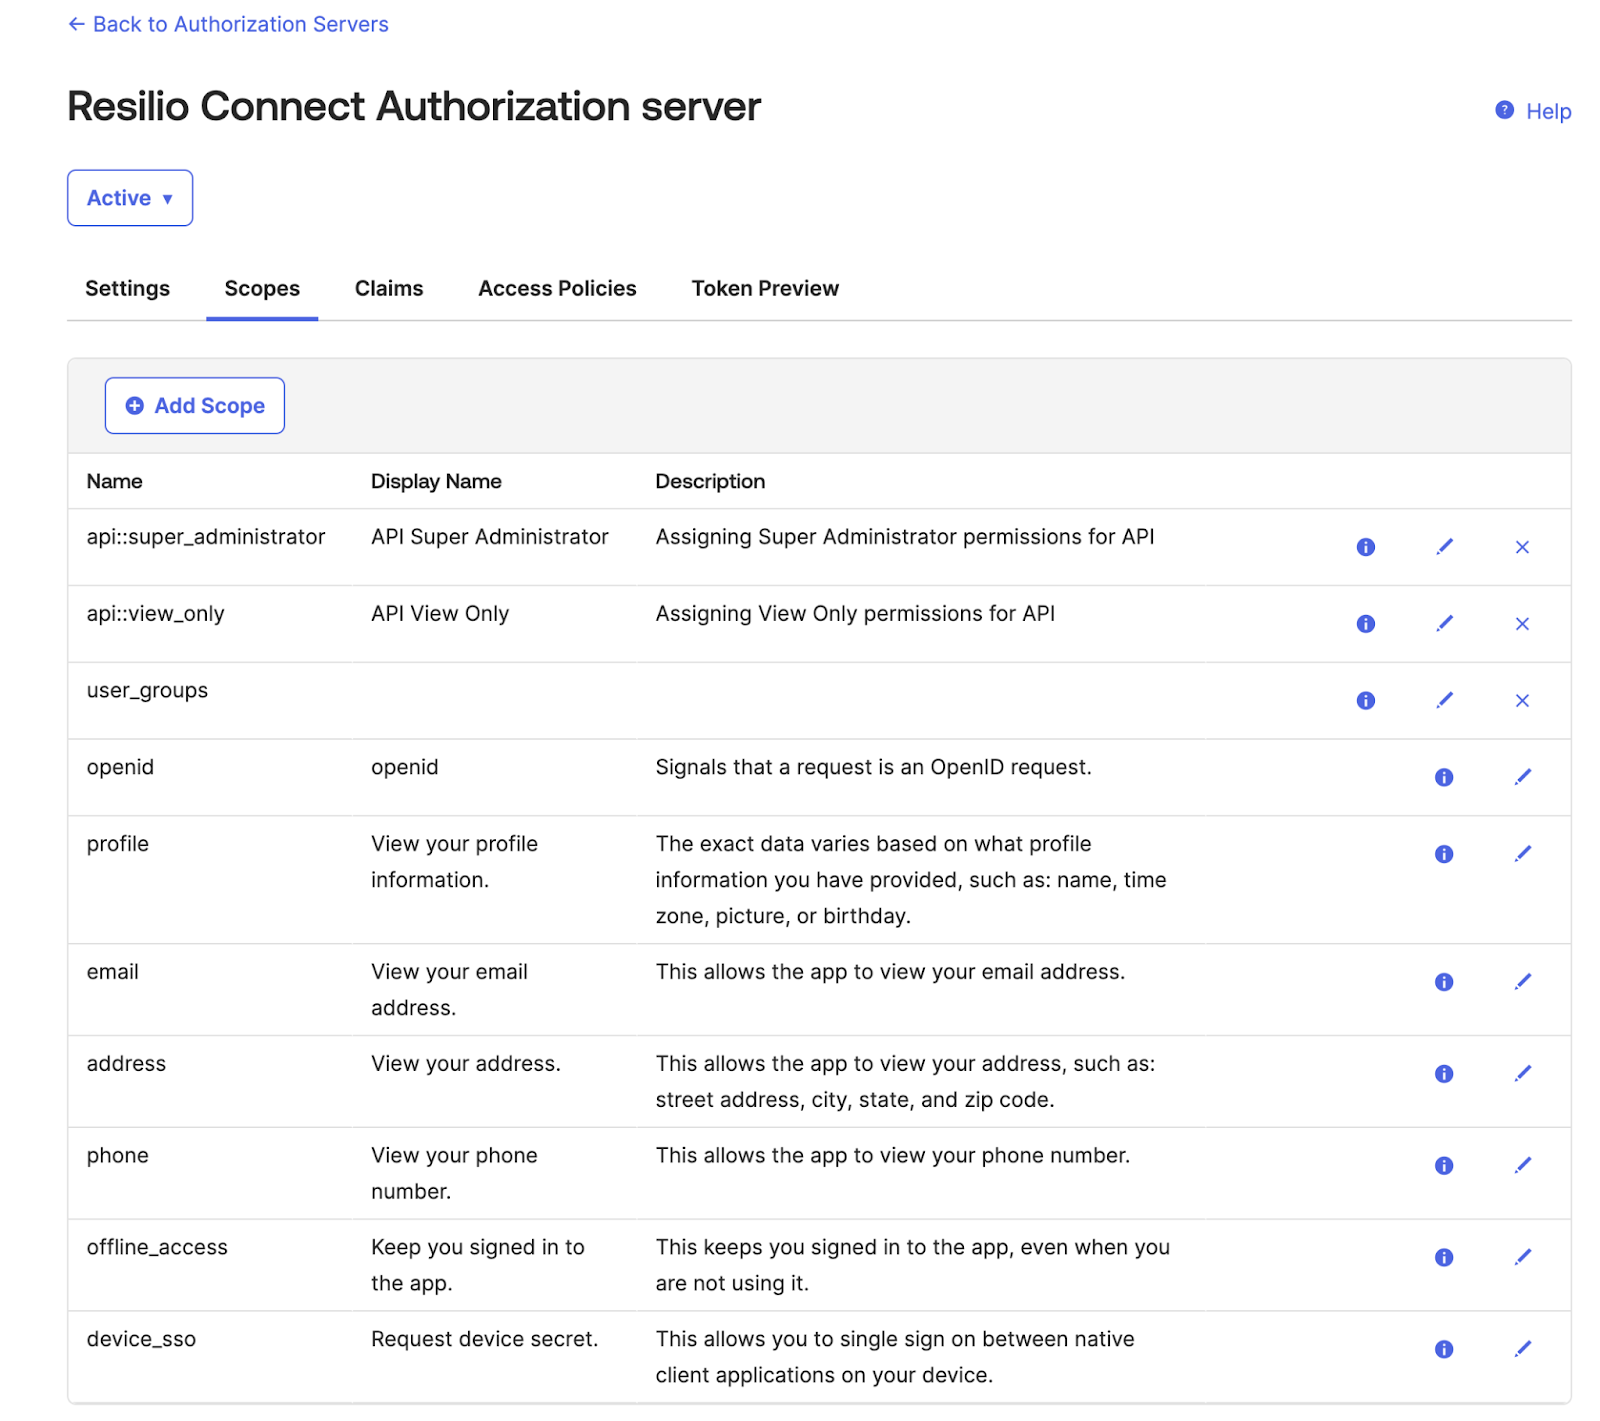
- For user authorization on Management Console - Required scopes are
user_groups,openid,profile,offline_access,email. Click Add Scope to add the missing ones. - For granting access to Management Console's API - Create scopes with pattern
api::<role\>, they will be needed later. The role should match the user group configured on the Management Console side (snake_case). In our example that might be the following, depending on the access level you're planning to grant
Important
Do not change the names of the scopes. The Management Console requests sсopes user_groups, openid, profile, offline_access, email and Okta it will report an error if at least one of the scopes is unknown.
Claims
Claim is a key-value pair included in a token (like an ID token or access token) that conveys specific information about the user or the authorization context. Claims are used to pass details to applications and APIs, which can then make authorization decisions based on this information.
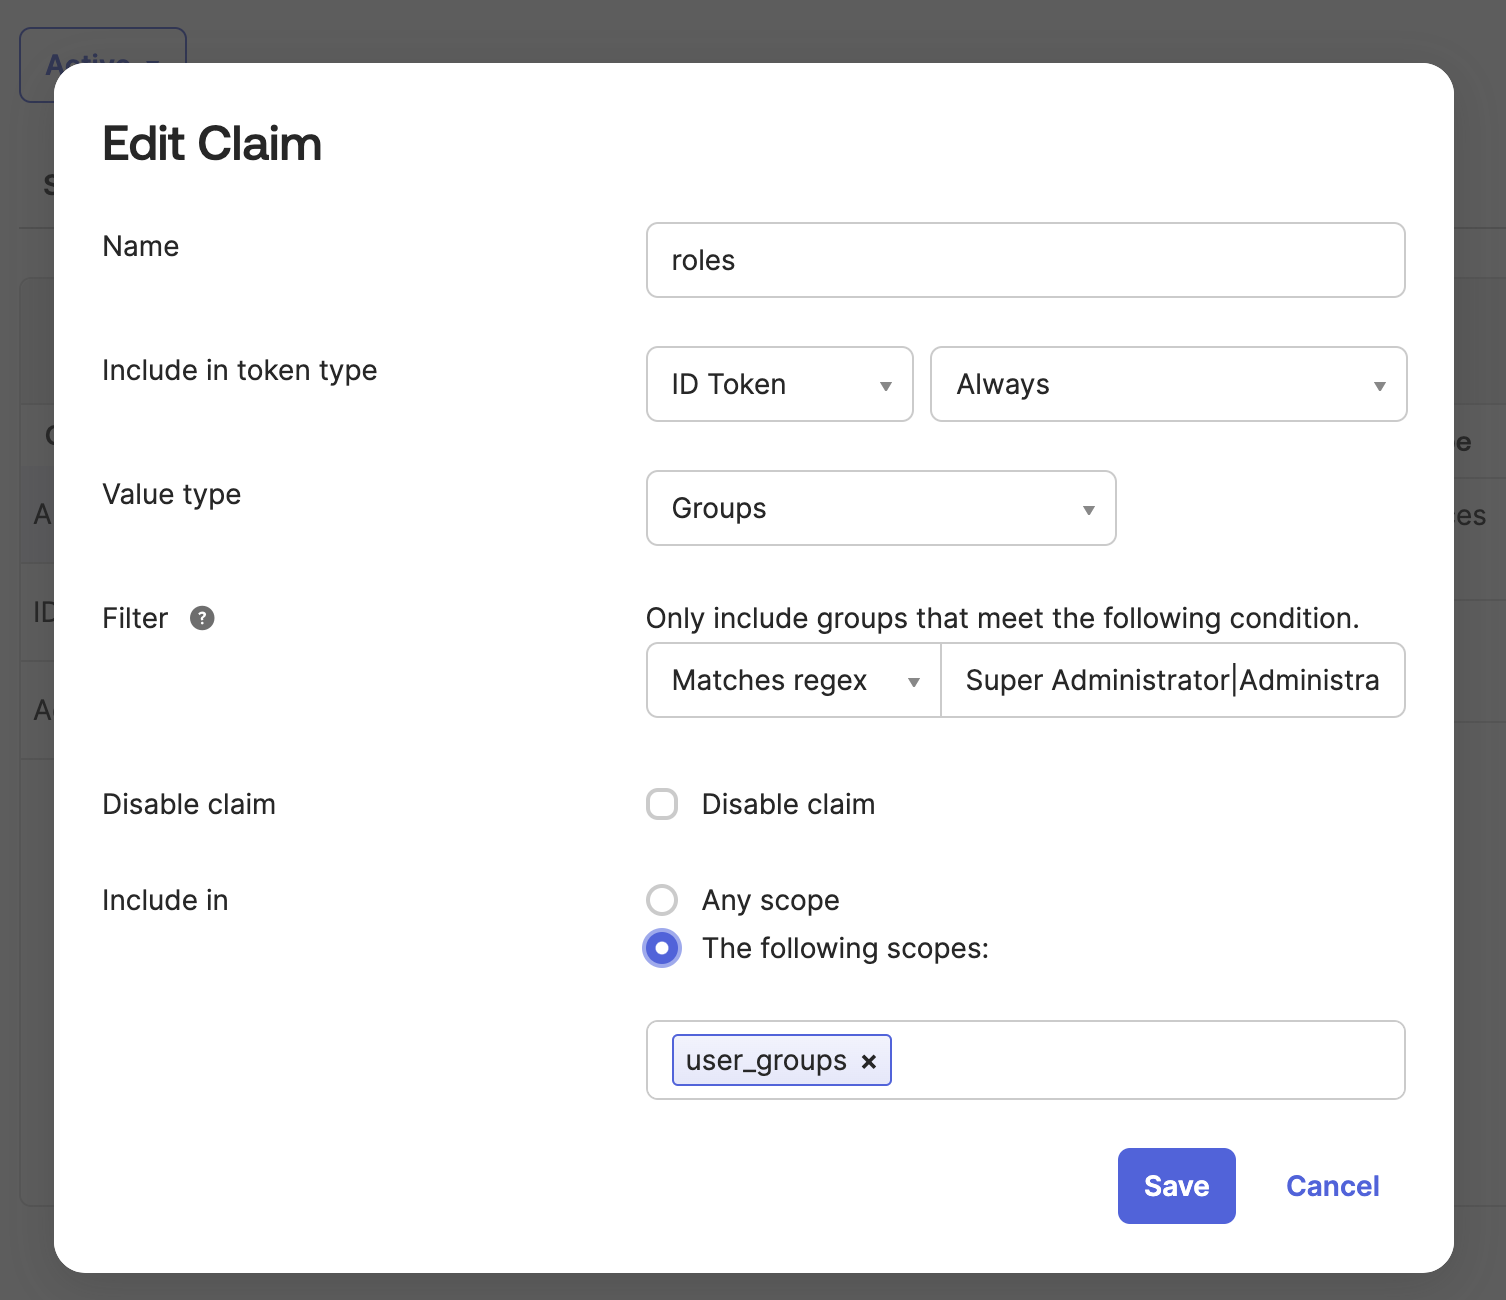
Create the roles claim, and provide the following configuration:
- Include in token type -
ID TokenandAlways. - Value type -
Groups - Filter - Optional, added for the purpose of demonstrating the possibility of customization.
Matches regex<enumerate your groups here\>. - Include in -
The following scopes:user_groups.
Custom Okta to Management Console user groups mapping
If you need to use specific user group names in Okta, add the claim as an expression that defines the mapping between the user groups. For example:
Arrays.flatten( isMemberOfGroupName("Resilio Admins") ? {"Super Administrator"} : {}, isMemberOfGroupName("Resilio View Only") ? {"View Only"} : {})
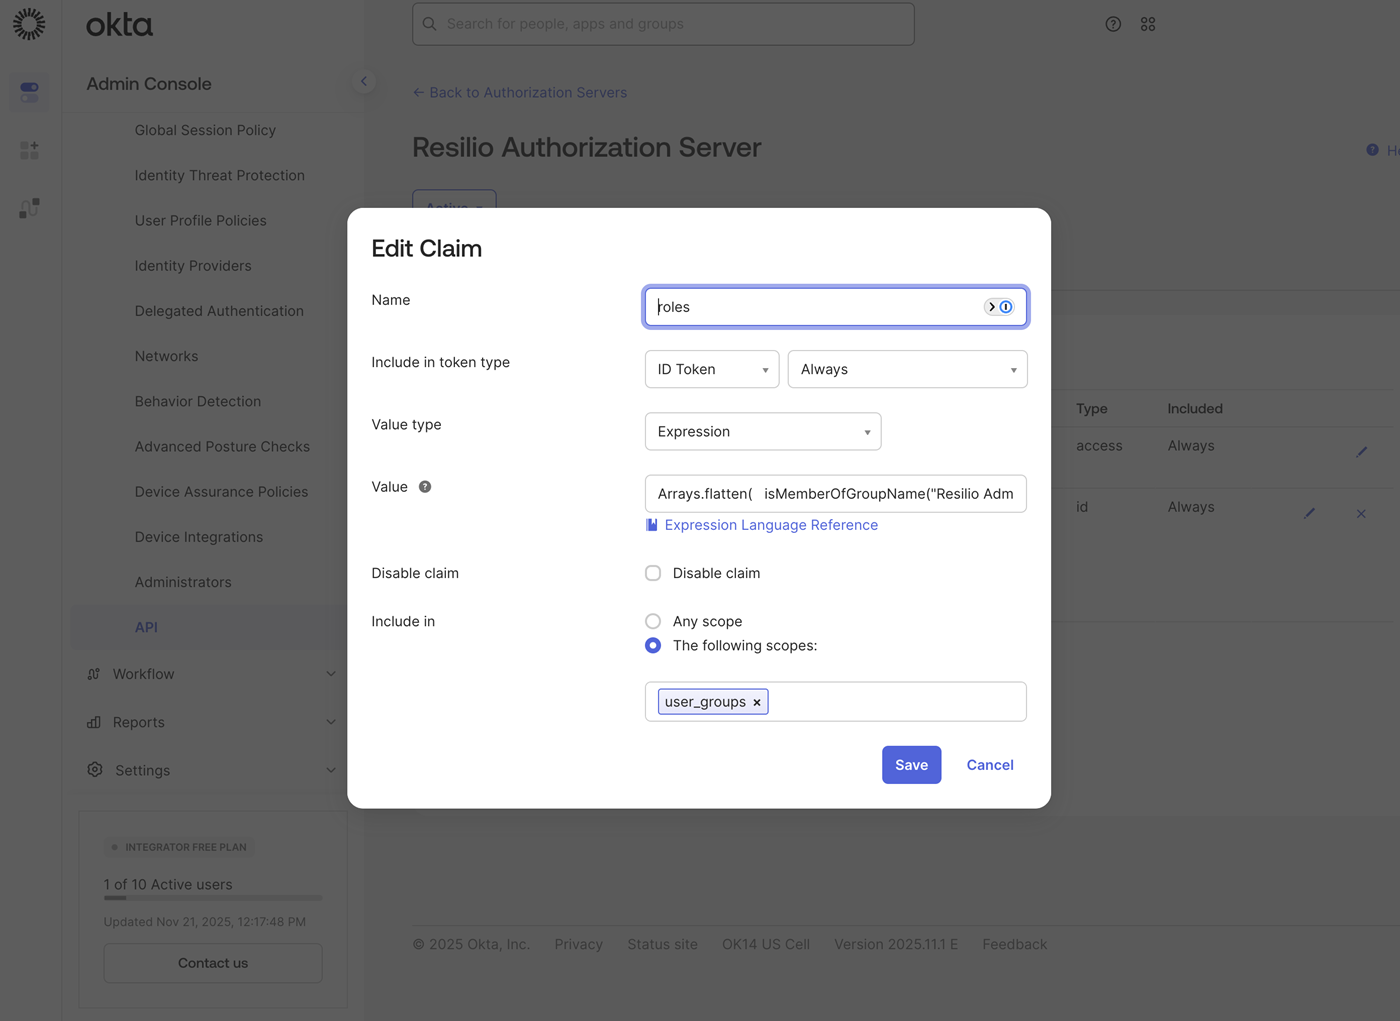
Alternatively, you can replace isMemberOfGroupName with isMemberOfGroup and provide the group identifier.
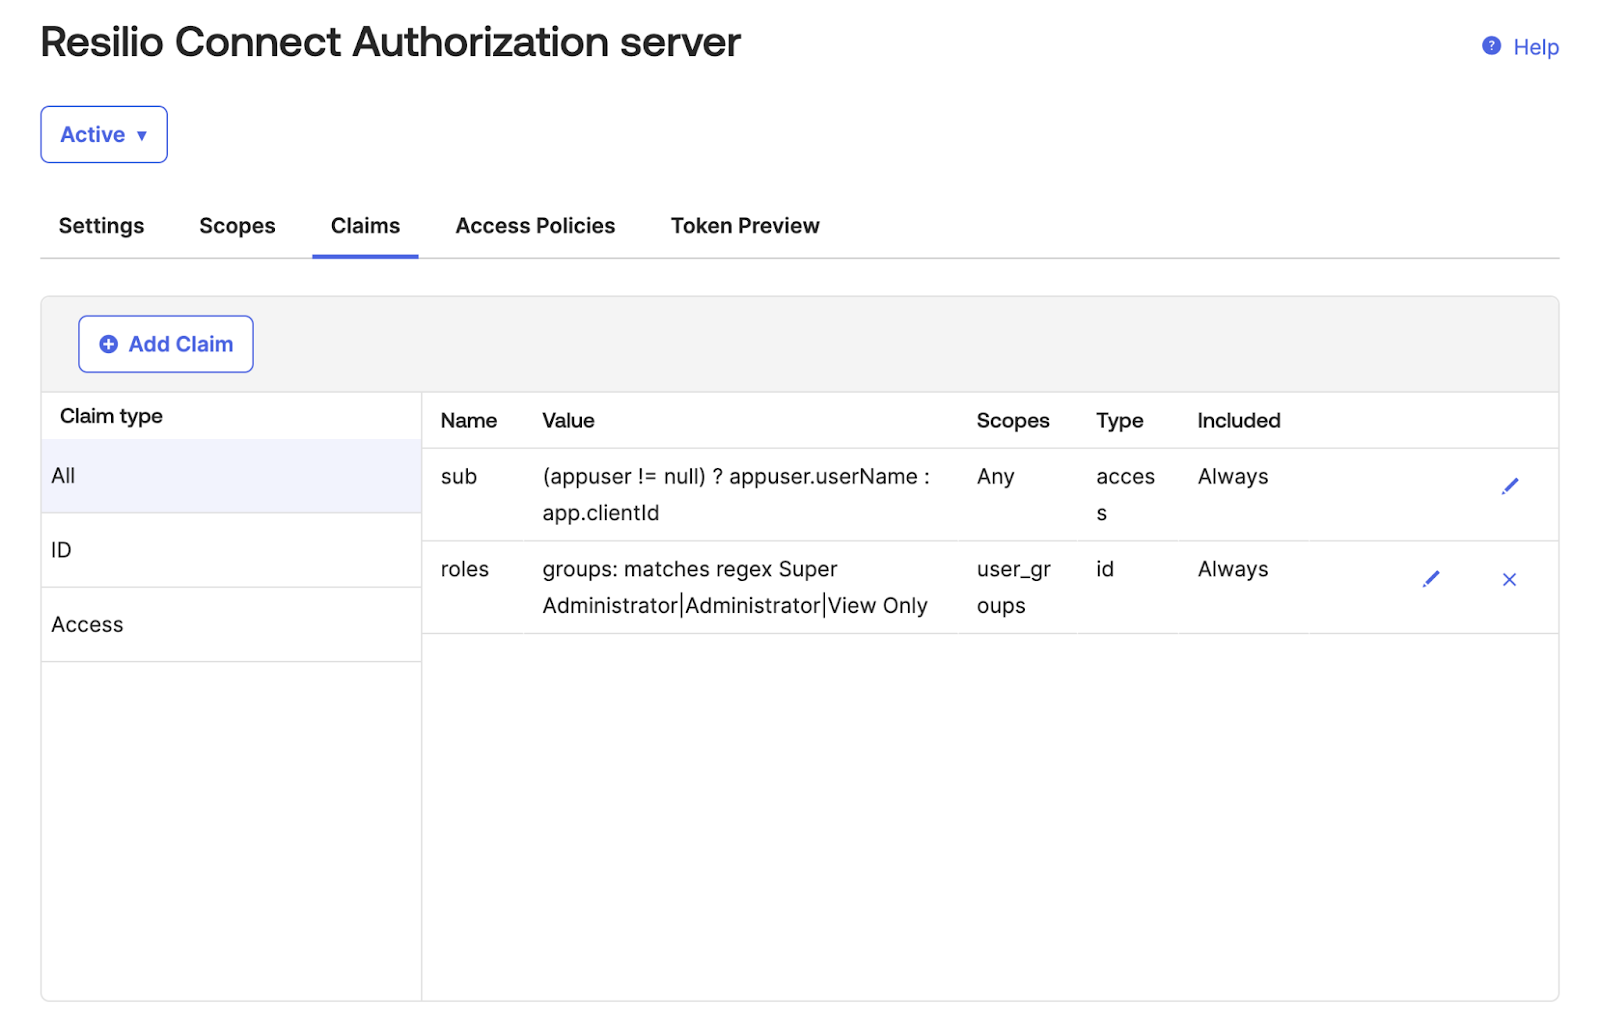
Review the saved Claims.
Access Policies
By default the policies list is empty and users will not be allowed to connect to this server. Policy is a set of rules that define the conditions and requirements for issuing tokens to API clients or users. Policies allow you to customize and control how tokens are granted based on specific criteria.
Click to add a new Access policy.
Note
You will need separate access policies for user authentication and for access to API, and additionally a separate policy for different levels of access to the API.
User authentication access policy
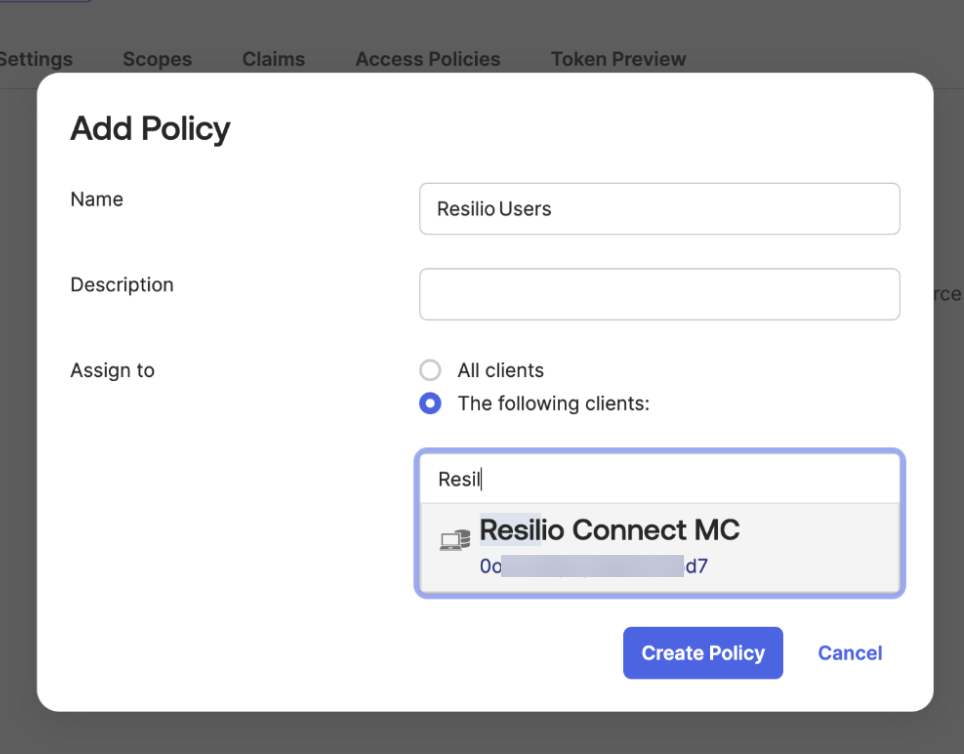
Create access policy for user authentication, assign it to the OpenID application created earlier.
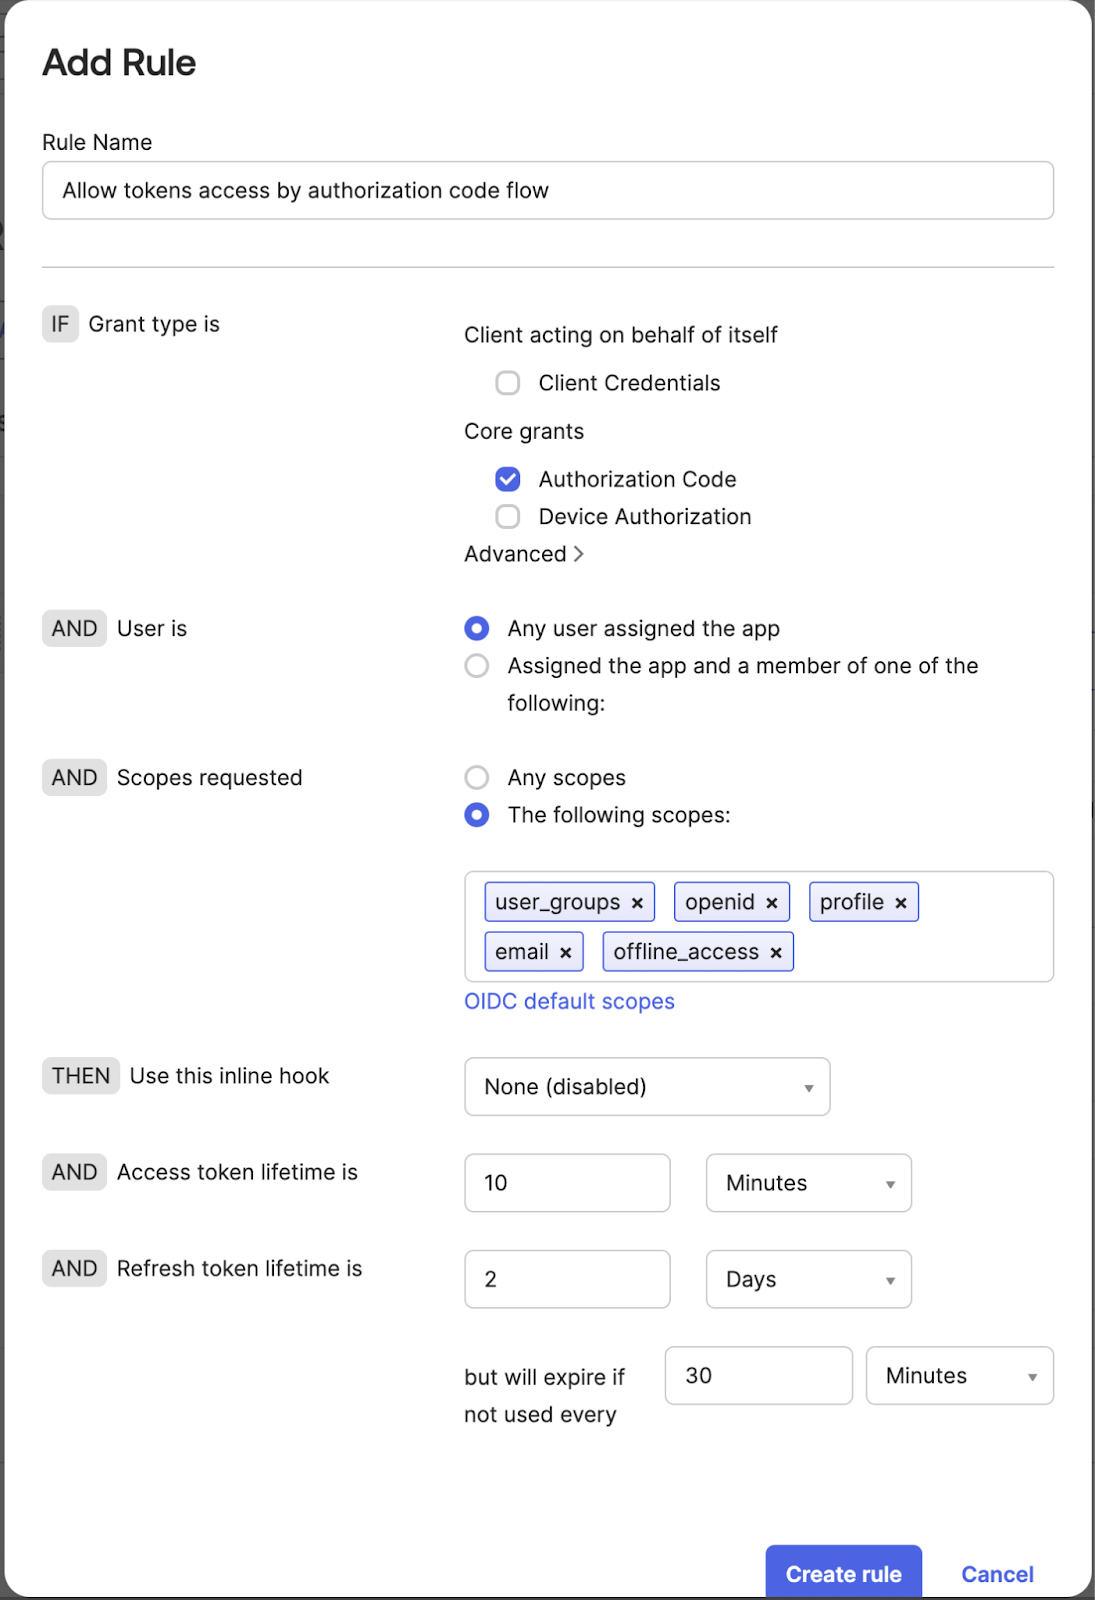
In the Policy click to add a rule Configuration for authorization code flow.
- Name -
Allow tokens access by authorization code flow. - Grant type is -
Core grants:Authorization Code -
Scopes requested - The following scopes:
user_groups,openid,profile,email,offline_access.Note
It is not necessary to list all the allowed scopes individually. You can simply use the OIDC default scopes function, but
user_groupsmust be configured as the default scope. In this example, all necessary scopes for console integration are intentionally listed for clarity.
API access policy
Note
This flow requires a separate access policy for different access levels.
Create access policy for API access for API integration application created earlier. For example, this policy will provide View-Only access to the Management Console API.
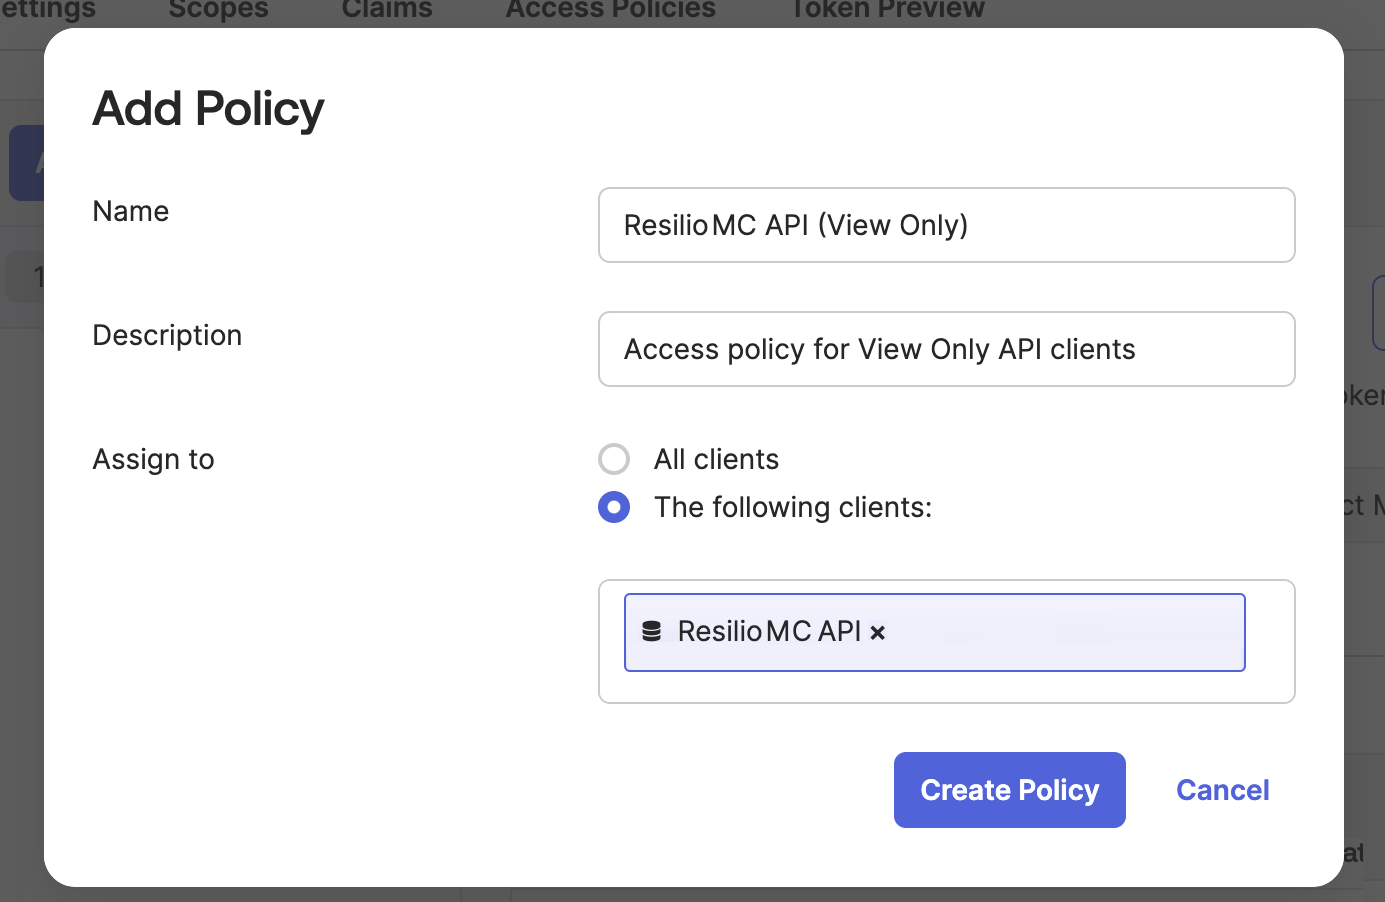
Create a new rule
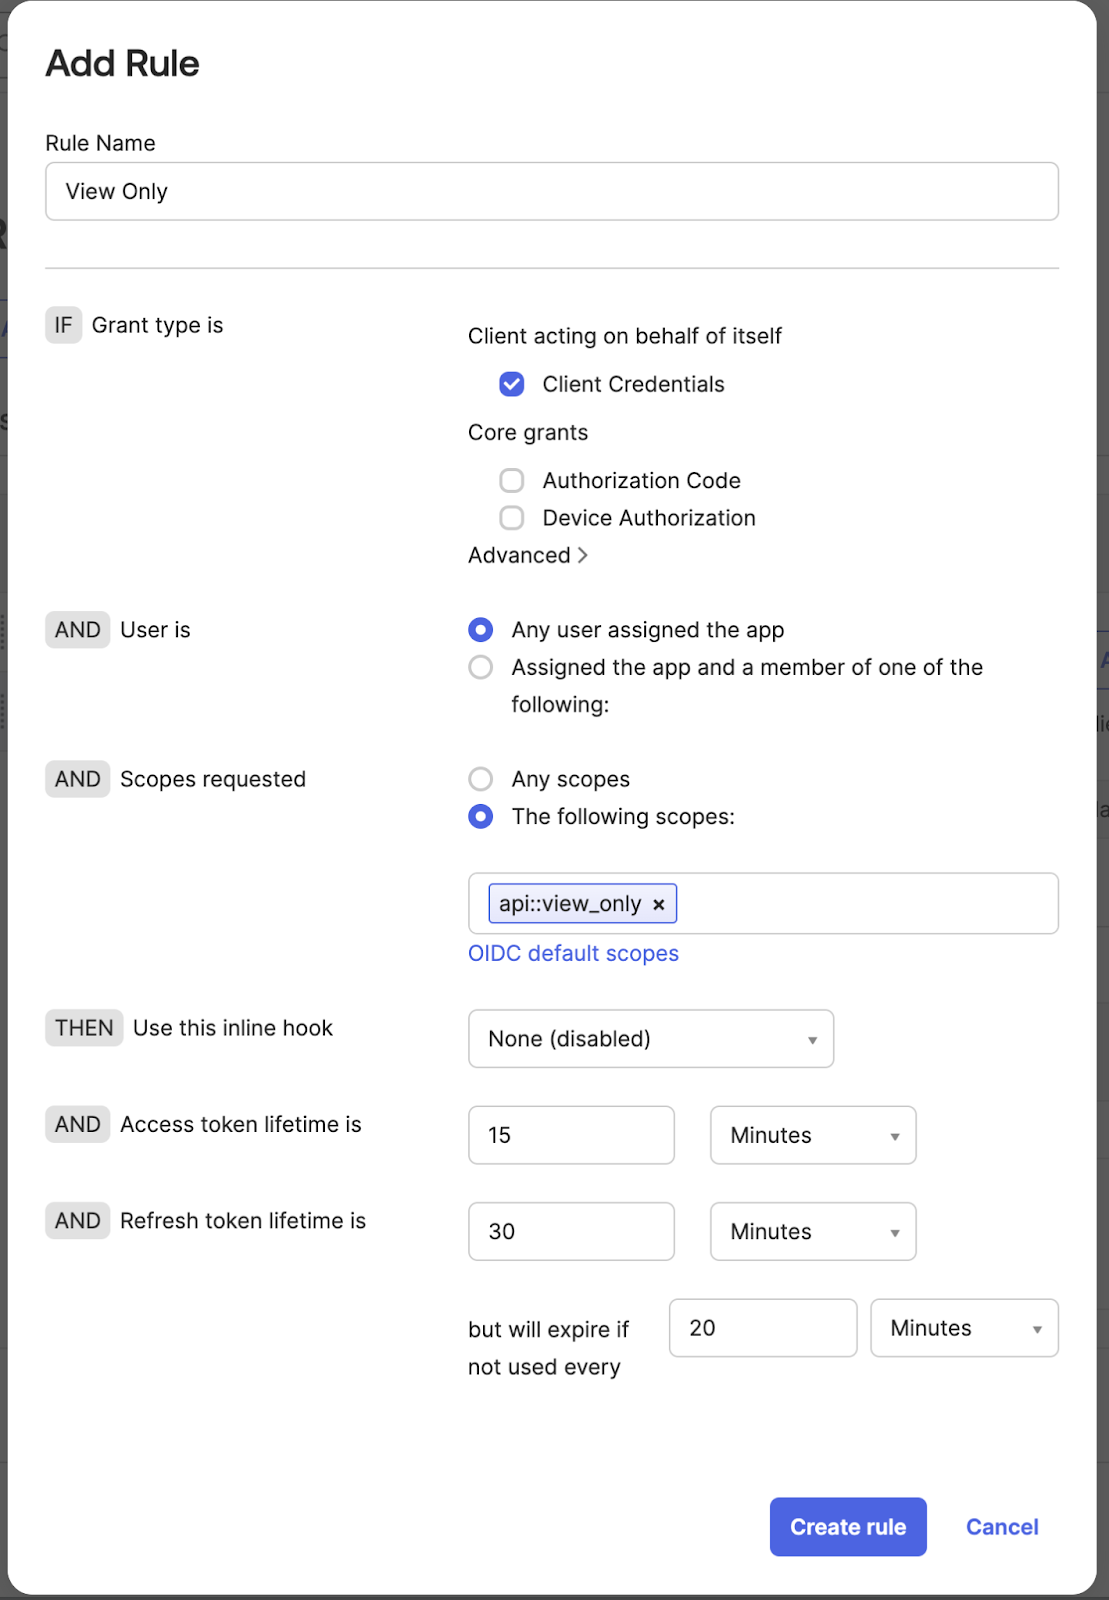
Create a new rule for your Access Policy, give it some comprehensive name.
Select Client Credentials only.
In this example, API client with view only type of access to the Management Console API in this scopes configuration.
Include all the custom scopes in this rule based on the pattern api::<role\> created earlier.
Note
If you want to grant an additional client view-only access to the API then you can just add the client to this created access policy Resilio MC API (View Only).
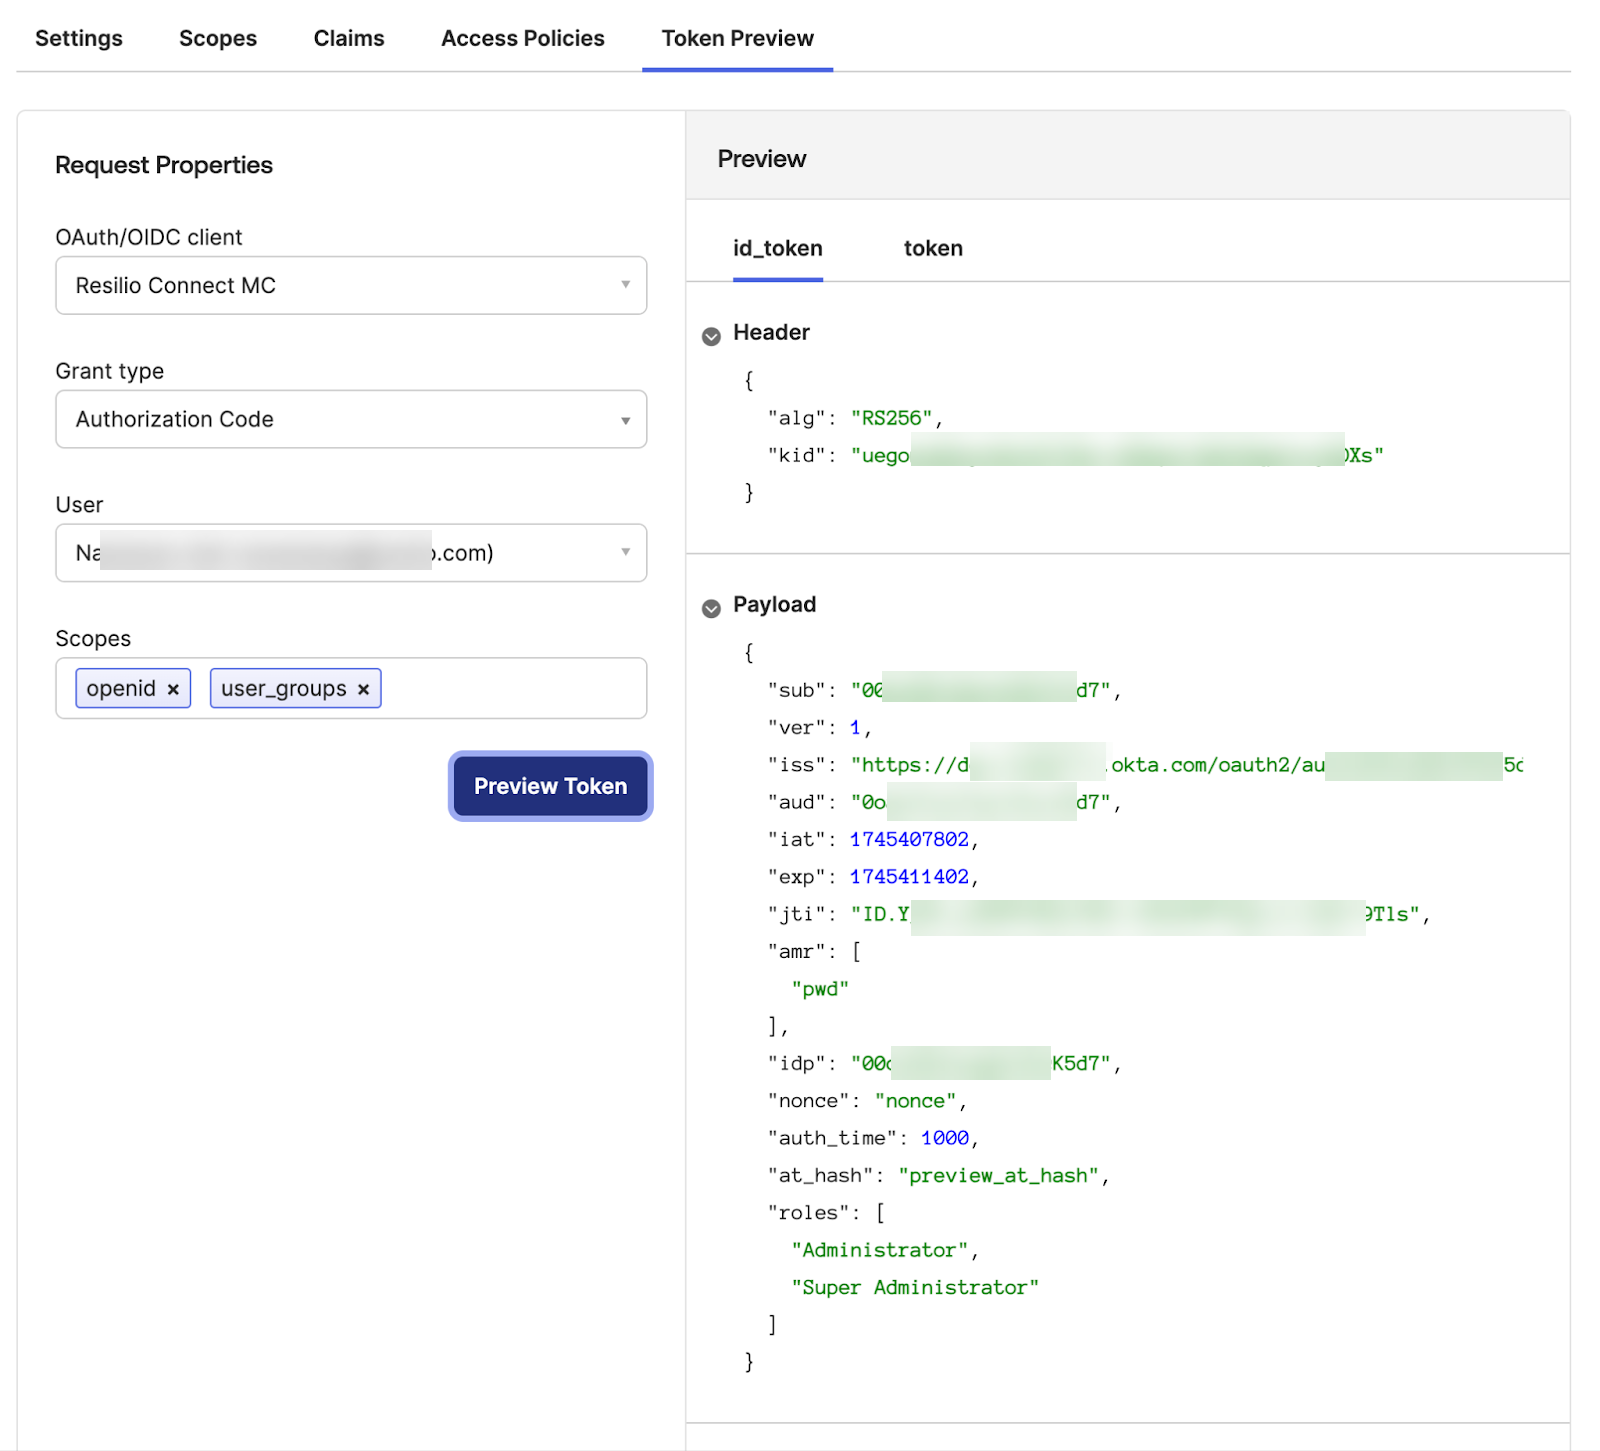
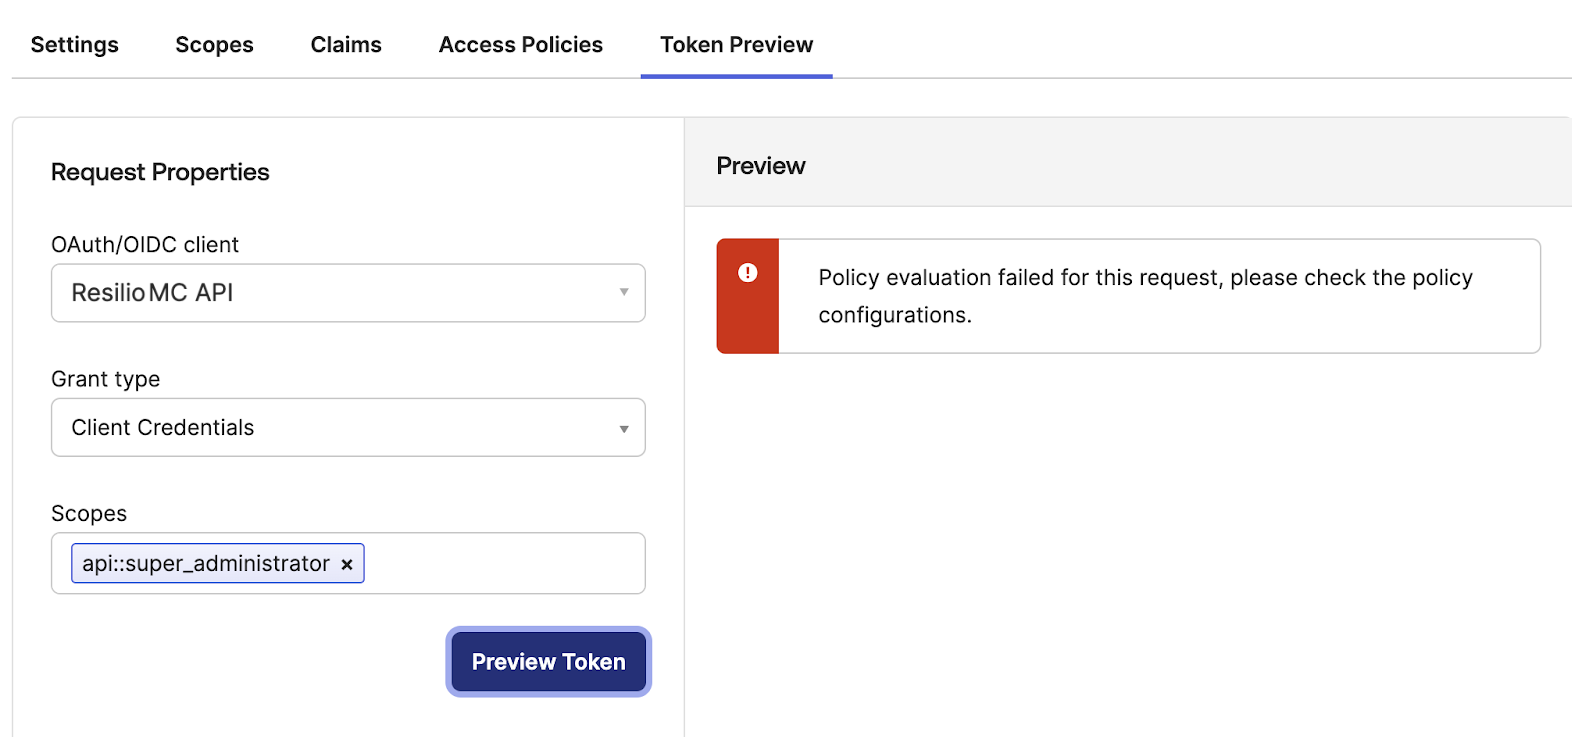
You can verify your setup using Okta's tools (Token preview tab).
User authentication
Ensure that the token contains the roles claim for the authorization code grant type. If you need to check the id_token payload, you must include the openid scope in your test. At least one scope must be included in the request.
API Integration
The scp attribute must be included in your token and should contain all the requested scopes, formatted with the application name and the supported role.
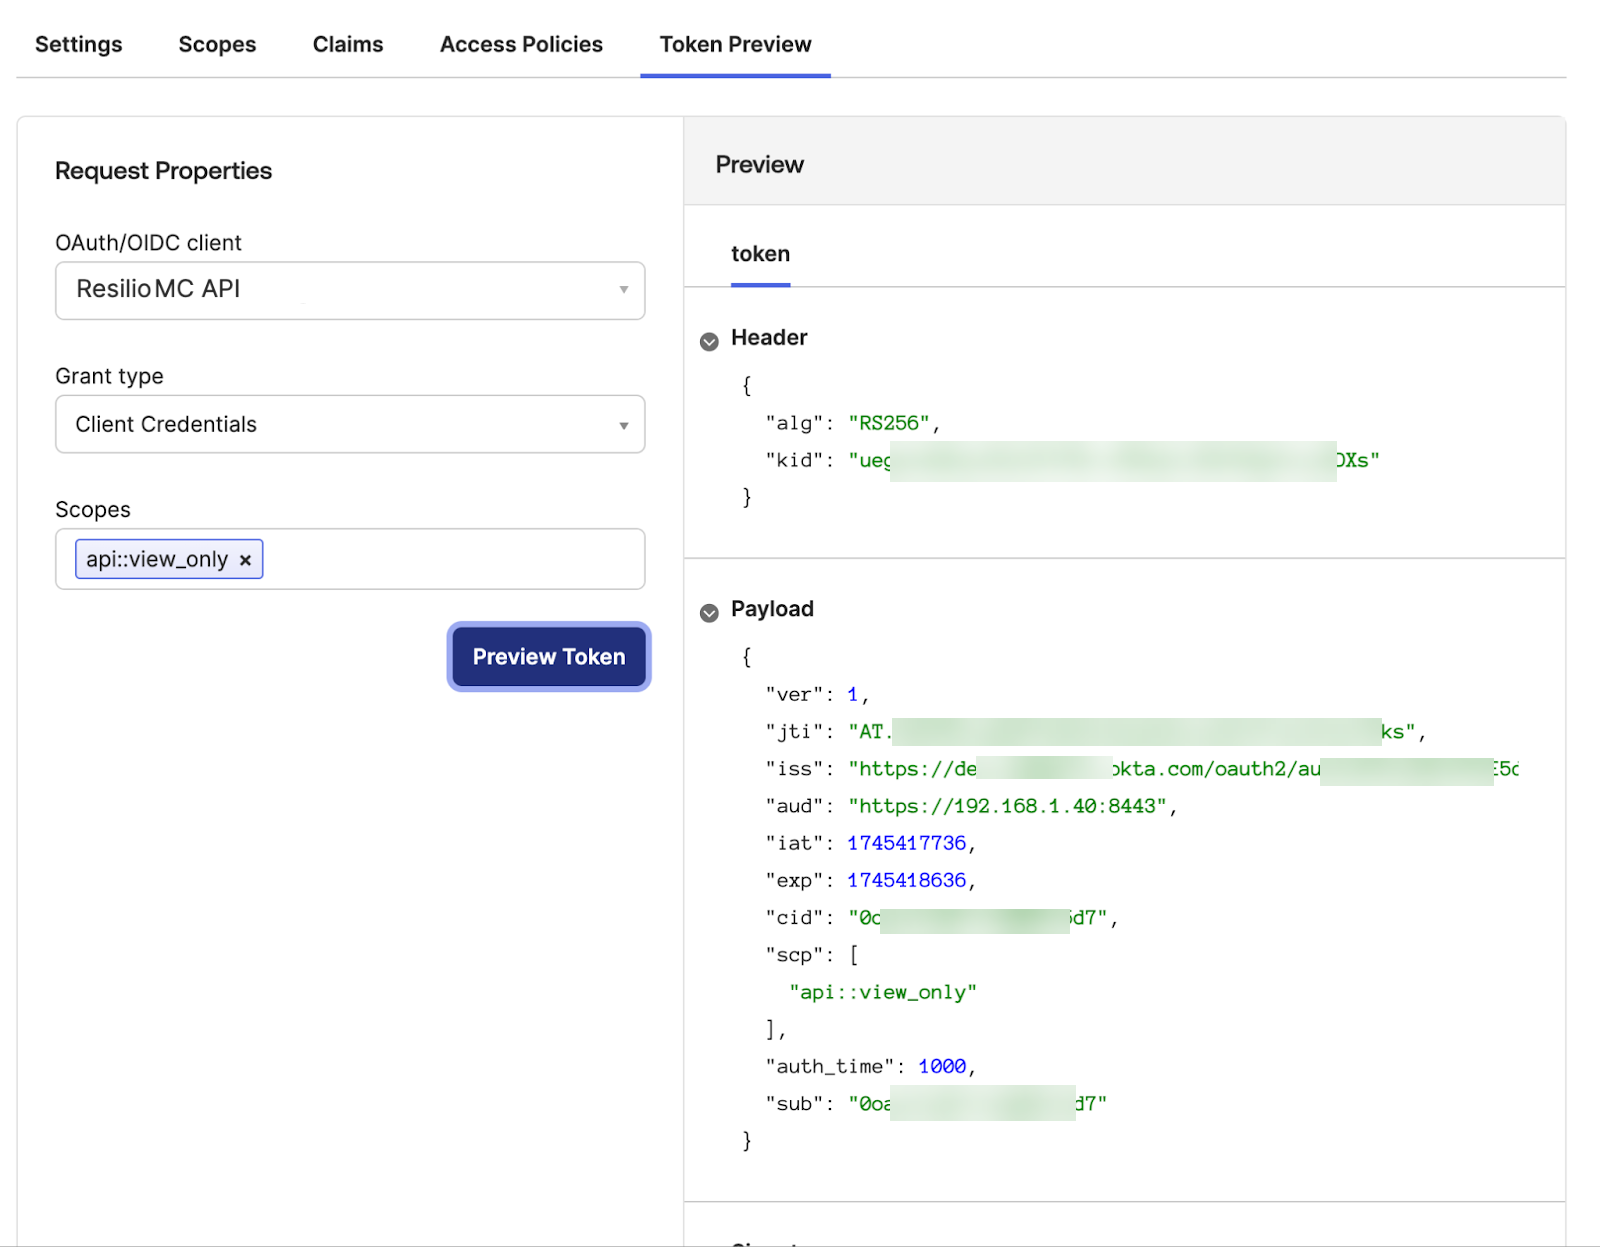
In our example, Admin access for view only client should not be granted:
Configure MC connection to Okta
To configure connection to your Okta authentication server:
- In the Resilio Management Console, select Settings > General.
- In the OKTA AUTHENTICATION section, click Configure.
-
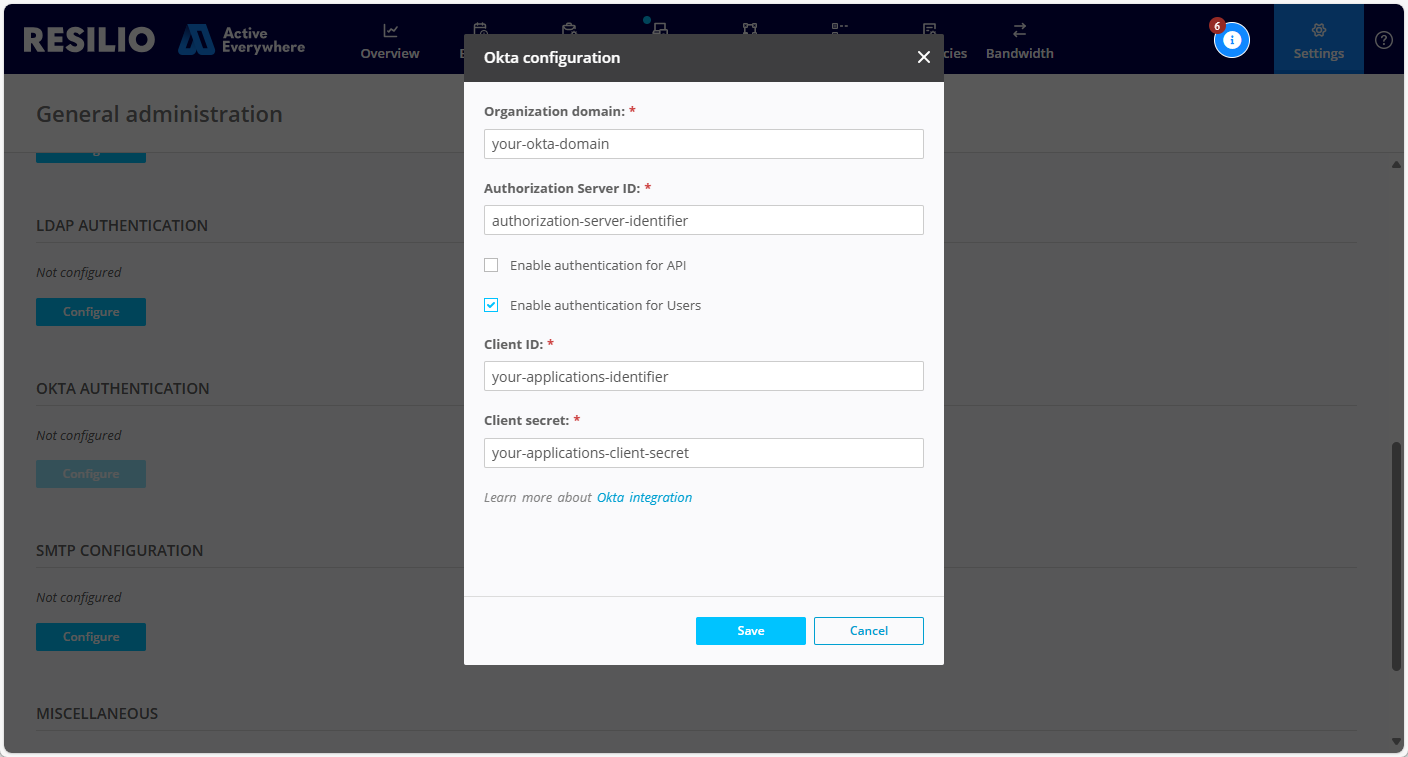
Provide your Okta authentication service configuration parameters:
-
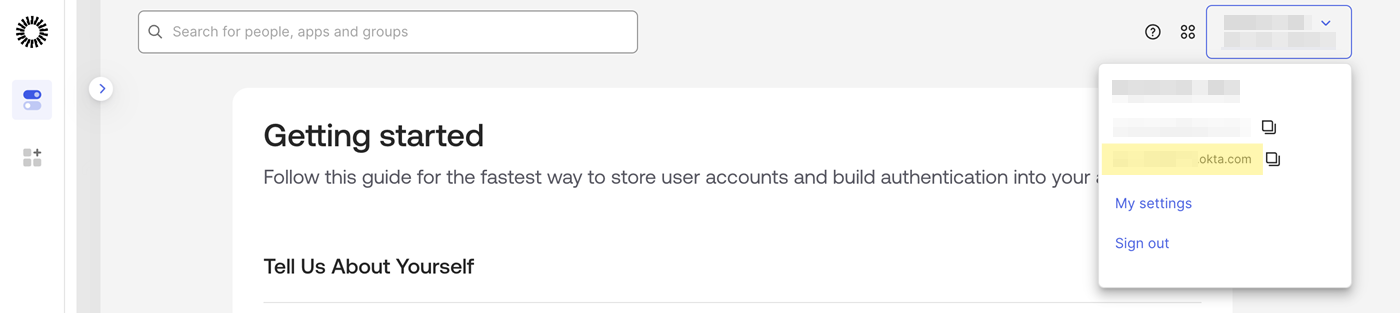
Organization domain - Your organization's Okta domain.
Important
Make sure to copy your organization domain from the user drop-down menu.
-
Authorization Server ID - Authorization server's identifier which can be extracted from its metadata URI.
Example :https://{yourOktaDomain}/oauth2/**{authorizationServerId}** /.well-known/oath-authorization-server
-
-
(Optional) Select Enable authentication for API to enable API authorization.
Note: To enable authentication for API, you must create API Services Integration application and a bearer token, or you must select Client Credentials option in the General Settings when creating your OIDC - OpenID Connect Web Application. -
Select Enable authentication for Users , then provide:
- Client ID - Your OpenID application's identifier.
- Client secret - Your application's client secret.
- Click Save.
Note
When you save your Okta connection configuration, the Management Console validates the provided configuration parameters and displays an error in case there's a mismatch between the expected values and the response it receives.
Once the connection to Okta connection is set up, an option to sign in with Okta will appear on the login screen. For information on troubleshooting Okta integration, see Okta login errors.
Bearer token
Refer to this guide to generate the bearer token. Pay special attention to the section that explains how to generate a base64 token using the client ID and client secret, commonly referred to as the Basic token.
The access_token in the response is your Bearer token. Note, that this token has an expiration time. You can modify the token lifetime in the rule settings, specifically in the Allow token access client credentials flow configuration.
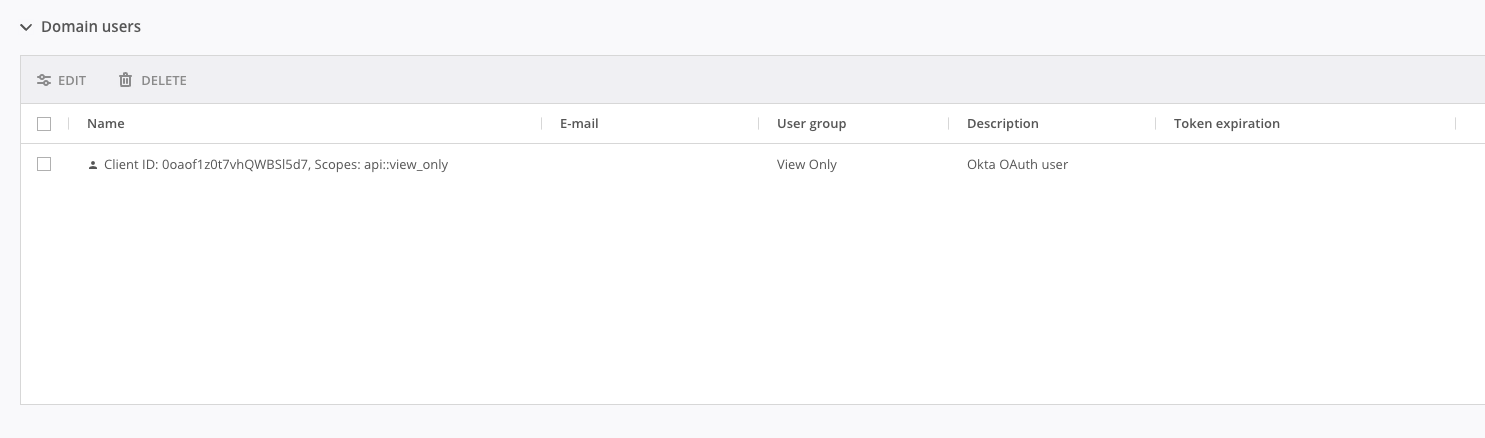
Each time you connect to the Management Console using a Bearer token with a unique set of scopes, a new domain user will be created. Unlike Azure AD, which generates a unique user identifier (oid, appended to the Bearer token) for each Azure service principal, Okta OAuth users are identified by the set of scopes. These scopes define the permissions granted to the specific API client.
Session management
Okta itself has a number of its own peculiarities and that have their effect on the session of a user in the Management Console.
Okta only supports a single user having an active session in a given Okta organization within a single browser.
Similarly, multiple Okta user sessions across different browsers is also not supported. Okta does not provide a user session ID to the application after user authentication, meaning refresh tokens cannot be bound to the user's session (only to the user itself). As a result, a user's tokens, along with their expiration time, will be updated whenever the user signs in from another device or browser.
A user may get signed out in the following cases:
- Refresh token expired (can be configured in Authorization server > Access policies >
<Rule\>). - A Management Console tab was inactive for a long time and refresh token expired because it was not used (can be configured in Authorization server > Access policies >
<Rule\>). - Management Console super administrator has changed Okta configuration settings.
- Okta returned error after the attempt to refresh tokens (e.g. connectivity issues).
Peculiarities and limitations
- It’s impossible to add group claims directly to access tokens in the client configuration flow. Therefore, group claims must be included through scopes.
- Okta does not allow creating additional API service with new Client ID and Client Secret and binding it to the application. This means that applications in Okta are less secure, since the Client Secret will be used in two places: during application configuration in the Management Console, and also when generating a Bearer token
- The Front-channel logout URL is not yet supported for the Resilio Application in Okta. As a result, local user sessions on the Management Console are not immediately closed when an Okta administrator clears a compromised user's Okta sessions (via Directory > People > More actions > Clear sessions).
- Updated Okta user information (such as new user groups or profile data) is not applied immediately on the Management Console. This data will be updated after the user re-logs in or when the access token expires. To adjust the access token lifetime, go to Authorization Server > Access Policies > Rules Configuration and modify the access token expiration settings.