Tracker connection encryption
Info
Available in Resilio Active Everywhere 6.0 and newer.
Resilio Tracker supports TLS encryption for connections between Agents and the Tracker server (both standalone and when the tracker runs with the Management Console) and between the Tracker server and the Management Console.
Agents version 6.0 and newer establish encrypted connections by default; older Agent versions do not. By default, Tracker allows establishing unencrypted connections to ensure backwards compatibility, but you can choose to allow only encrypted connections.
You can either use a self-signed TLS certificate or a custom TLS certificate issued by a trusted Certificate Authority.
Initial self-signed TLS certificate
The Tracker server generates a self-signed TLS certificate during the initial startup. You can replace it with a TLS certificate issued by a trusted Certificate Authority or a different self-signed certificate.
Certificates validation
Certificates are validated using certificate pinning (based on certificate fingerprint) or certificate chain verification.
Certificate pinning
To enable fingerprint-based verification:
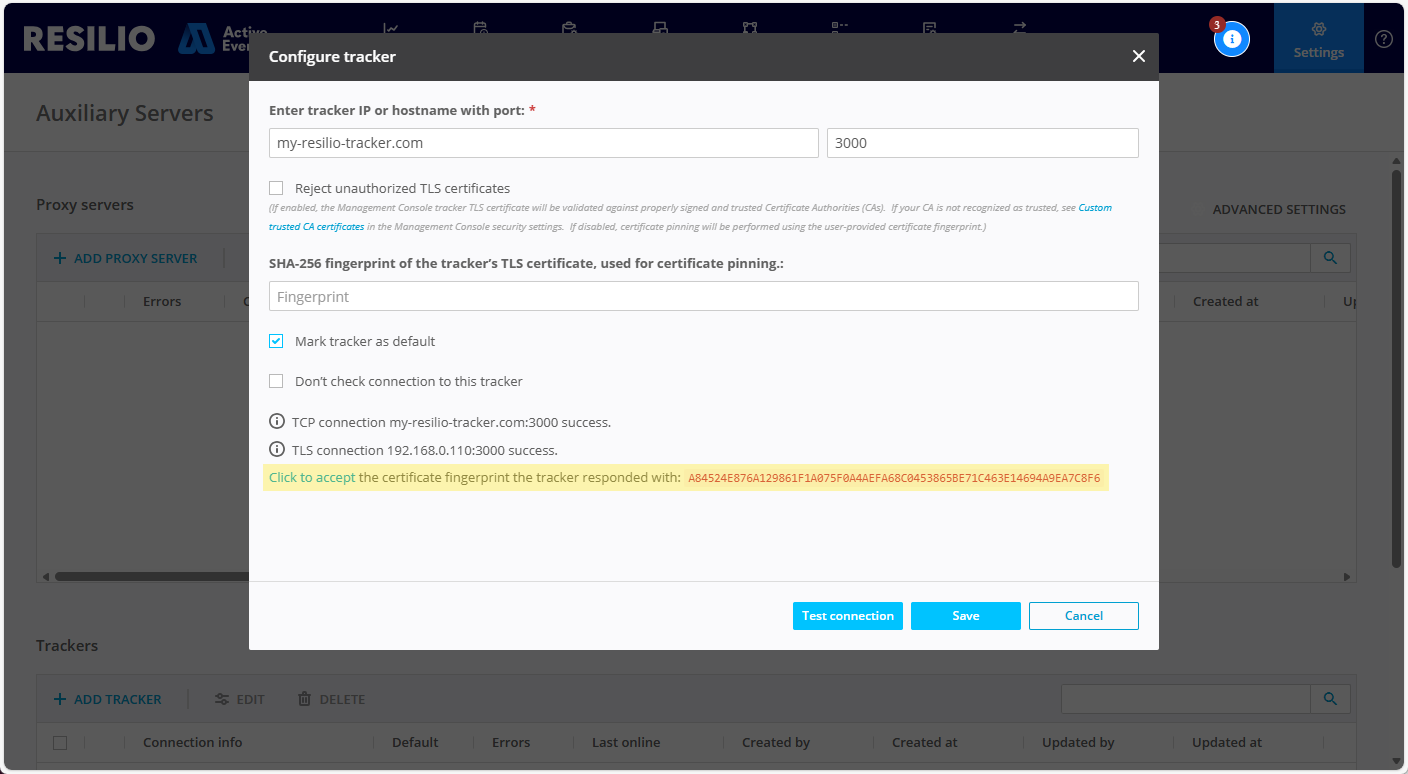
- In Tracker server settings, deselect the Reject unauthorized TLS certificates option.
-
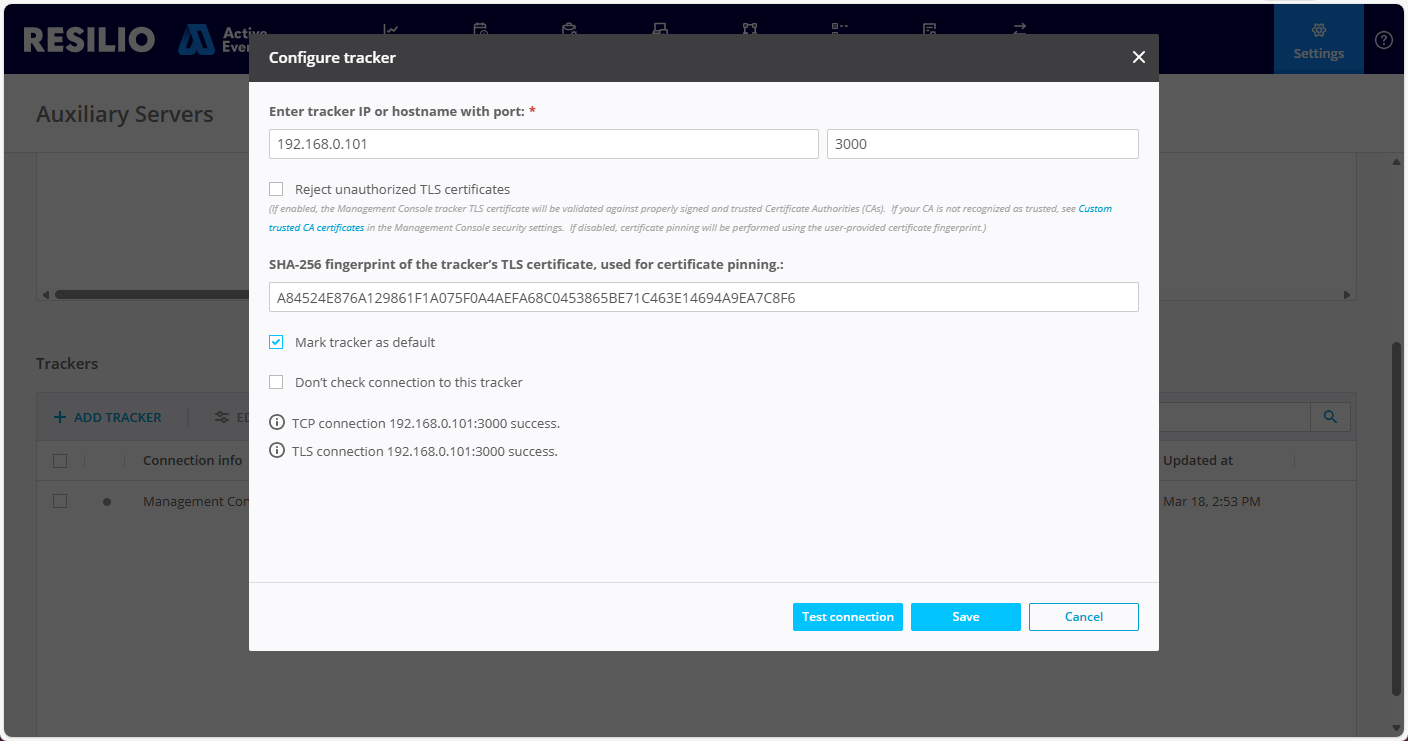
Provide tracker server TLS certificate fingerprint, or click Test connection to fetch the fingerprint, verify it and click the option to accept and use its value.
-
Click Save.
Certificate chain verification
Agent to Tracker connections - Trusted Root CA
For Agents to validate Tracker's certificate based on the certificate chain, the relevant CA certificate must be placed in Agent's operating system trusted root certificate storage. Otherwise, Agents will not trust the Tracker's TLS certificate and will not establish a connection to the Tracker server.
Certificate chain verification - standalone Tracker servers
To enable TLS certificates validation based on certificates chain verification for standalone Tracker servers:
-
(Applicable to self-signed certificates) Add your custom trusted CA Root certificate:
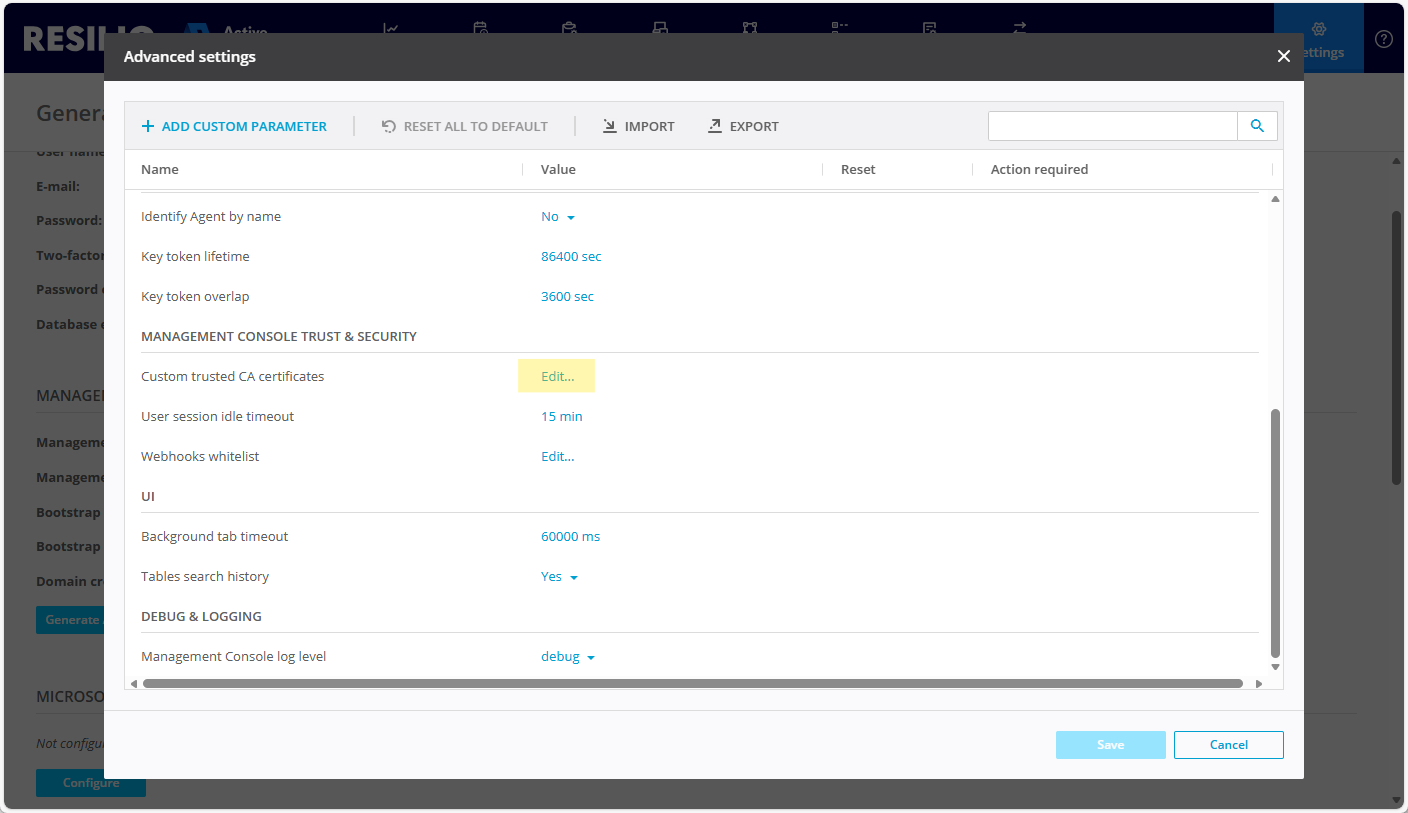
- In Management Console, select Settings > General, then click Advanced settings.
-
In the Management Console trust & security section, locate the Custom trusted CA certificates parameter and click Edit.
-
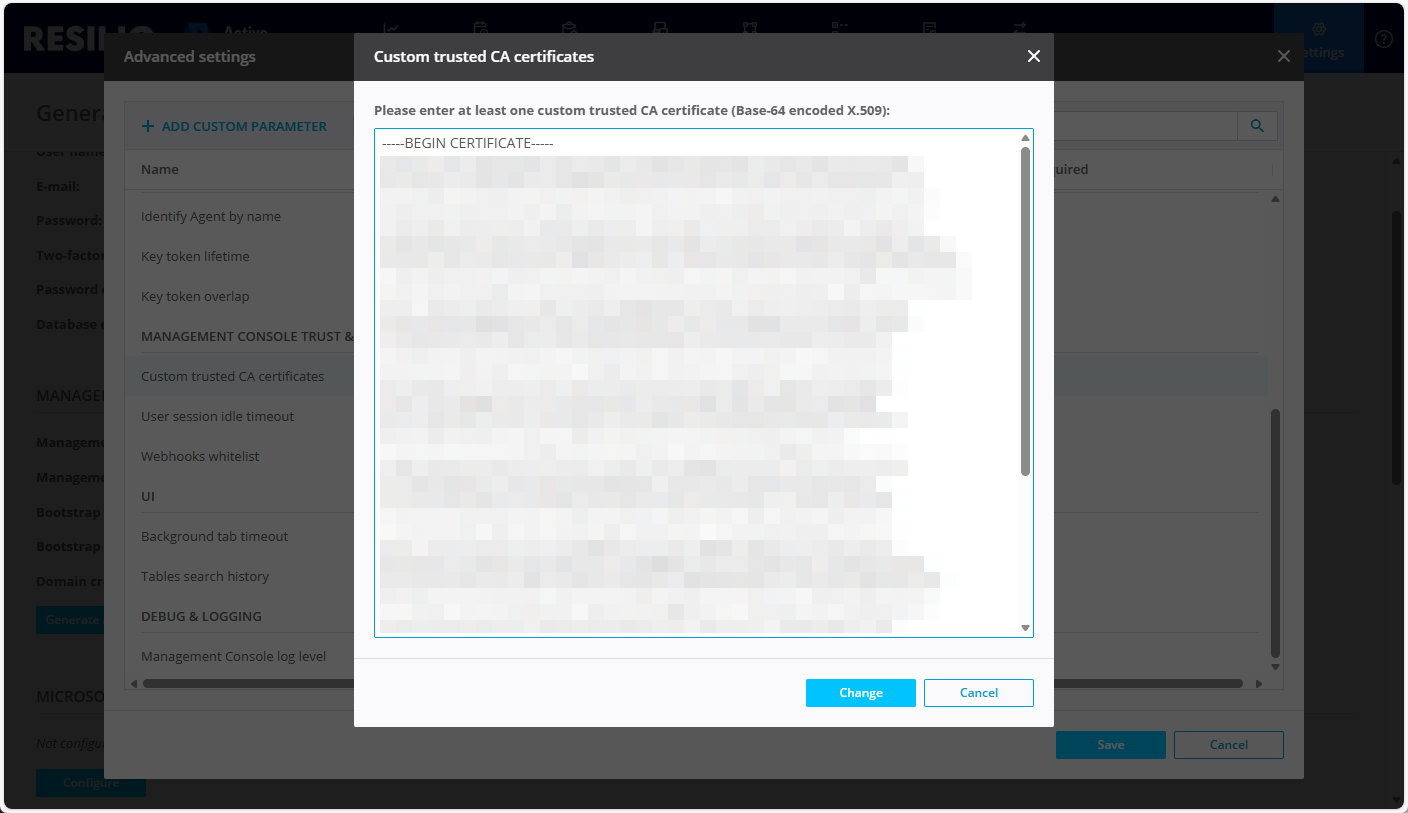
In the Custom trusted CA certificates window, add your Base-64 encoded X.509 certificate and click Change.
-
In Tracker server settings, select Reject unauthorized TLS certificates.
- (Optional) Click Test connection.
-
Click Save.
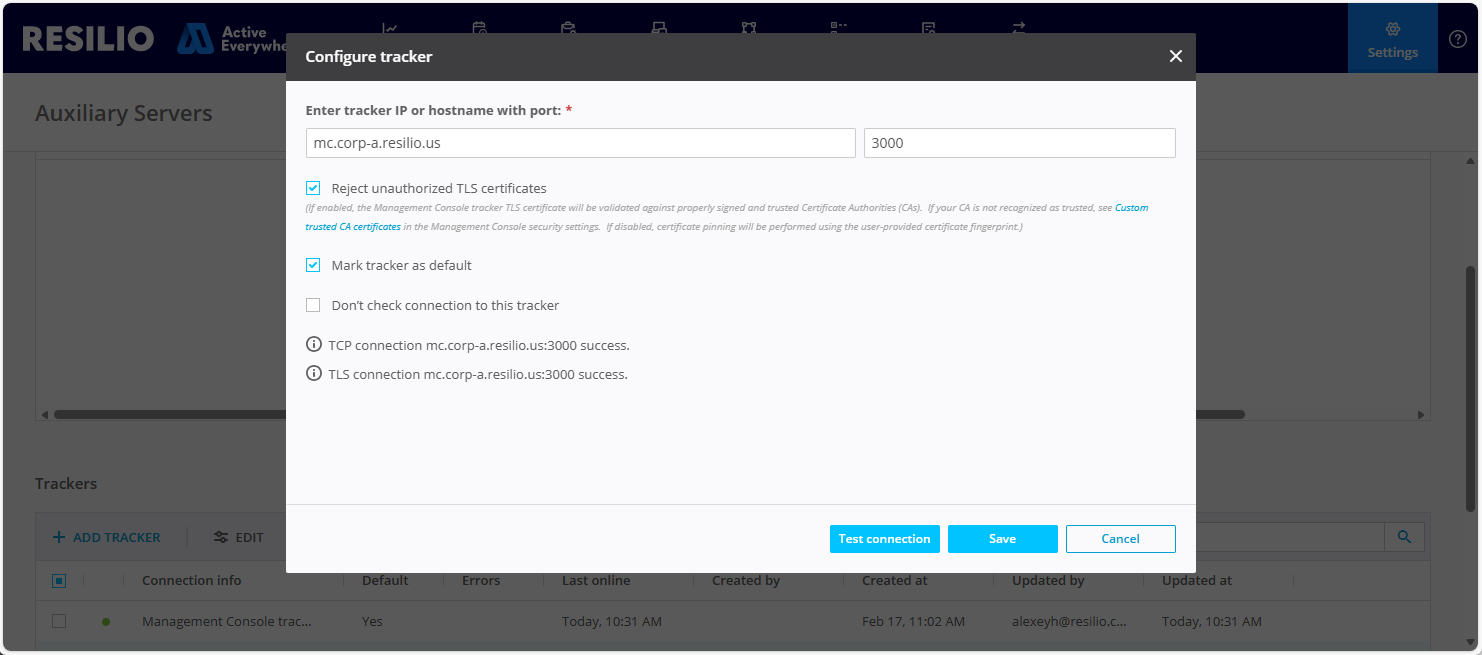
Certificate chain verification - built-in Tracker server
To use certificate chain verification to validate a TLS certificate of the built-in Tracker server:
- Replace the
cert.pemand thekey.pemfiles in the Tracker server storage folder with your CA-issued certificate and its private key. - Open the Management Console configuration file.
-
In the
trackersection, change theconfigureBuiltInTrackerTLSManuallyparameter's value totrue. -
Save the file, then restart the Management Console.
- Log in to the Management Console, go to Settings > Auxiliary servers.
- Select the built-in Tracker instance and click Edit.
-
Select Custom Management Console host tracker address then provide the address that matches the Common Name (CN) or the Subject Alternative Name (SN) in your TLS certificate.
Note
This will allow to successfully perfom connection test from the Management Console to the Tracker server and avoid certificate mismatch error in case the certificate is issued for a hostname or a public IP address, while the Management Console is on a LAN network and connects to the Tracker server via private IP address.
-
Select Reject unauthorized TLS certificates to validate the TLS certificate against a trusted Certificate Authority.
- (Optional) Click Test connection to perform connection test.
- Click Save.
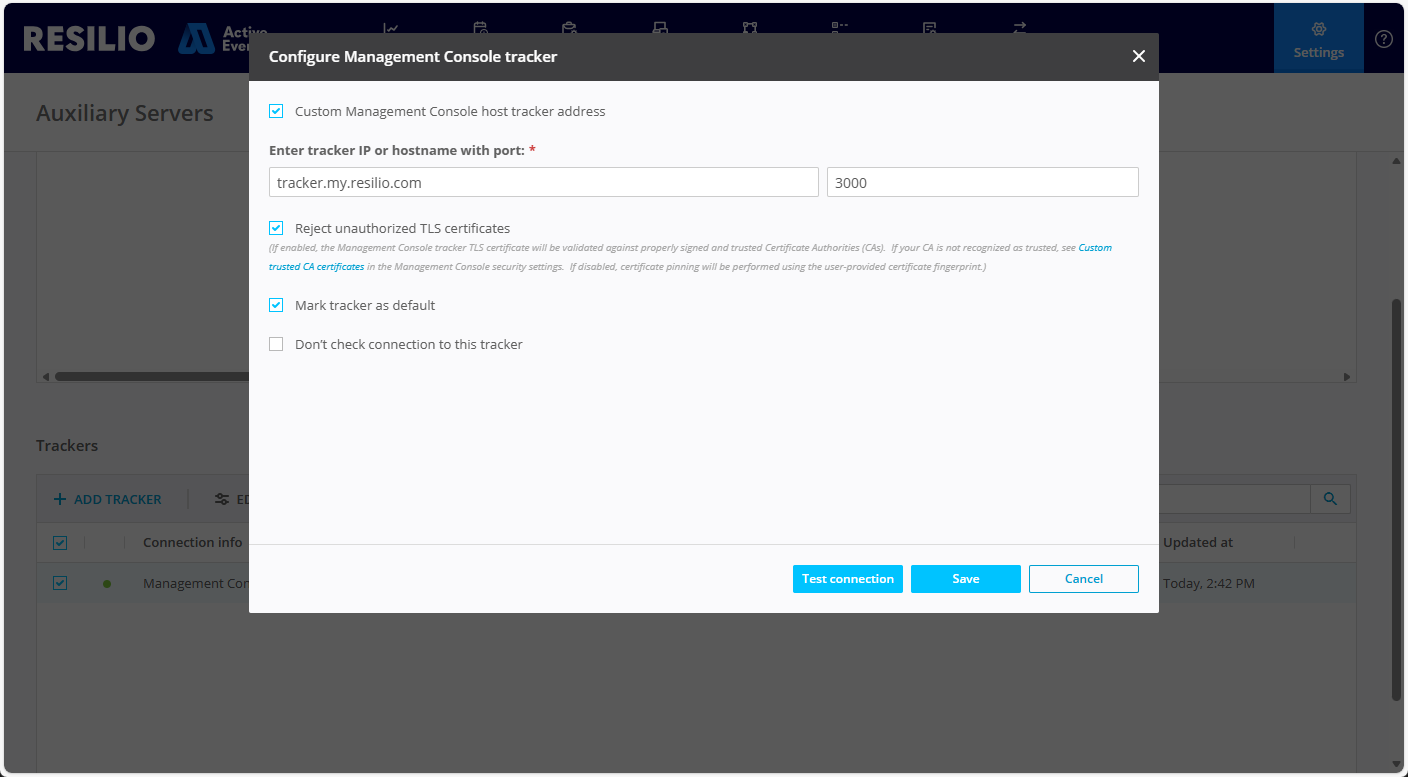
Enforce encrypted connections
Important
If you want to allow only encrypted Tracker connections, make sure to update all Agents in your deployment to version 6.0 or newer.
Windows
Note
Applicable to both standalone Tracker server instance and Tracker server running with the Management Console.
To allow only encrypted connections to a Tracker server running on Windows, recreate the Tracker Windows service or edit the registry.
Recreating the Tracker service
To allow only encrypted connections to the Tracker server by recreating the Tracker service:
-
Open Command Prompt as Administrator and navigate to the tracker's binary file location:
cd "C:\Program Files\Resilio Connect Server\tracker" -
Delete the associated Tracker service:
ConnectTracker.exe -sd -
Create a new service with the
--enforce-tlsparameter allowing establishing only encrypted connections:ConnectTracker.exe -sr --enforce-tls -
Start the service:
sc start resilio-connect-tracker
Editing Windows Registry
To allow only encrypted connections to a Tracker server running on Windows via Registry Editor:
- Open Registry Editor and navigate to
HKEY_LOCAL_MACHINE\SYSTEM\ControlSet001\Services\resilio-connect-tracker. - Right-click the
ImagePathparameter and select Modify. -
Add the
--enforce-tlsparameter at the end of the value data field, then click OK.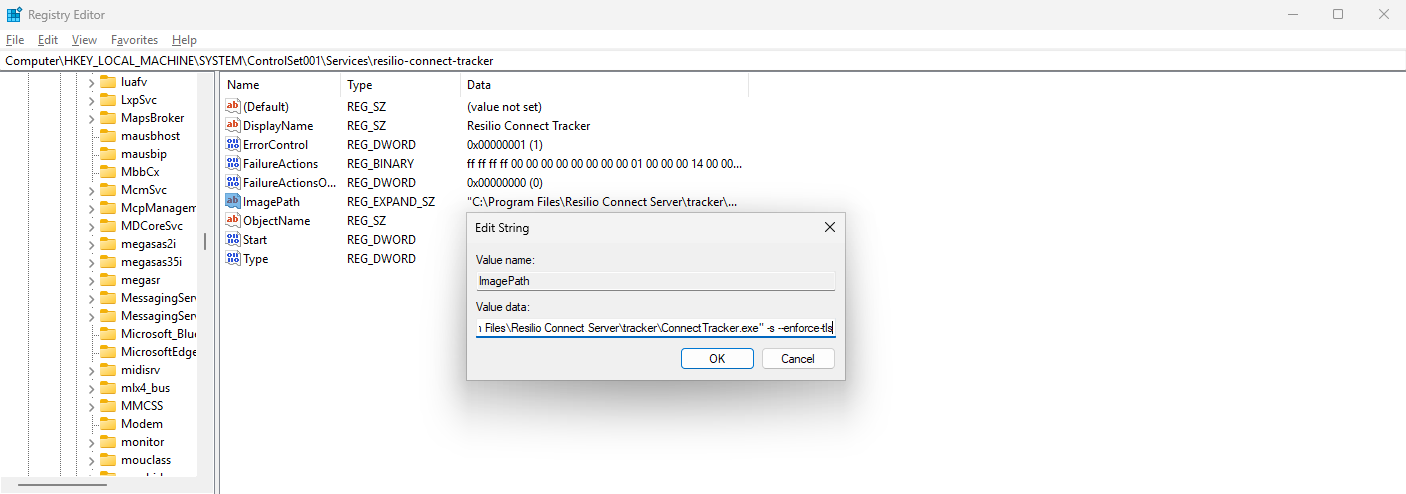
Linux
Integrated Tracker server
To allow only encrypted connections to the Tracker server integrated with the Management Console:
- Open the Management Console configuration file.
-
In the
trackersection, add theposixobject with thetlsEnforceproperty set to true: -
Save the file and restart the Management Console:
-
If your Management Console is registered as daemon:
sudo systemctl restart resilio-connect-management-console -
If your Management Console is not registered as daemon:
sudo /opt/resilio-connect-server/srvctrl restart
-
Standalone Tracker server
Installed from a tarball archive
To allow only encrypted connections to a Tracker instance, add the --enforce-tls parameter when starting the Tracker service:
sudo /opt/resilio_tracker/tracker --enforce-tls
Installed from a DEB or RPM package and managed via systemd
To allow only encrypted connections to a Tracker instance, add the --enforce-tls parameter to the ExecStart line in the Tracker service file:
-
Stop the Tracker service:
sudo systemctl stop resilio-connect-tracker -
Edit the Tracker service file:
sudo nano /etc/systemd/system/resilio-connect-tracker.service -
Add the
--enforce-tlsparameter to theExecStartline:[Unit] Description=Resilio Connect Tracker service Documentation=https://connect.resilio.com After=network.target [Service] Type=simple User=rsltracker Group=rsltracker UMask=0002 Restart=on-failure LimitNOFILE=1000000 TimeoutSec=600 ExecStart=/opt/resilio-connect-tracker/tracker -p 3000 --enforce-tls [Install] Alias=resilio-connect-tracker WantedBy=multi-user.target
Change Tracker's storage folder
By default, Tracker server stores its data in the storage folder. You can change the storage folder path by adding the --storage <path> parameter when launching the Tracker service.
Windows
To change the Tracker's storage folder path on Windows, recreate the Tracker Windows service or edit the registry.
Recreating the Tracker service
To change the Tracker's storage folder path by recreating the Tracker service:
-
Open Command Prompt as Administrator and navigate to the tracker's binary file location:
cd "C:\Program Files\Resilio Connect Server\tracker" -
Delete the associated Tracker service:
ConnectTracker.exe -sd -
Create a new service with the
--storageparameter specifying the new storage folder path:ConnectTracker.exe -sr --storage C:\temp\tracker-storage -
Start the service:
sc start resilio-connect-tracker
Editing Windows Registry
To change the Tracker's storage folder path on Windows via Registry Editor:
- Open Registry Editor and navigate to
HKEY_LOCAL_MACHINE\SYSTEM\ControlSet001\Services\resilio-connect-tracker. - Right-click the
ImagePathparameter and select Modify. - Add the
--storage <path>parameter at the end of the value data field, then click OK.
Linux
Integrated Tracker server
To change the Tracker's storage folder path on Linux for the Tracker server integrated with the Management Console:
- Open the Management Console configuration file.
-
In the
trackersection, add theposixobject with thestoragePathproperty set to the desired path: -
Save the file and restart the Management Console:
-
If your Management Console is registered as daemon:
sudo systemctl restart resilio-connect-management-console -
If your Management Console is not registered as daemon:
sudo /opt/resilio-connect-server/srvctrl restart
-
Standalone Tracker server
Installed from a tarball archive
To change the Tracker's storage folder path for a standalone Tracker instance, add the --storage <path> parameter when starting the Tracker service:
sudo /opt/resilio_tracker/tracker --storage /etc/resilio/tracker-storage
Installed from a DEB or RPM package and managed via systemd
To change the Tracker's storage folder path for a standalone Tracker instance managed via systemd, add the --storage <path> parameter to the ExecStart line in the Tracker service file:
-
Stop the Tracker service:
sudo systemctl stop resilio-connect-tracker -
Edit the Tracker service file:
sudo nano /etc/systemd/system/resilio-connect-tracker.service -
Add the
--storage <path>parameter to theExecStartline:[Unit] Description=Resilio Connect Tracker service Documentation=https://connect.resilio.com After=network.target [Service] Type=simple User=rsltracker Group=rsltracker UMask=0002 Restart=on-failure LimitNOFILE=1000000 TimeoutSec=600 ExecStart=/opt/resilio-connect-tracker/tracker -p 3000 --storage /etc/resilio/tracker-storage [Install] Alias=resilio-connect-tracker WantedBy=multi-user.targetDisable Agent to Tracker connections encryption
To disable encryption for connections between Agents and the Tracker server, add the encrypt_tracker_connections custom parameter with the value set to 0 in the Agent profile.
Add custom TLS certificate
Resilio Tracker server uses a self-signed TLS certificate that it generates during the initial startup. You can replace it with a custom TLS certificate issued by a trusted Certificate Authority or a different self-signed certificate.
To use a custom TLS certificate, replace the cert.pem and the key.pem files in the Tracker server storage folder.
Supported ciphers
Resilio Tracker server supports TLS 1.3 cipher suites:
- TLS_AES_256_GCM_SHA384
- TLS_CHACHA20_POLY1305_SHA256
- TLS_AES_128_GCM_SHA256
Pecularities and limitations
- Passphrase protected certificates are not supported.
- Tracker online/offline status may take 5-10 seconds to update in the Management Console after changing TLS encryption settings or updating TLS certificates.
- A single Tracker server (4+ CPU cores, 8+ GB RAM) is capable of managing 10k encrypted Agent connections.
- Tracker server logs are not automatically included in the support request. For troubleshooting Tracker related issues, make sure to manually collect required logs.
- macOS Agents cannot establish encrypted connections to the Tracker server and the Management Console if the chain verification is enabled.