Install Agent
Resilio Active Everywhere Agents are lightweight applications that enable file transfers between job participants.
Resilio Agents are available on:
- Microsoft Windows
- macOS
- Linux
- NAS devices (Synology, QNAP, WD)
- Android
Prerequisites
Before installing Resilio Agent, make sure you have:
- A hardware platform that meets the minimum system requirements.
- A download page URL. You should receive it along with your license. If you already have a license, reach out to our support team for the latest version available.
-
Firewall rules and port forwarding set up to allow traffic on a set of ports. For details, see Ports Protocols Port Forwarding.
Note
For the Windows built-in firewall, the installer automatically configures the necessary rules.
-
Windows domain environment (Microsoft Active Directory or Entra Domain Services) for Enterprise Hybrid Work Job. For additional requirements, see System Requirements and Prerequisites - Enterprise Hybrid Work Job.
Generate configuration file
The configuration file is one of the options for connecting Resilio Agents to the Management Console. It's a JSON file containing a set of parameters that specify the connection details along with a bootstrap token to authenticate and authorize the connection.
To generate a configuration file:
- Log in to the Management Console.
-
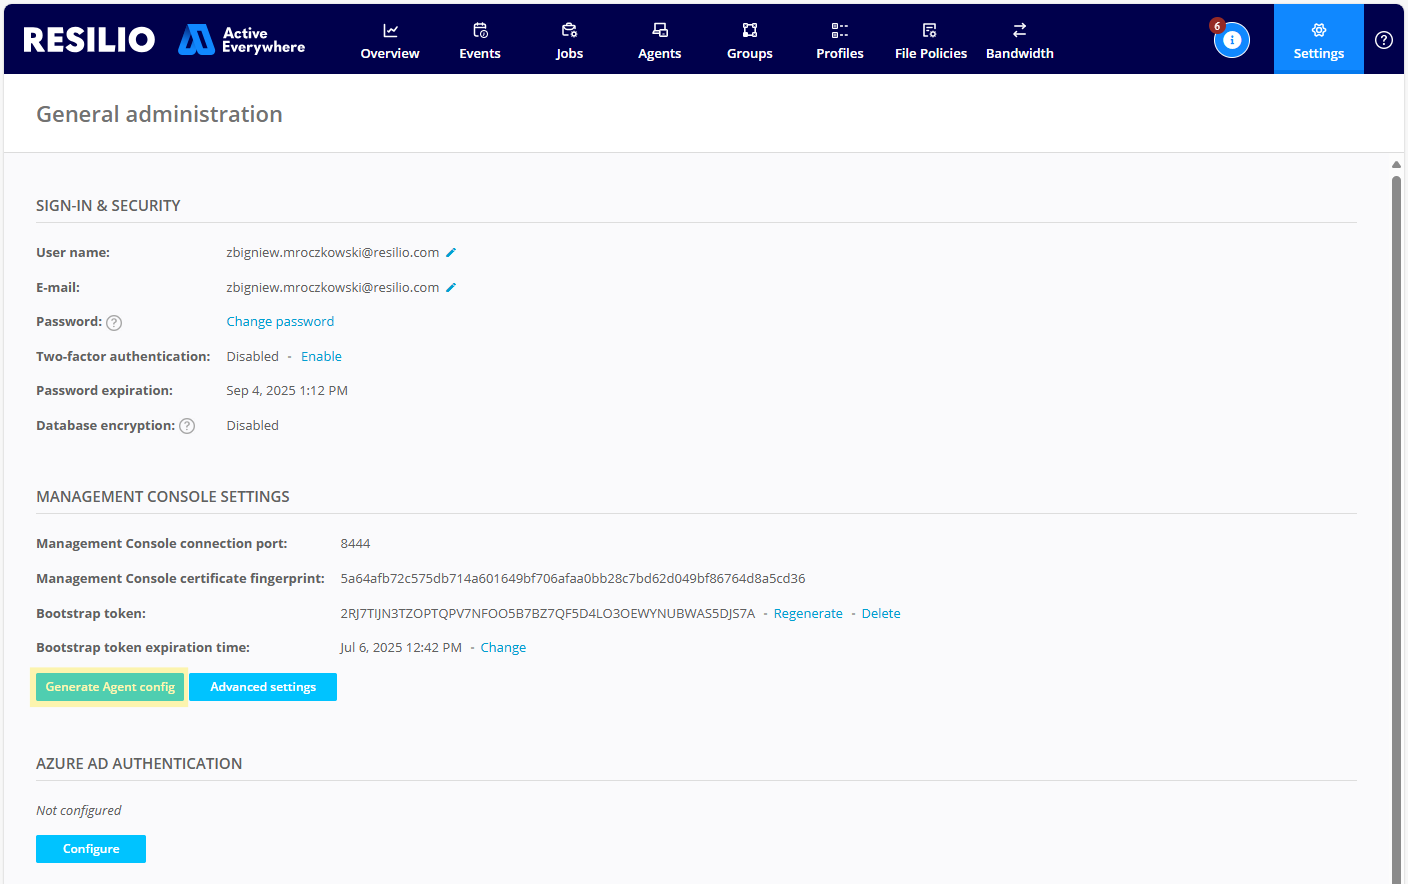
Select Settings > General and in the MANAGEMENT CONSOLE SETTINGS section, click Generate Agent config.
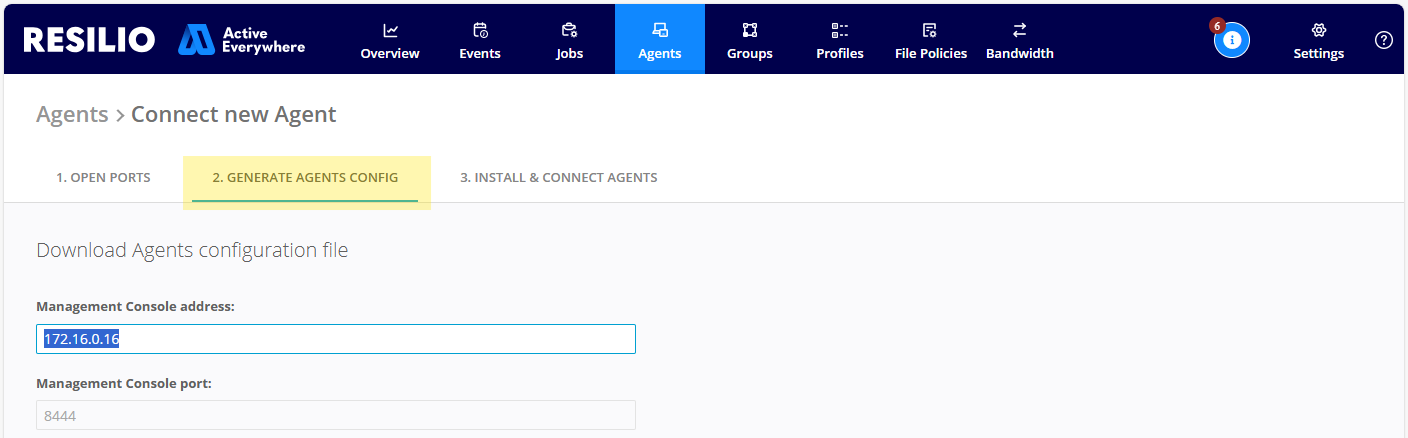
or navigate to Agents, then click + CONNECT NEW AGENT and select GENERATE AGENTS CONFIG.
-
Provide the following:
- Management Console address - The Management Console's IP address, hostname or FQDN.
Note: If you're connecting a Primary Storage Agent, this must be an FQDN. -
Management Console port - The port number on which the Management Console listens for incoming connections.
Note: The Management Console incoming connections port number is read-only. It can be changed by editing the configuration file. -
Bootstrap token - The bootstrap token authenticates the connection between Resilio Agents and the Management Console.
- Default storage path - The default storage path for Resilio jobs.
- Enable Agent UI - Enables user interface for Resilio Agents running on Microsoft Windows and macOS.
Note: Disable this option if you're connecting a Primary Storage Agent. - Enable limited user - The limited user mode restricts access to the operating system. It disables file system browsing, and scripts and triggers execution. For details, see Limiting admin’s access to the Agent.
- Add Agent tags - Tags enable automated assignment of Agents to groups.
- Management Console address - The Management Console's IP address, hostname or FQDN.
-
Click Save/Download.
Install Resilio server or desktop Agent
Note
These instructions apply to Agents running non-Enterprise Hybrid Work Jobs. For instructions on installing Agents participating in Enterprise Hybrid Work Jobs, see Install Resilio Primary Storage Agent and Install Resilio End User Agent.
Windows
To install Resilio Agent on Windows:
- Download the Agent installer.
- (Optional) Copy the Agent configuration file to the folder where the installer is located.
- Launch the installer.
- On the welcome page, click Next.
-
(Optional) Customize your installation, then click Next.
Resilio 6.0 and newer
- UI shortcuts and autostart - Shortcuts for launching the Agent UI and autostart entry for launching the Agent UI at user login.
-
File locking driver - OS level driver that enables the file locking feature.
Important
Installing the File Locking driver later, after the Active Everywhere Agent has been installed initially, is difficult. We highly recommend installing the locking driver with the Active Everywhere Agent if you plan on using file locking.
-
WinFSP driver - File system driver that enables Transparent Selective Sync feature. For details, see Transparent Selective Sync.
- Shell extensions - Context menu options in File Explorer for quick access to Active Everywhere Agent features.
Active Everywhere 5.0 and older
- Resilio Connect Agent Service - The Resilio Agent service that enables participating in different transfer jobs.
- Firewall exception - Rules in Windows Firewall allowing Resilio Active Everywhere to establish network connections.
-
File Locking driver - OS level driver that enables the file locking feature.
Important
Installing the File Locking driver later, after the Resilio Agent has been installed initially, is difficult. We highly recommend installing the locking driver with the Resilio Agent if you plan on using file locking.
-
On the Configure connection with Management Console screen, choose one of the options:
Note
Applicable to Active Everywhere 5.0 Agents and older, without the configuration file placed alongside the installer.
Enter Console's address after installation (UI is required)
If you select this option, you will be prompted to input the Management Console's hostname or IP address the first time you start the Resilio Agent application. After you input the address, your Resilio deployment administrator will have to approve the pending Agent connection request.
Select Enter Console's address after installation (UI is required), then click Next.
Paste agent config as text
- Select Paste agent config as text, then click Next.
- Paste the contents of the configuration file, then click Next.
Note: Make sure theuse_guiparameter's value is set totrue. - Click Next to confirm that the
use_guioption is enabled.
Choose folder that contains sync.conf
- Select Choose folder that contains sync.conf.
- Provide the path to the folder where the configuration file is located, or click Browse to locate the folder, then click Next.
Note: Make sure theuse_guiparameter's value is set totrue. - Click Next to confirm that the
use_guioption is enabled.
-
Enter the destination folder, then click Next.
- Click Install to begin the installation.
Windows - silent
For silent installation, run the msiexec.exe utility with additional parameters:
msiexec.exe /i Resilio-Connect-Agent_x64.msi ADDSOURCE=ALL /qn SERVICE_USER="Local System" CONFIG_SRC_PATH="C:\path\to\config\Downloads\" /norestart
ADDSOURCE=ALLflag can be replaced withADDLOCAL="MainApplication,AgentUi,FileLockingDriver"to specify which extensions you'd like to install.SERVICE_USER="Local System"flag can be used to specify service installation under System or a local user. Otherwise, it can be omitted, and the service is installed as Local System by default. AddSERVICE_USER_PASSWORDwhen installing as a local user.CONFIG_SRC_PATH="C:\path\to\config\Downloads\"flag is necessary to point the service to the config file downloaded from the Management Console. Note the trailing slash in the path, and make sure that the configuration file is named sync.conf.-
CONFIG_SRC_PATH- The path to the configuration file must be absolute and must be specified if you want the MSI installer to load the configuration during installation.Note
You can create a custom installer package containing both the installer and the configuration file. For details, see Packaging installer and configuration file.
-
/norestartparameter blocks the automatic reboot of the system right after installation. Reboot is not always required to complete Agent installation. You can manually reboot later at a convenient time if required.
Also note that when installed silently, the Agent won't open its UI automatically, even if Agent UI is enabled in its configuration file. Use the Agent desktop shortcut to open it.
Packaging installer and configuration file
Silent Agent installation on an endpoint computer requires at least two files: the installer or archive and the sync.conf configuration file, which contains information for connecting to your Management Console.
Sometimes it is preferable to package the sync.conf file inside the installer to get a single-file-installer which does not require any extra actions, in cases like:
- The installation process is done by a novice user and not supervised by the Administrator.
- The administrator has several configuration files for different groups of users/locations.
- For centrally managed deployment systems where Applications are installed without any user interaction.
Important
The resulting .msi files are unsigned. If your installation policy requires files to be signed, you'll have to sign them with your own digital certificate.
-
Download the script from the Resilio, Inc. public Git repository.
Note
The packaging script requires PowerShell v5.0 or newer to run.
-
Download the Resilio Active Everywhere Agent MSI installers from Connect download site and your sync.conf from your Management Console. Running the script depends on the shell you use.
-
If you run the script from PowerShell:
Set-ExecutionPolicy -ExecutionPolicy Bypass -Force attach-sync-conf-to-msi.ps1 -MSIPath <path_to_msi> -SyncConfPath <path_to_config> -
If you run the script from the command prompt:
powershell.exe -ExecutionPolicy Bypass -Noprofile attach-sync-conf-to-msi.ps1 -MSIPath <path_to_msi> -SyncConfPath <path_to_config>
Result
The script will exit and rename the MSI to
<MSI_Name\>_configured.msi. If you plan to install Resilio Active Everywhere Agents on computers with different architectures (x86 and x64), you need to run the script separately for each MSI installer. -
WindowsPE
WindowsPE is a limited environment, not intended for installing and operating applications. Full installation of the Agent is not supported, you can only launch the Agent process.
System requirements
- WinPE 7 and newer, x64/x86.
- Network connectivity.
-
Download the
sync.confconfiguration file from the Management Console. Depending on whether Windows Explorer is available, keep or clear the Enable Agent UI option when generating the configuration file. -
Configure the storage path - the location in the file system where the Agent stores its settings, database, and logs. If it's not configured in the
sync.conffile, the Agent creates storage in the%appdata%folder of the currently logged-in user, which may not be available. Opensync.confin a text editor and add the line"storage_path":"C:\\path_to\\storage\\folder",. Mind the double backslash, and be sure to preserve JSON format. -
Download the Resilio Active Everywhere Agent executable file from the download page and place it in a folder together with the
sync.conffile.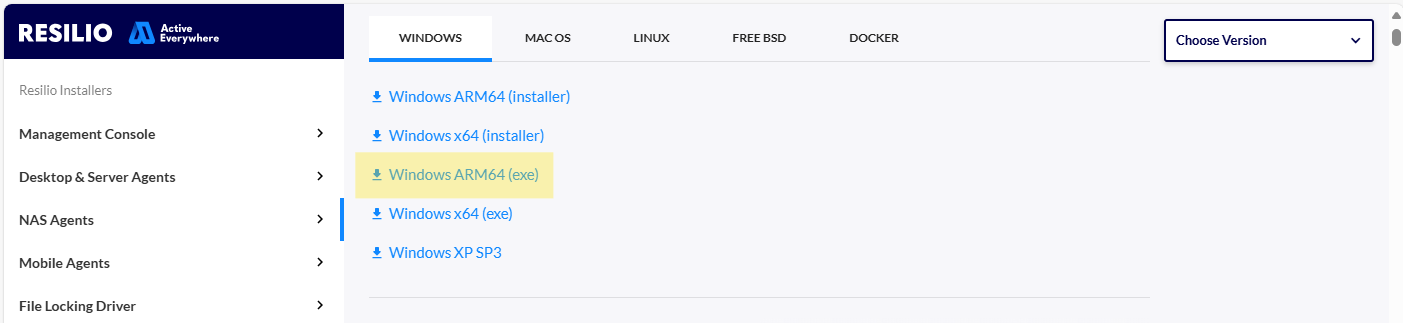
-
Launch Command Prompt as an administrator, navigate to the directory with those files, and launch the Agent from there. If you receive no error message in CMD, the Agent launched successfully.
C:\Resilio>
C:\Resilio>Resilio-Connect-Agent_x64.exe /config sync.conf

C:\Resilio>_
Warning
Since Windows PE has limited functionality, the following peculiarities apply:
- Further process management - starting and stopping - must be done manually either through CMD or a script.
- Full Resilio Agent functionality is not guaranteed.
macOS
To install Resilio Agent on macOS:
- Download the Agent installer.
- Open the installer image, then drag and drop the Resilio Agent onto the Applications folder.
- Open the Resilio Agent application.
-
On the Configure connection with Management Console screen, select how you want to connect to the Management Console and proceed accordingly:
Host
If you select this option, you will be prompted to input the Management Console's IP address the first time you start the Resilio Agent application.
Select Host, then click OK.
Editor
Select Editor, paste the contents of the configuration file, and click OK.
Config file
- Select Config file.
- Click Choose File, then browse the file system to locate the configuration file.
- Click OK.
Packaging installer and configuration file for silent installation
Silent Agent installation on an endpoint computer requires at least two files: the installer or archive and the sync.conf configuration file, which contains information for connecting to your Management Console.
Sometimes it is preferable to package the sync.conf file inside the installer to get a single-file-installer which does not require any extra actions, in cases like:
- The installation process is done by a novice user and not supervised by the Administrator.
- The administrator has several configuration files for different groups of users\locations.
- For centrally managed deployment systems where Applications are installed without any user interaction.
Important
The resulting .pkg files are unsigned. If your installation policy requires files to be signed, you'll have to sign them with your own digital certificate.
-
Download the script from the Resilio, Inc. public Git repository. The packaging shell script requires the
pkgbuildtool to be installed (bundled with Xcode tools and often preinstalled on your Mac).Tip
The downloaded package has a readme file with the below instructions as well.
-
Download the Resilio Active Everywhere Agent for Macs from our download page and also the
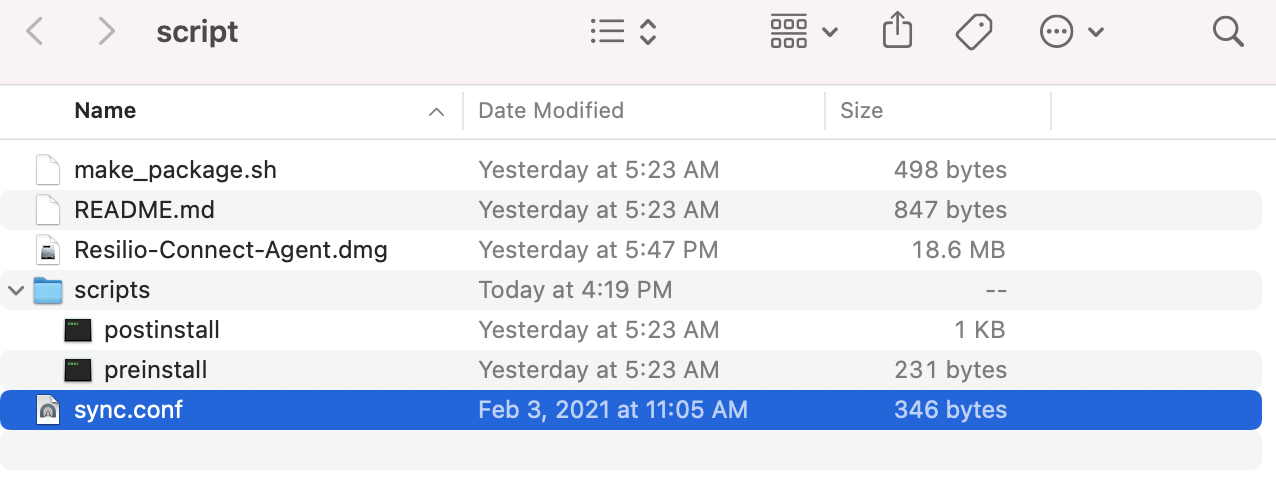
sync.conffile from your Resilio Active Everywhere Management Console. You need to create a folder that has the following set of files in it (in the screenshot below we created one called script):make_package.sh(downloaded in step 1)scripts(the folder containing deployment scripts, downloaded in step 1)Resilio-Connect-Agent.dmg(use the version you want to deploy)sync.conf(download from your management console)
Example
-
Open Terminal and navigate to the folder containing
make_package.sh, then run commands:chmod +x make_package.sh ./make_package.shResult
The script will create a
Resilio-Connect-Agent.pkgfile in the same directory. This package uses standard macOS installation dialog and registers Agent as LaunchAgent which starts as soon as the user logs in to their macOS.Important for MDM deployments
If you plan to centrally deploy Resilio Active Everywhere Agents 2.11 or higher via an MDM, you should also whitelist the Resilio Active Everywhere Kernel Extension. For more information, see How To Whitelist The Resilio Agent For Mac Kernel Extensions Using Jamf Pro 10.
Linux
You can install Resilio Agent using tarball archive, DEB and RPM packages, or using apt-get and yum package managers.
Linux - Tarball
To install Resilio Agent from a tarball archive:
-
Download, then extract the Resilio Agent tarball archive:
tar zxf resilio-connect-agent_x64.tar.gz -C /home/vboxuser/apps/resilio-agent -
Start the Resilio Agent by specifying the location of the configuration file:
./rslagent --config /home/vboxuser/Downloads/sync.confor start the Resilio Agent by specifying the IP address of the Management Console:
./rslagent --server 192.168.0.41:8444
Note: When you start the agent with specifying the IP address, log in to the Management Console and approve the pending Agent connection request.
Note: Files created by Resilio Agent are owned by the user running the
rslagent process and with its umask. Resilio Agent uses POSIX.1 permissions
and it's unaware of any ACLs applied to your filesystem.
Tip: Increase Agent's performance
Resilio Agents tarball archive comes with the adjustsettings.sh script that changes some of system settings to boost Agent's performance.
Warning
The script is incompatible with Ubuntu 25.10.
To run the script:
-
Add the executable attribute:
sudo chmod +x adjustsettings.sh -
Run the script:
./adjustsettings.sh
The script performs the following:
- Increases system socket buffers to increase speed of synchronization over ZGT protocol.
- Increases number of notify watchers so that the Agent receives file system notifications about all files and does not run out of the watchers.
- Removes core dumps limits. With the limits removed, the Agent will be able to create core dump if it crashes. Note, the limit is removed for other applications on the computer as well, thus core dumps created by them may take a lot of storage space.
Linux - DEB
To install Resilio Agent from a DEB package:
- Download the
sync.confconfiguration file and place it in the/etc/resilio-agentfolder. -
Download the
.debpackage, then run the following command:sudo dpkg -i resilio-connect-agent-<architecture>.debNote
- In Resilio Active Everywhere older than 4.2.1, the Agent package is named
resilio-agent_<version>_<architecture>.deb. - In case the installer doesn't find the
sync.conffile, enter the IP address of the Management Console, then approve the pending Agent connection request.
- In Resilio Active Everywhere older than 4.2.1, the Agent package is named
-
(Optional) Enable automatic startup of the Resilio Agent service:
sudo systemctl enable resilio-agent -
Start the Resilio Agent service:
sudo systemctl start resilio-agent
Install via Resilio repository
To install Resilio Agent from a DEB package via Resilio repository:
-
Register Resilio repository, make sure to change the revision number for the one you want to install:
echo "deb http://linux-packages.resilio.com/resilio-agent-4.2/deb resilio-agent non-free" | sudo tee -a /etc/apt/sources.list.d/resilio-agent.list -
Add public key:
wget -qO - https://linux-packages.resilio.com/resilio-agent/key.asc | sudo apt-key add -apt-keydeprecated or not foundIn case the
apt-keycommand isn't available on your system, proceed as follows:-
Download Resilio's public key:
wget https://linux-packages.resilio.com/resilio-agent/key.asc -
Convert the downloaded key to the gpg format by importing it to a temporary keyring file, then exporting it to a final output:
gpg --no-default-keyring --keyring ./temp-keyring.gpg --import key.ascgpg --no-default-keyring --keyring ./temp-keyring.gpg --export --output resilio.gpgrm temp-keyring.gpg
-
Place the
resilio.gpgkey file in the/etc/apt/keyrings/directory. - Edit the
/etc/apt/sources.list.d/resilio-agent.listfile and add[signed-by=/etc/apt/keyrings/resilio.gpg]between deb and the package URL.
deb [signed-by=/etc/apt/keyrings/resilio.gpg] http://linux-packages.resilio.com/resilio-agent-4.2/deb resilio-agent non-free -
-
Update your repository:
sudo apt-get update -
Install Resilio Agent:
sudo apt-get install resilio-agent -
(Optional) Enable automatic startup of the Resilio Agent service:
sudo systemctl enable resilio-agent -
Start the Resilio Agent service:
sudo systemctl start resilio-agent
Linux - RPM
To install Resilio Agent from an RPM:
- Download the
sync.confconfiguration file and place it in the/etc/resilio-agentfolder. -
Download the
.rpmpackage, then run the following command:sudo rpm -Uhv resilio-connect-agent-<architecture>.rpmNote
- In Resilio Active Everywhere older than 4.2.1, the Agent package is named
resilio-agent_<version>_<architecture>.rpm. - In case the installer was unable to find the
sync.conffile, enter the IP address of the Management Console, then approve the pending Agent connection request.
- In Resilio Active Everywhere older than 4.2.1, the Agent package is named
-
(Optional) Enable automatic startup of the Resilio Agent service:
sudo systemctl enable resilio-agent -
Start the Resilio Agent service:
sudo systemctl start resilio-agent
Install via Resilio repository
To install Resilio Agent from an RPM package via Resilio repository:
-
Register Resilio repository, make sure to change the revision number for the one you want to install:
printf "[resilio-agent-4.2]\nname=Resilio Agent\nbaseurl=http://linux-packages.resilio.com/resilio-agent-3.7/rpm/\$basearch\nenabled=1\ngpgcheck=1" | sudo tee /etc/yum.repos.d/resilio-agent.repo -
Add public key:
sudo rpm --import https://linux-packages.resilio.com/resilio-agent/key.asc -
Update your repository metadata:
sudo yum makecache -
Install Resilio Agent:
sudo yum install resilio-agent -
(Optional) Enable automatic startup of the Resilio Agent service:
sudo systemctl enable resilio-agent -
Start the Resilio Agent service:
sudo systemctl start resilio-agent
Note
Resilio Agent creates rslagent user and runs with it. Files created by the
Agent service are owned by the user running the rslagent process and with
its umask. Resilio Agent uses POSIX.1 permissions and it's unaware of any ACLs
applied to your filesystem. Additionally, Resilio creates the
/home/rslagent/Resilio Connect Agent folder which is used as the default
%DOWNLOADS% folder storage path macro. For other path macros see Path
macros.
Tip
By default, the Resilio Agent service runs under the rslagent user. You can configure it to run under a different account. For details, see Run the Agent service as a different user.
Install Resilio Primary Storage Agent (Resilio 6.0)
The Primary Storage Agent provides access to shared file storage resources in Enterprise Hybrid Work Jobs.
Note
Installed Agent service must run under the Local System account.
To set up a Primary Storage Agent:
- Download and run the Primary Storage Agent installer.
-
On the Configure connection with Management Console screen, choose how you want to connect to the Management Console and proceed accordingly:
Enter Management Console address
- Select Enter Management Console address, then click Next.
- Enter the Management Console's FQDN.
- (Optional) Select Check certificate fingerprint, then paste the fingerprint.
- Click Next.
Paste agent config as text
- Select Paste agent config as text, then click Next.
-
Prepare the configuration file as described in the Generate configuration file section.
Important
When creating the configuration file for the Primary Storage Agent, make sure to:
- Provide the FQDN of the machine where the Management Console is installed in the Management Console address field.
- Disable the Agent UI option.
-
Open and edit the configuration file accordingly:
- Remove the lines with
bootstrap_tokenandmc_restricted_accessparameters. - If the Primary Storage Agent is installed in a local network, add the
external_addrparameter with a public IP address of the Primary Storage Agent along with a port number used for data transfer (default3839). This information is distributed to end user Agents via tracker server to allow direct connection to the Primary Storage Agent for file transfers.
Important: Theexternal_addrparameter cannot be a DNS hostname. In case you're running a single Primary Storage Agent available via a DNS hostname, define known hosts in end user Agents Job profiles.
- Remove the lines with
-
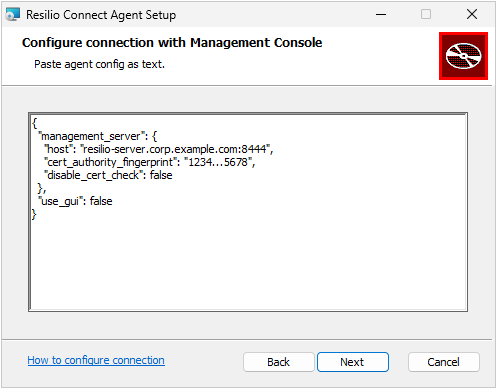
Copy the resulting configuration to the clipboard, paste it into the installer, then click Next.
Choose folder that contains sync.conf
- Select Choose folder that contains sync.conf.
-
Prepare the configuration file as described in the Generate configuration file section.
Important
When creating the configuration file for the Primary Storage Agent, make sure to:
- Provide the FQDN of the machine where the Management Console is installed in the Management Console address field.
- Disable the Agent UI option.
-
Open and edit the configuration file accordingly:
- Remove the lines with
bootstrap_tokenandmc_restricted_accessparameters. - If the Primary Storage Agent is installed in a local network, add the
external_addrparameter with a public IP address of the Primary Storage Agent along with a port number used for data transfer (default3839). This information is distributed to end user Agents via tracker server to allow direct connection to the Primary Storage Agent for file transfers.
Important: Theexternal_addrparameter cannot be a DNS hostname. In case you're running a single Primary Storage Agent available via a DNS hostname, define known hosts in end user Agents Job profiles.
- Remove the lines with
-
Provide the path to the folder with the
sync.conffile, and click Next.
-
Enter the destination folder, then click Next.
- Click Install to proceed with the installation.
- Click Finish to complete the installation.
Install Resilio End User Agent (Resilio 6.0)
User Agents are installed on end users' machines to provide them with access to the shared storage resource via the Primary Storage Agent in Enterprise Hybrid Work Jobs.
Windows
Domain-joined computers
If the Management Console's hostname is not the same as the FQDN of the machine in the Active Directory, a configuration file is required to connect end user Agents to the Management Console. Use the template below to prepare sync.conf file and place it in the %AppData%\Resilio Connect Agent folder, then proceed with the installation.
{
    "management_server": {
        "host": "resilio.my-company.com:8444",
        "cert_authority_fingerprint": "iddqdi...91705",
        "disable_cert_check": false,
        "spn": "rslmc/mc.corp.resilio.us"
    },
    "use_gui": true
}
Where:
"use_gui": trueis mandatory for enabling the Agent user interface.spnis the Service Principal Name of the Management Console machine in the Active Directory. It is required for end user Agents to authenticate against the Management Console via Active Directory.hostis the hostname or the IP address of the Management Console machine. It must be accessible from end user devices.cert_authority_fingerprintis the fingerprint of the Management Console's certificate authority, which you can find under Settings > General.
To set up end user Agents:
-
Download and install the End User Agent.
Note
-
Installing Resilio Agent requires elevated privileges. To verify that the installer runs with administrator rights:
In Task Manager, select Details, then verify that the installer process hasYesin the Elevated column.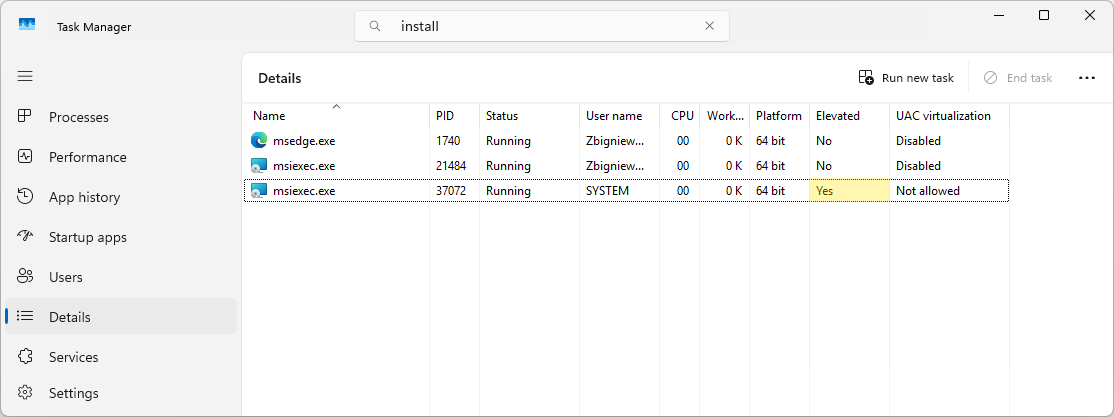
-
Windows Explorer restart is required to activate Resilio Shell Extension in order to enable TSS overlay icons. Conflicts with other shell extensions providers may occur, resulting in missing TSS icons. For information on how to resolve this issue, see No TSS icons on Windows Agent.
-
-
Connect Agent to the Management Console:
OpenID Connect (Entra ID and Okta) authentication
When end user Agent runs on a non-domain joined computer, it can authenticate using OpenID Connect identity provider, e.g. Entra ID or Okta.
-
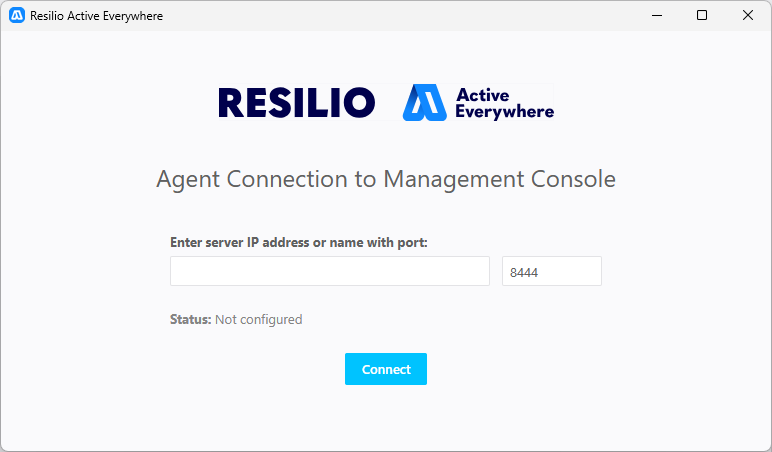
In the Agent UI, provide the Management Console's FQDN, then click Connect.
-
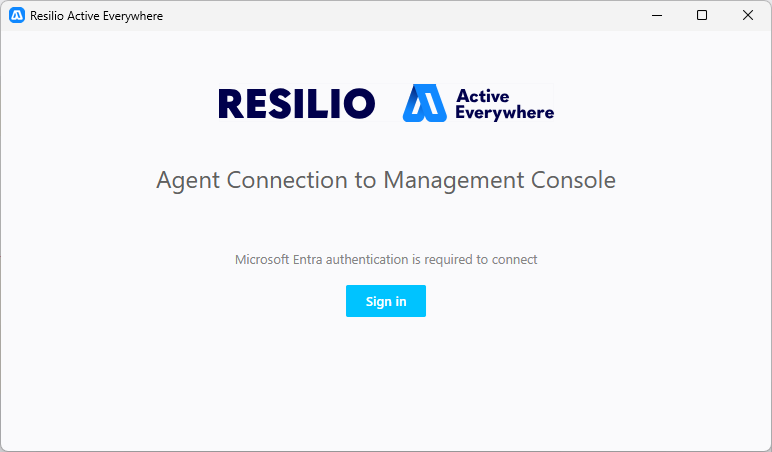
Authenticate against an OpenID Connect identity provider.
Click Sign in, and once you're redirected to the web browser, authenticate with your OpenID Connect login credentials.
Note
If your organization uses multi-factor authentication, you may need to generate an app password to authenticate the Agent connection to the Management Console.
Active Directory authentication
Enter Management Console's FQDN, then click Connect.
Note
- When authenticating using Active Directory, the user is not prompted for credentials.
- The Resilio Agent instance is tied to the AD user account used to log in to the computer during Agent setup. If you log in to the computer with a different AD user account, the Agent won't be able to connect to the Management Console.
Tip: Verify the end user system is domain-joined
Windows Settings
In Windows Settings, select System > About. Locate and analyze Full device name. If the device is domain-joined, the Full device name contains the domain name, for exampledevice1.corp.us.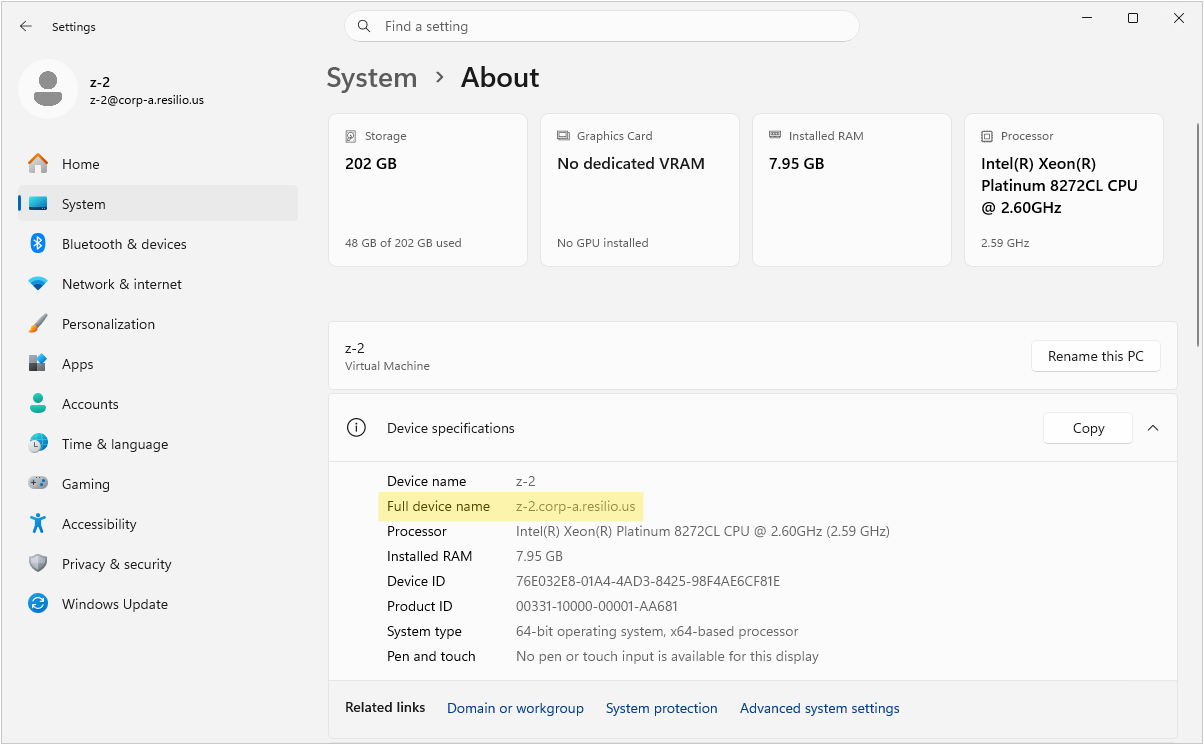
Windows CMD/PowerShell
In Windows Command Prompt or PowerShell, run the commandsysteminfo | findstr "Domain". If the device is domain-joined, the output will contain the domain name, for exampleDomain: corp.us. If the device is not domain-joined, the output will indicate that the device is part of a workgroup, for exampleDomain: WORKGROUP.Periodic reauthentication
End user Agents authenticating via Active Directory require direct connection to the domain controller to obtain Kerberos tickets for authentication. You can allow Agents to reuse their authentication tokens and continue to operate for a certain period of time without having to re-authenticate. For more information, see Agent authentication - Active Directory.
-
Windows - silent
- Download the End User Agent installer, but don't start it.
-
Open Registry Editor, create the
HKEY_LOCAL_MACHINE\SOFTWARE\Resilio\Resilio Connect Agent\configkey, and add the entries as shown below.Important
- Registry entries override the configuration in
sync.conffile. If you have bothsync.confand registry entries, the Agent will use the values from the registry. - If the
management_server.hostis specified in the registry, you must also specify the remainingmanagement_server.*parameters.
Registry entries for Agent configuration
Registry entry Description management_server.hostThe hostname or IP address of the Management Console along with the Management Console's control traffic port number (default: 8444).
Data type:String Value
Example:resilio.my-company.com:8444management_server.cert_authority_fingerprintThe fingerprint of the Management Console's certificate authority.
Data type:String Value
Example:r2d21244iddqdaab5idkfafb8def2965b03e32be628b624a9d08a33588b0ae96bbmanagement_server.disable_cert_checkWhether to disable certificate checking.
Applicable values:0- False1- True
DWORD 32-bit Valuemanagement_server.bootstrap_tokenThe bootstrap token for the Management Console.
Data type:String Value
Example:IDDQDIDKFAR2D2C3POMHETX7ZZ44GEWULIBTIWVL3RFXQUA6H3RJ6HQmanagement_server.spnThe service principal name for the Management Console.
Data type:String Value
Example:rslmc/mc.corp.resilio.uslocal_policy.allowed_jobsThe types of jobs allowed for the Agent.
Applicable values:allsyncscripttransferhybrid
String Valuelocal_policy.allowed_hybrid_job_cache_pathThe path for the hybrid job cache.
Data type:String Value
Default:%HOME%\Resilio\Cachelocal_policy.allow_fs_browsingWhether to allow filesystem browsing.
Applicable values:0- False1- True
DWORD 32-bit Value - Registry entries override the configuration in
-
Open an elevated Command Prompt and navigate to the folder where the End User Agent installer was downloaded. Run the following command.
macOS
To install Resilio 6.0 Agent on macOS:
- Download the End User Agent disk image (
.dmg). - Open the image, then drag and drop the Resilio Agent onto the Applications folder.
-
Enable Resilio Connect Agent extensions:
- In System Settings, select General > Login Items & Extensions.
- In the Extensions section, click By Category.
-
Locate the File Providers category and click to manage file provider extensions.
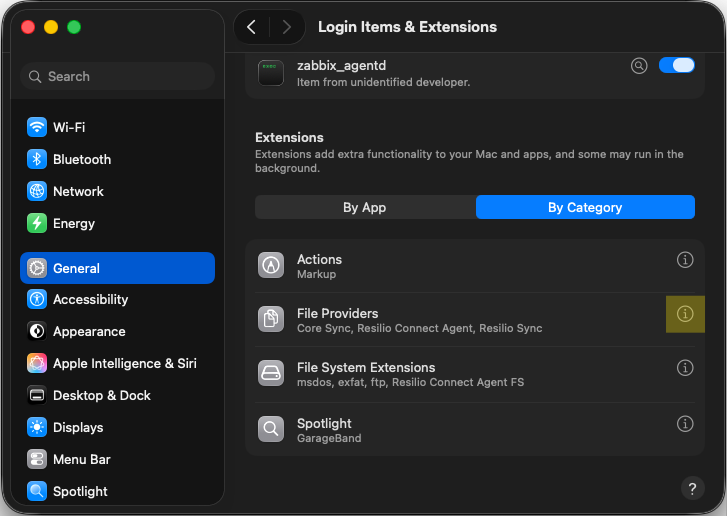
-
Enable Resilio Connect Agent extension, then click Done.
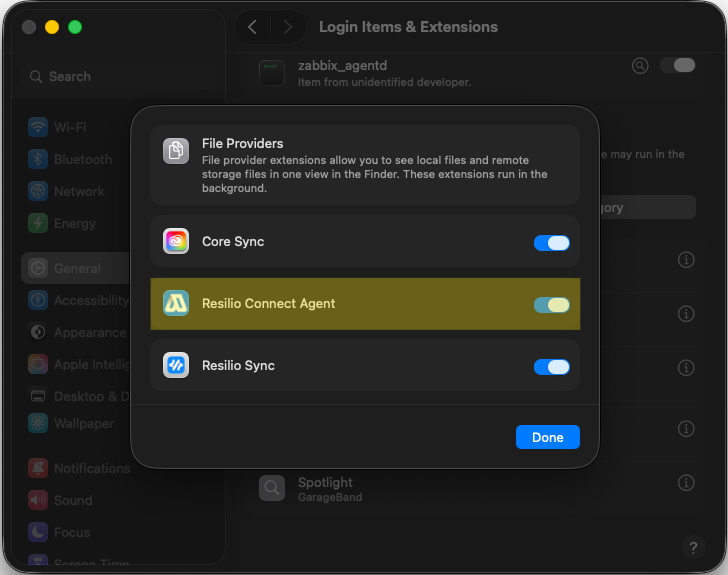
-
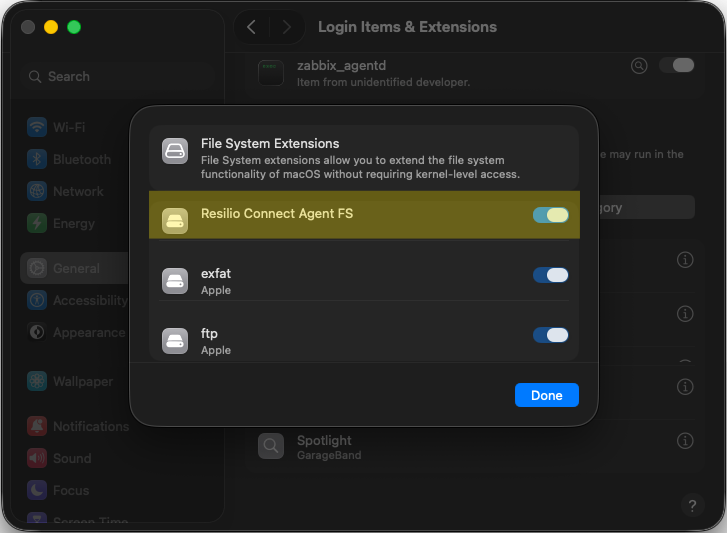
Locate the File System Extensions category and click to manage file system extensions.
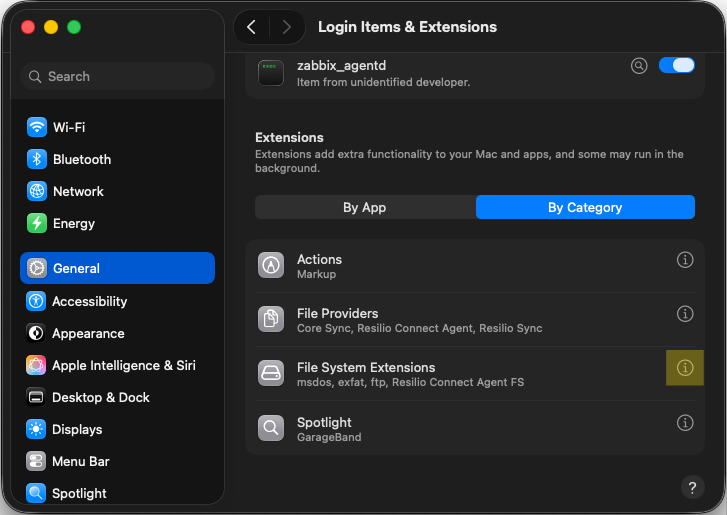
-
Enable Resilio Connect Agent FS extension, then click Done.
-
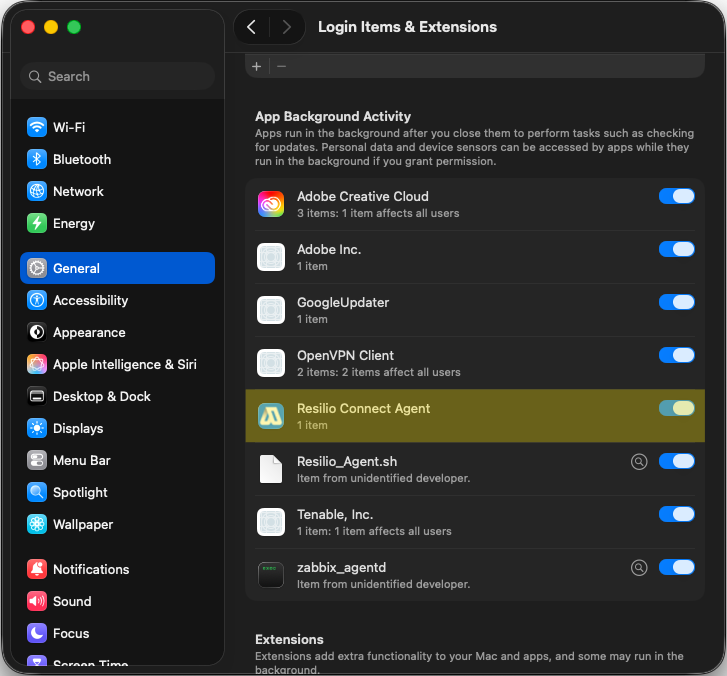
Enable background activity for Resilio Connect Agent:
- In System Settings, select General > Login Items & Extensions.
-
In the App Background Activity section, locate and enable Resilio Connect Agent.
-
Connect Agent to the Management Console:
- In the Agent UI, provide the Management Console's FQDN, then click Connect.
-
Authenticate against an OpenID Connect identity provider.
Click Sign in, and once you're redirected to the web browser, authenticate with your OpenID Connect login credentials.
Note
If your organization uses multi-factor authentication, you may need to generate an app password to authenticate the Agent connection to the Management Console.