Command line interface
Console's command-line interface is a python wrapper around Resilio Management Console's API. It lets your copy data from an agent or a group to other agents or groups. Commands can be executed on any machine with network access to Management Console.
Preparing
Preparation implies enabling Console API and installing python and pip.
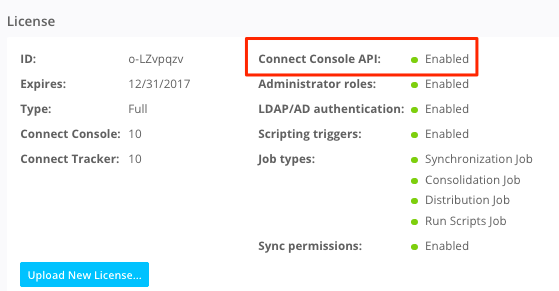
You need to have Resilio Active Everywhere license with Console API feature and API authentication token generated:
- Navigate to Settings > Licensing and make sure you have the Connect Console API feature enabled.
-
Go to Settings > API and generate the token, or use an already created one.

Now you need to have python 2.7 or newer and pip packet manager installed. Python3 is more preferable.
sudo apt install python3 python3-pip
To install python and pip on Windows use this nice guide.
Installing and updating
For windows installation open Powershell prompt as administrator
For automated install run:
python -m pip install --extra-index-url https://pypi.resilio.com/ connect-cli==0.1.8
For manual installation run a set of commands:
python -m pip install setuptools
wget https://pypi.resilio.com/connect-api/connect-api-0.0.31.tar.gz | Out-File connect-api-0.0.31.tar.gz
wget https://pypi.resilio.com/connect-cli/connect-cli-0.1.8.tar.gz | Out-File connect-cli-0.1.8.tar.gz
tar xf connect-api-0.0.31.tar.gz
tar xf connect-cli-0.1.8.tar.gz
cd connect-api-0.0.31
python setup.py install
cd ../connect-cli-0.1.8
python setup.py install
cd ..
Update %PATH%
After installation on Windows, connect.exe file shall appear in Scripts the subdirectory of python's installation folder. Be sure that the Scripts subdirectory is present in the PATH environment variable on the computer no matter if you installed CLI manually or automatically
Check that it's installed and works by executing command connect -h. If all was correct, the output will show usage for the package. Or check the CLI version with connect version command.
Run the command for automated install or update to the latest version (0.1.8 for today)
python3 -m pip install --extra-index-url https://pypi.resilio.com/ connect-cli==0.1.8
Or the following commands for manual installation
python3 -m pip install setuptools
wget https://pypi.resilio.com/connect-api/connect-api-0.0.31.tar.gz
wget https://pypi.resilio.com/connect-cli/connect-cli-0.1.8.tar.gz
tar xf connect-api-0.0.31.tar.gz
tar xf connect-cli-0.1.8.tar.gz
cd connect-api-0.0.31
python3 setup.py install
cd ../connect-cli-0.1.8
python3 setup.py install
cd ..
Check that it's installed and works by executing command connect -h. If all
was correct, the output will show usage for the package. Or check the CLI
version with connect version
command.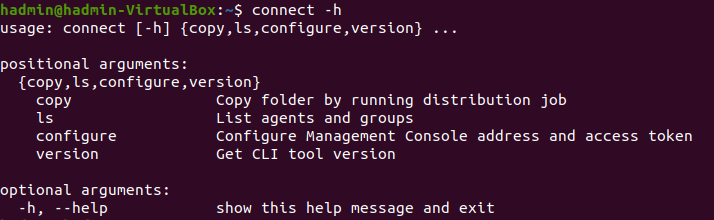
After installation and configuring the MC, the script will create a hidden .resilio-cli directory which will keep the configuration info. If this directory or files in it get deleted, it's will be required to configure the connection to MC again.
General usage info
The first command to connect to the Management Console is
connect configure
CLI will require entering Management Consoles' address, API token and timeout.
Address is to be entered in https://IP:port format, where IP - is Console's
local or public address and port - is Console's WebUI listening port.
API token is the token created in the previous step.
Timeout is necessary to abort the data transfer if it takes longer than
configured. Default it 10, so just press Enter to preserve it or set your own
timeout. The 'no timeout at all' mode is not implemented.

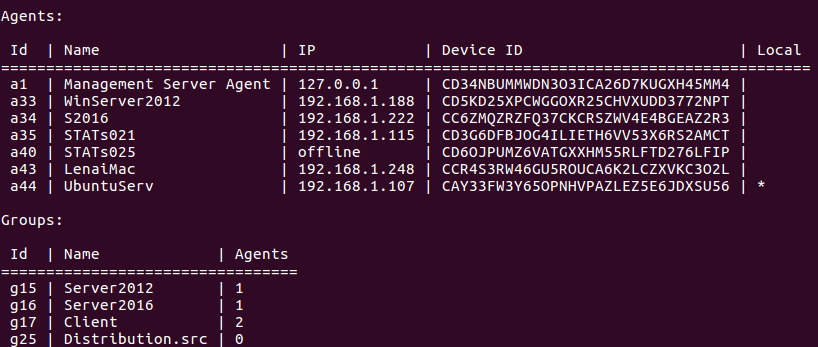
To view the Agents and agent groups on the MC run command
connect ls
The output shows two tables - agents and groups. Each table has columns with
identifiers - these can be later used to execute copy and masscopy
commands. The IP address shows the address of an Agent as seen on the
Management Console.
Copy
The basic syntax for copy command is
connect copy {source} [destination1] [destination2] [destinationN]
Each of the arguments - source and destinations - consists of two parts
separated by a colon: the identifier and path. For example, by agent:
device_id:path, agent_name:path, ip:path, agent_id:path or by
groups:group_name:path, group_id:path.
Identifier is the agent or group ID, name or agent IP address that can be
learned from the listing command. If the command is executed on the machine
with an agent installed, the first identifier part can be omitted for the
local agent*.
Path - is the full path to the selected directory. Relative paths are also
supported and they'll be relative to the "folders_storage_path" from agent's
config file. On the local agent, these will be relative
to the current directory. Source path must exist before starting data
transfer.
Basically, a copy command run is a new job
run with default profile settings.
For example, the command below copies files from local* /home/admin/logs directory to agents from g17 and g16, given directories:
connect copy /home/admin/logs g17:/home/username/docs g16:F:\Documents
Another example of a command that copies files from agent named S2016 to a33 agent and a35, given directories (mind the escaped backslash for Windows paths):
connect copy S2016:F:\\Documents a33:C:\\Important\\docs a35:data
Use this command to copy files from remote agent to agents from group15 and the local* Agent's /home/admin/updates directory:
connect copy CD3G6DFBJOG4ILIETH6VV53X6RS2AMCT:updates g15:updates /home/admin/updates
The successful copy command shows the following output
[ INFO ] Start indexing...
[ INFO ] Indexing completed. Indexed: 13.0B
[ INFO ] Job size: %size, %files
[ INFO ] Started transfer
[ INFO ] Transfer completed
[ INFO ] Average transfer speed: %speed. Transfer duration: %sec
Masscopy
Masscopy functionality allows to synchronize the files located all across different directories by creating and following reference symbolic links to the files.
Important before using masscopy
- Source Agent must support symbolic links on its file system
- Following symbolic links must be enabled in the Agent's profile (per this guide)
- Only a Linux Agent can be the source
- Agent's API v2 must be enabled in the Agent's profile via
client_api_enabled=truecustom parameter
First, it's advisable to enable debug mode to add more verbosity to the command line:
export DEBUG=1
connect configure
Add required files into masscopy index. Absolute paths must be used:
connect masscopy-add full_path_1
connect masscopy-add full_path_2
......
connect masscopy-add full_path_N
CLI will calculate common path prefix for added files automatically. Prepare added files to be transferred:
connect masscopy-prepare
To view calculated common path prefix run the command:
connect masscopy-prepare --show-common-path-prefix
To view index file run the command:
connect masscopy-prepare --show-index
CLI will create symlinks to added files in masscopy temporary directory that was set on configuration step. Start transfer (see above for specifying target directories) from the local agent to a destination:
connect masscopy-start local {dst}:{dst_path}
In case you need to preserve and later review the masscopy run information,
launch it with --no-cleanup and - -no-cleanup-masscopy parameters:
connect masscopy-start local {dst}:{dst_path} --no-cleanup --no-cleanup-masscopy
Masscopy from a JSON config file
Starting with CLI version 0.1.8 masscopy functionality allows to build the data index from a pre-configured json file. It greatly saves performance on large dataset. Use this flow instead of masscopy-add.
In advance create a json file with the following structure
{
    "destination": "<dst>:<dst_path>",
    "common_prefix": "/tmp/files",
    "files": [
        "/tmp/files/file1.txt",
        "/tmp/files/nested/file2.txt"
    ]
}
< dst> learn from connect ls command, can be agent or a group, by ID,
device name or device ID. Only one dst is allowed.
< dst_path> - the full target path on the destination.
common_prefix - is the source directories common path prefix.
files - an array of full paths to the files.
Once the json file is ready, launch masscopy command pointing to the file's location. The example below also shows two possible, but not obligatory parameters
connect masscopy --json /path/to/json/config.json --check-common-path-prefix --no-create-symlinks
--check-common-path-prefix - checks that the common path prefix in json is
correct. If it's not, it will be automatically replaced with the correct one.
It will take time on large dataset, so it's better to be avoided.
--no-create-symlinks - add this parameter if json file already contains
symlinks so that masscopy does not create them
In case you need to preserve and later review the masscopy run information,
launch it with --no-cleanup and --no-cleanup-masscopy parameters:
connect masscopy-start local {dst}:{dst_path} --no-cleanup --no-cleanup-masscopy
Managing output
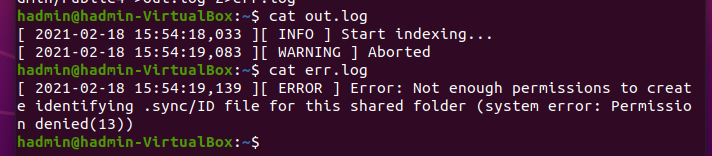
By default, the script writes its output into stdout. Three levels of records are available: info, warning and error.

It's possible to redirect the error into a separate log file. Append > out.log 2>err.log to your command (mind the escaped backslash for Windows paths):
connect copy /home/admin/logs g17:/home/username/docs g16:F:\\Documents >out.log 2>err.log
The result will be:
Important notes
- Only one source is allowed. If you use a group as source, only one agent shall be in that group.
- While
copyis being performed, you can see "Copy %foldername%" job and groups - source and destination - with the same name created. These will be removed once the copying's done. - Agents record and store events about a
copyoperation in its storage folder in events subdirectory. - When setting path in copy command, the source directory shall already exist on the computer. On destinations it's not compulsory: if the folder already exists, it will be used, otherwise, a new one be created.
- Copying single file is not supported. Only directories with their content can be copied.
- Understanding local agent. The agent that runs on the same computer where CLI commands are executed is considered local. In listing it's marked with an asterisk symbol in column Local. For the local agent to be detected, it must listen to API calls: enable Agent API (port 3840) in Profile for this agent.
In copy command you can omit the identifier part for it.